YOUR CREATIVE WORKFLOW, EXPLAINED
From your first prompt
to your finished scenes.
A practical guide to Flow Studio, with screenshots of the actual extension interface. Follow the steps in order, or jump straight to the part you need.
Screenshots use the actual submitted Flow Studio 1.13.39 interface. Account, project and media examples are staged offline; numbered highlights are added for this guide. Available controls depend on your platform and project.
START HERE
Your first run
Start small: make one image before running a whole story. You will need Chrome, Flow Studio, and a signed-in account on the platform you want to use.
Install and pin Flow Studio
Use Get the extension at the top of this guide to open the Chrome Web Store listing and install Flow Studio. In Chrome, open Extensions (the puzzle icon), then pin 0xtnp Flow Studio. If you already installed it, open its Details page to check the version.
Open your generation platform
Open a project in Google Flow, or the supported ChatGPT, Gemini or Grok page you plan to use. Sign in there first. Your platform account is separate from your Flow Studio Builder account.
Open the extension panel
Click the Flow Studio toolbar icon. In Control, choose the platform that matches your open tab, then choose Text to Image for a simple first test.
Try one prompt
Enter one clear image prompt, set Outputs per Prompt to 1, and use Concurrent Prompts = 1. Click Start. Keep the platform tab and the extension panel open until the queue reports completion.
Your first run
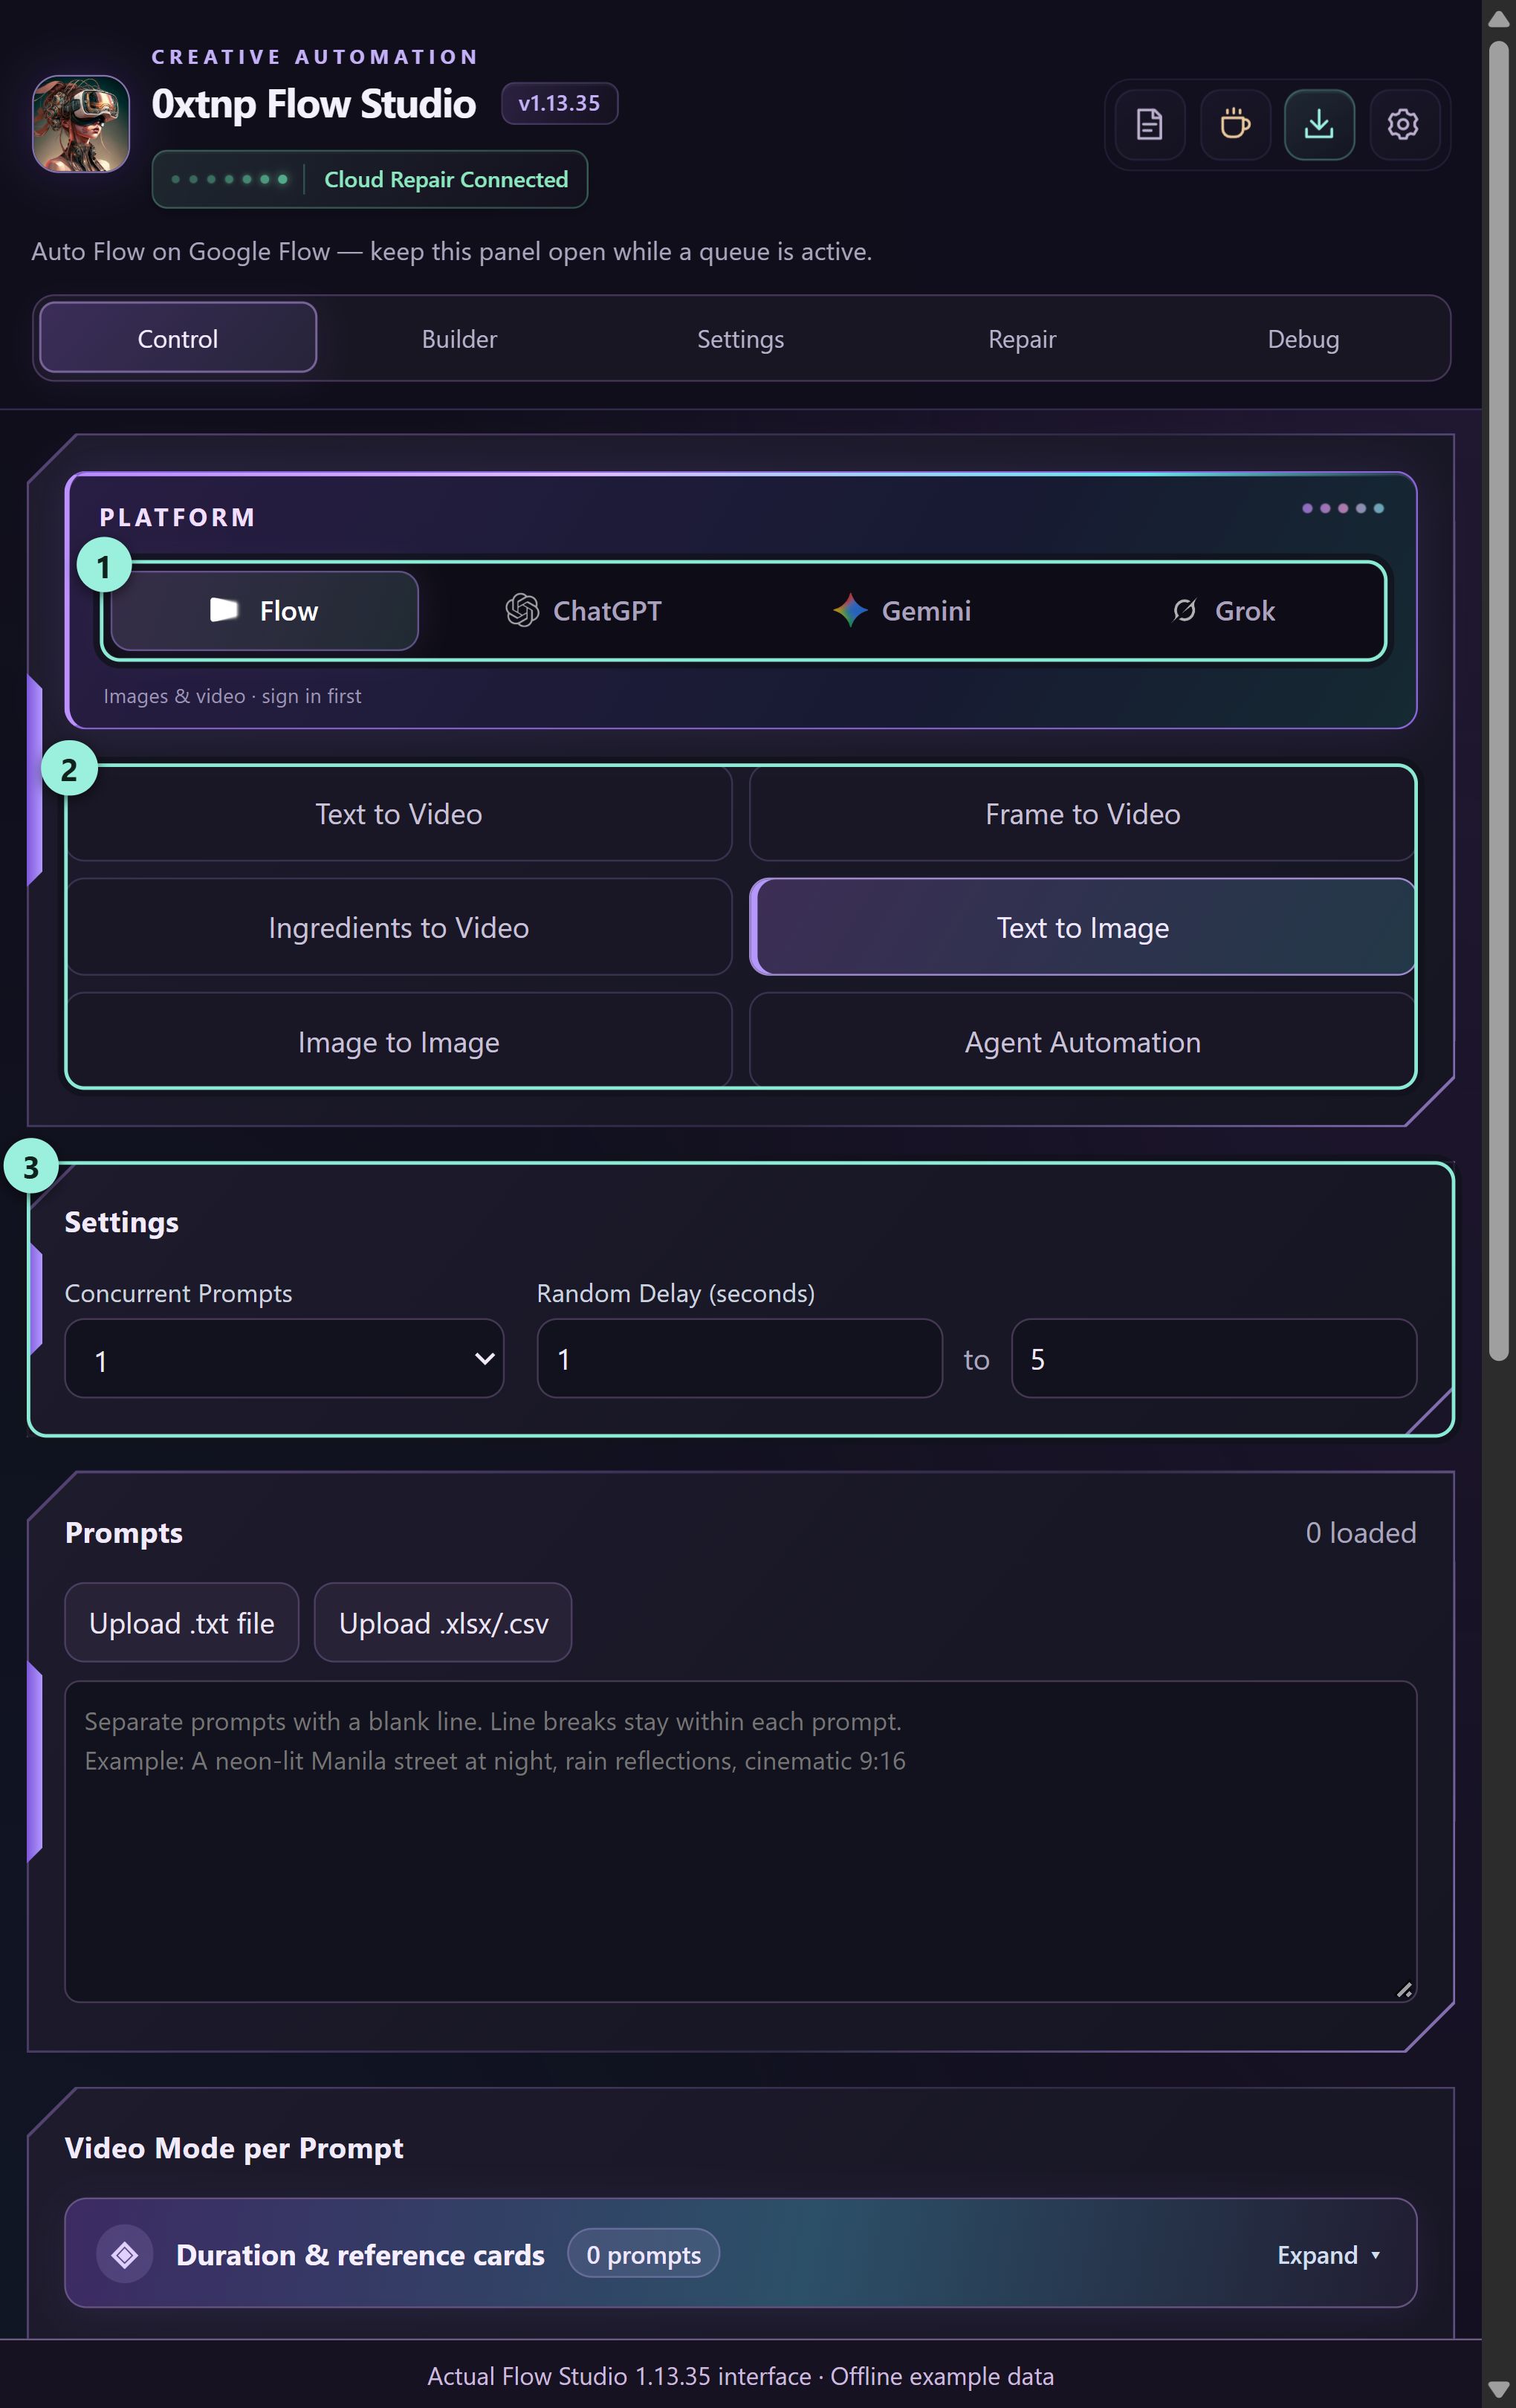
What you should seeYour first queue item is marked done. If downloading is enabled, the image is saved in Chrome’s download location.
BUILDER
Sign in to the Builder
Builder sign-in lets the server check your plan and daily story allowance. It does not sign you in to Google Flow or other generation websites.
Open Builder
Select AI Story (Builder) in the panel. Choose Sign in with Google or Sign in with Discord when those options are available on the connected server.
Finish the account window
Choose your account and finish the provider’s sign-in screen. Allow the browser to return to Flow Studio. Open only one sign-in window at a time.
Sign in on a phone — one-time code
On Android browsers that can install extensions (Lemur, Kiwi, Edge), the account window cannot open. Press Sign in with Google or Sign in with Discord anyway: Flow Studio opens a repair.corethea.com page in a new tab and shows a 4-digit number in the panel.
Check that the page shows the same number, then finish signing in on that page. Return to the panel — sign-in completes by itself. The link works once and expires after 10 minutes; press Sign in again if it expires. Never open a sign-in link that someone sent you. Arrives in the next extension update.
Check the account card
Confirm the displayed account, plan and remaining stories. The server decides your allowance; a newly created account or a shared browser installation may have a smaller free allowance than the usual two stories per day.
Use Discord Pro with the right account
Sign in with Discord using an account that belongs to the owner’s configured Discord server. Membership must be verified to receive Discord Pro. If it says you are not a member, check that Discord account or sign out and use Google.
Sign in to the Builder
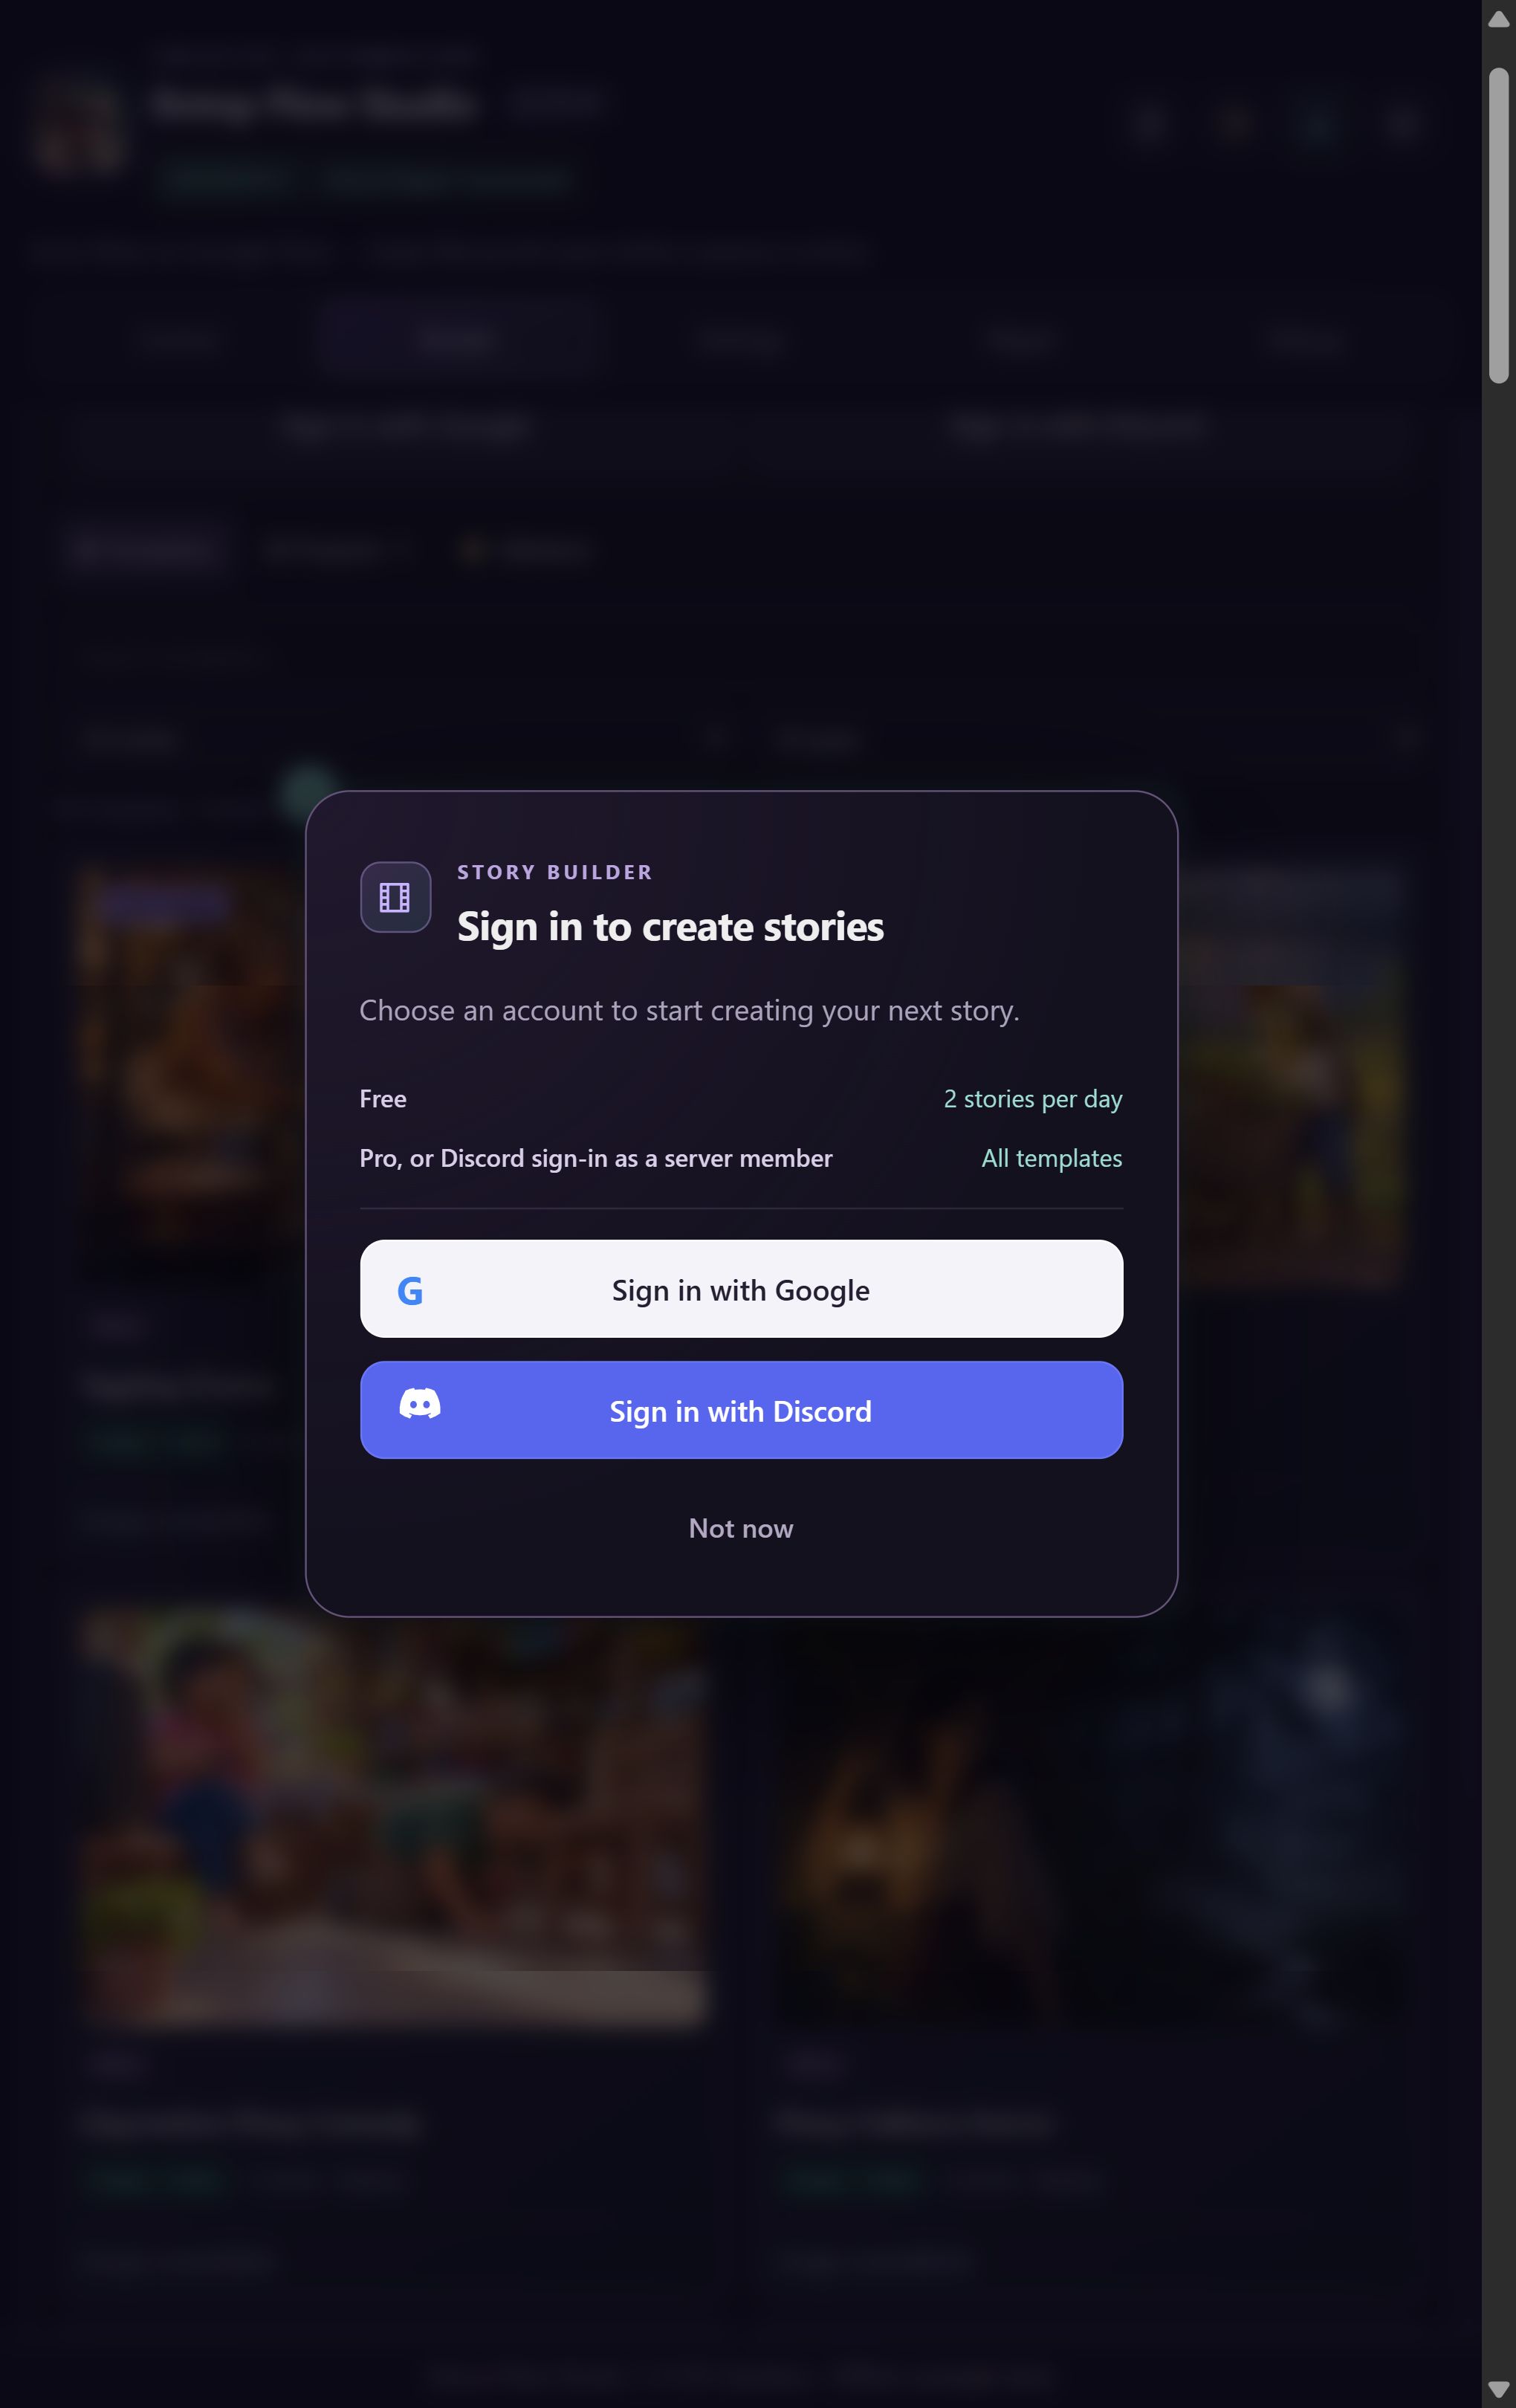
What you should seeYour account and current allowance appear above the template library.
BUILDER
Choose a template and topic
A template supplies a niche and starting settings. Choose the subject first, then check the setup before asking Builder to write.
Browse Templates
Open Builder → Templates. Search by title or choose a niche category. Tagalog Drama is placed first; newer niches follow near the top — from Kapre Vlogs to Podcast Hugot Host, where every project picks its own hair, outfit and studio look.
Open a template
Click the card that fits your video. Badges highlight selected or active niches. The stories-created number counts recorded completed story/part builds, not unique users.
Describe the video
Enter a specific topic or short brief. Example: “A small act of kindness at a rainy bus stop changes two strangers’ day.” Include the outcome you want the story to reach.
Continue or ask for ideas
Click Continue to use your topic. Alternatively, click Suggest 5 topics, wait for the choices, and select one. Suggestions prepare ideas; they do not create images or videos.
Choose a template and topic
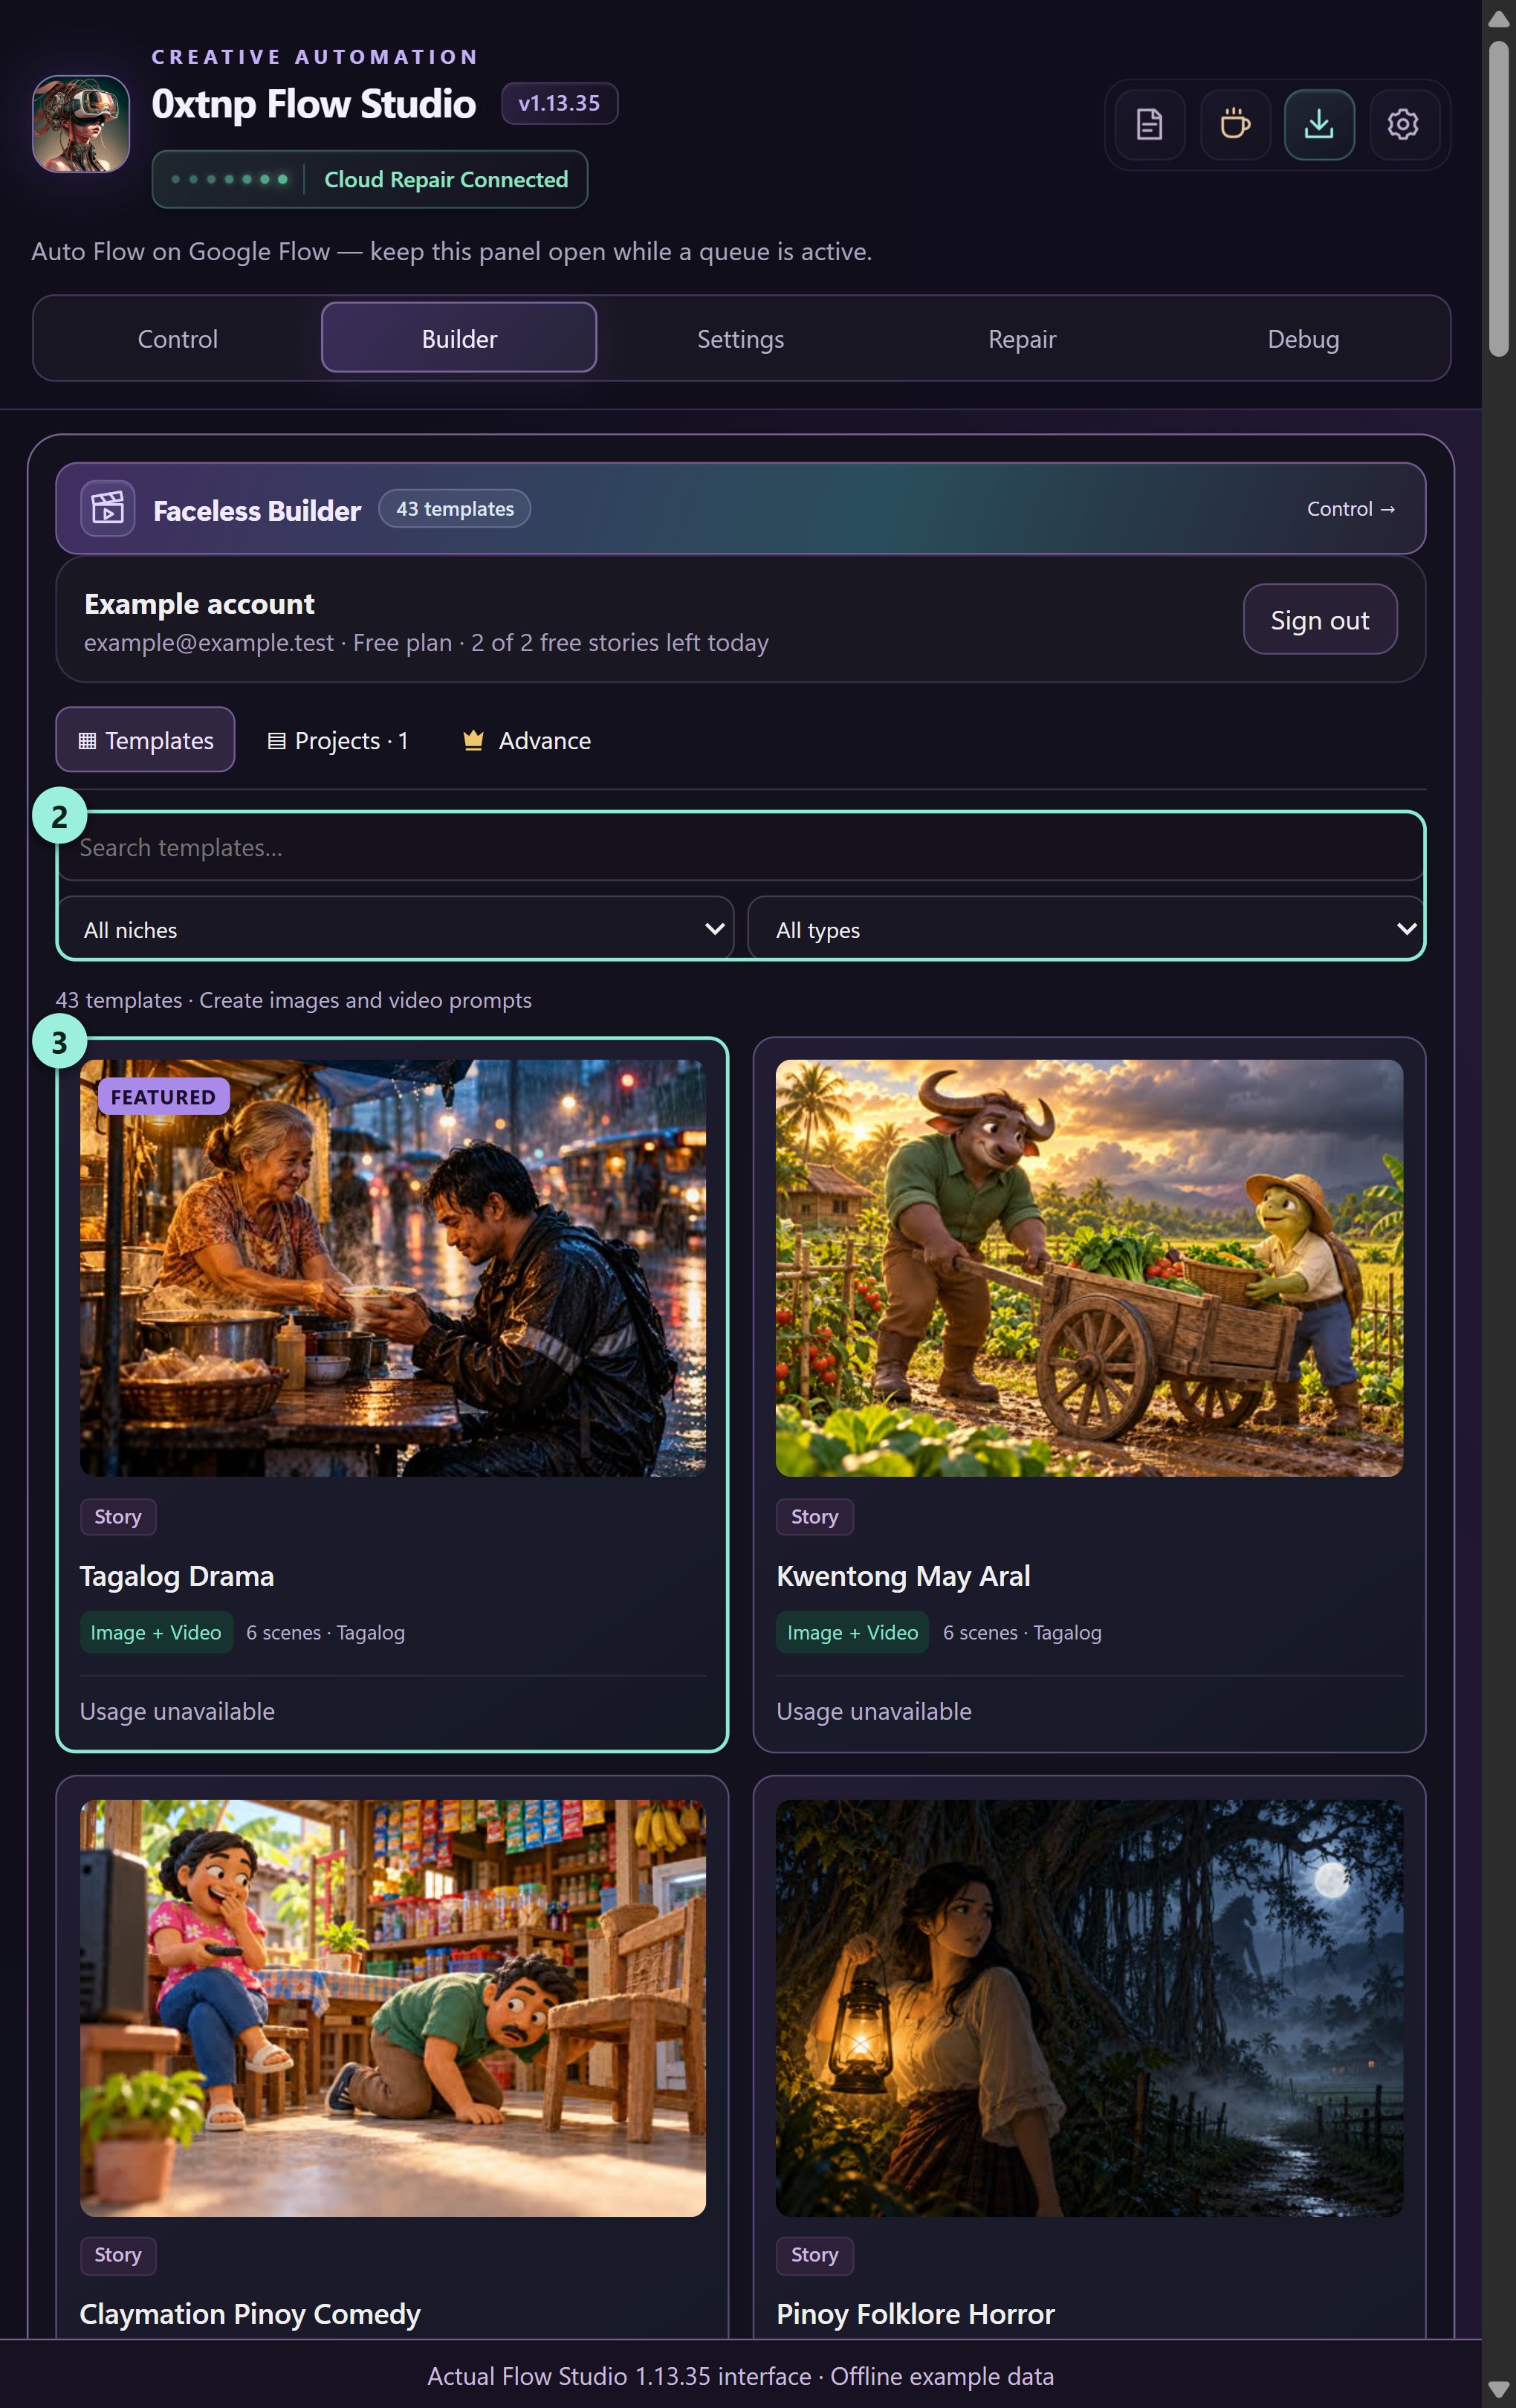
Enter your topic, then Continue
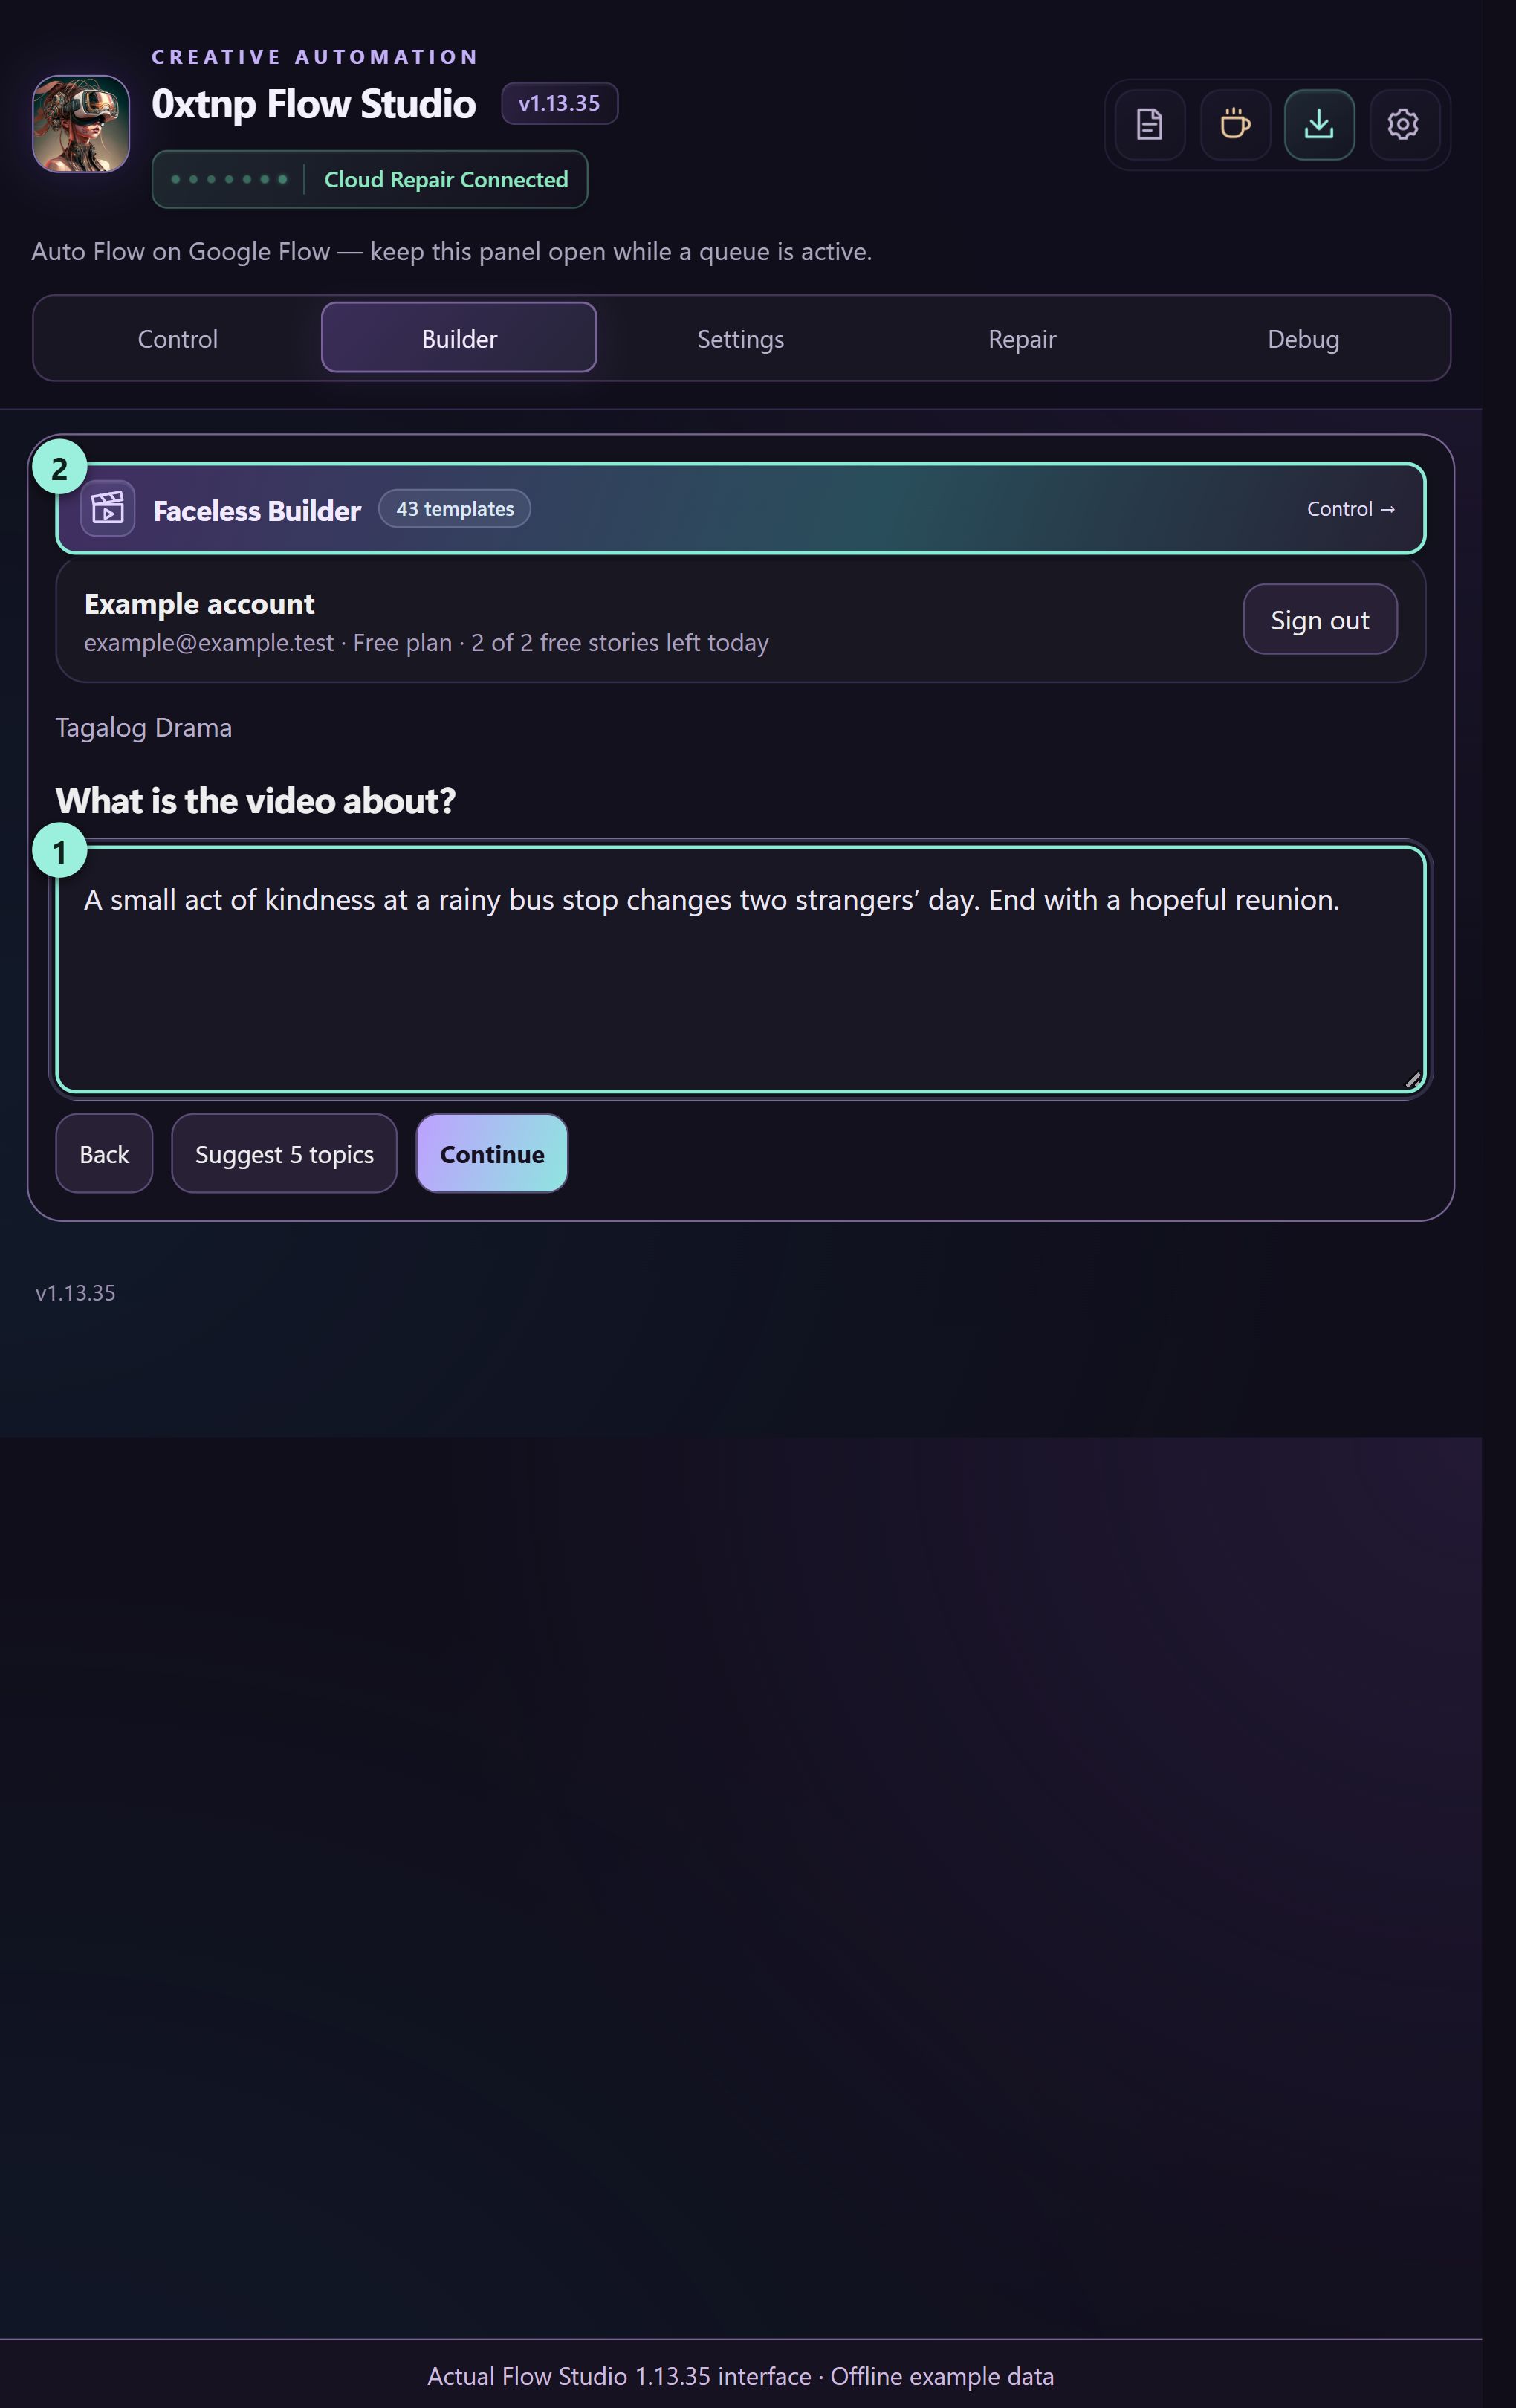
What you should seeYou reach a setup summary for the selected topic.
BUILDER
Set up your scene package
Check the scene count, duration, language and platforms before writing. A scene package is text and production prompts; generation happens in later stages.
Review the topic and language
At “Your video, ready to write”, check the topic and viewer language. Use Edit topic to change the premise. Customize everything opens the full guided setup.
Choose scenes and duration
Use Scenes and Scene length to select the package size. Six scenes × ten seconds is sixty seconds of planned clips. For Flow Veo, use eight-second scenes; ten-second projects need a compatible model or platform.
Pick the image workflow
Reference images first creates reusable assets before scene frames. Direct scene frames writes each scene image independently. Choose the workflow before building; it affects what the next steps ask you to generate.
Choose platforms and story type
Use Platforms to select the image and video services. Where offered, choose Standalone story or a two/three-part series. A series continues later; standalone should finish in one part.
Create the package
Click Create video package (or Build scene prompts in full setup). Wait for writing to finish. Open the finished project and read every scene’s narration and prompts before spending generation credits.
Set up your scene package
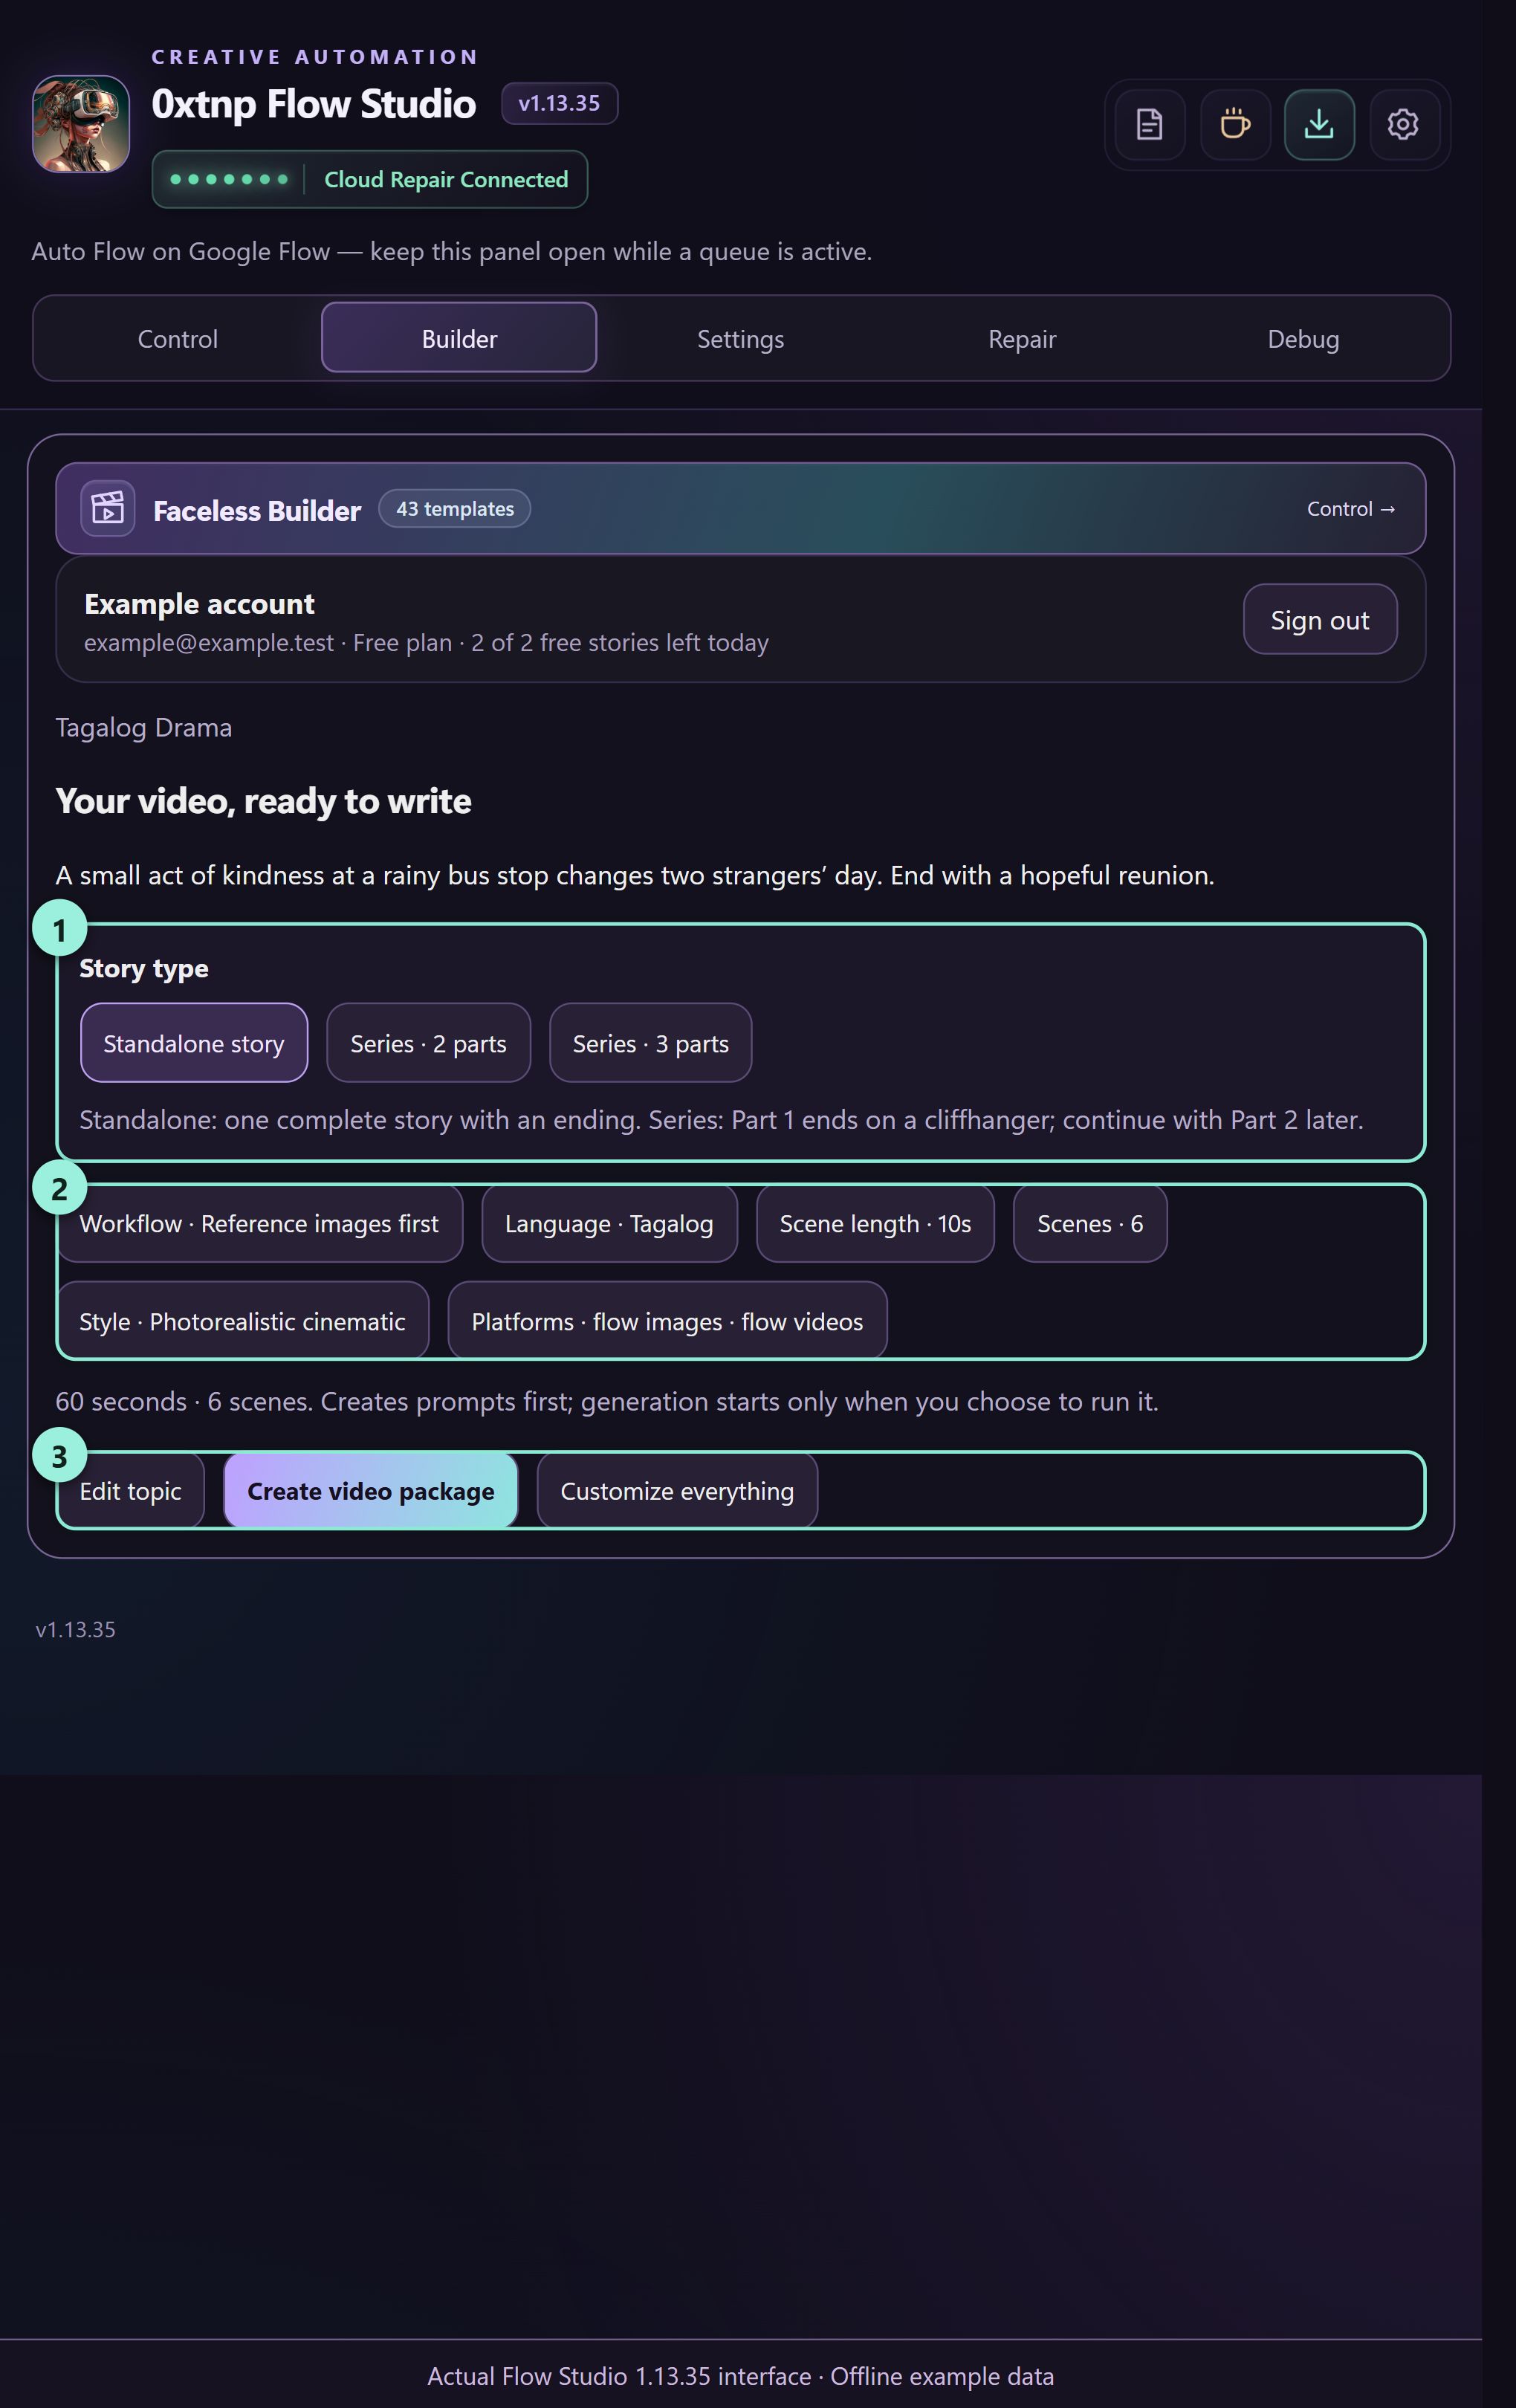
What you should seeThe project contains scene text, image prompts and video prompts at the selected count and duration.
CREATE YOUR MEDIA
Generate and review images
Create the visual references before the scene images when the project requires them. Loading a queue and starting that queue are separate actions.
Load reference images when requested
If the next step says 1 · Load reference images, click it. Go to Control and click Start. These assets establish recurring characters, locations or props. Projects with no reusable assets skip this stage.
Load scene images
Return to the project when references are complete. Click 2 · Load scene images, then Start in Control. Keep the target platform signed in and wait for the queue to finish.
Review every frame
Open the project and inspect faces, clothing, props, setting, screen positions and correspondence with the scene text. Review every scene, not only the first thumbnail.
Correct individual images
Use Regenerate under a bad frame, or upload a replacement where offered. Regenerating a reference can affect dependent scene frames, so review those again.
Approve reviewed images
When every required image is present and correct, click 3 · Approve reviewed images. This confirms you are ready to use them for video generation.
Generate and review images
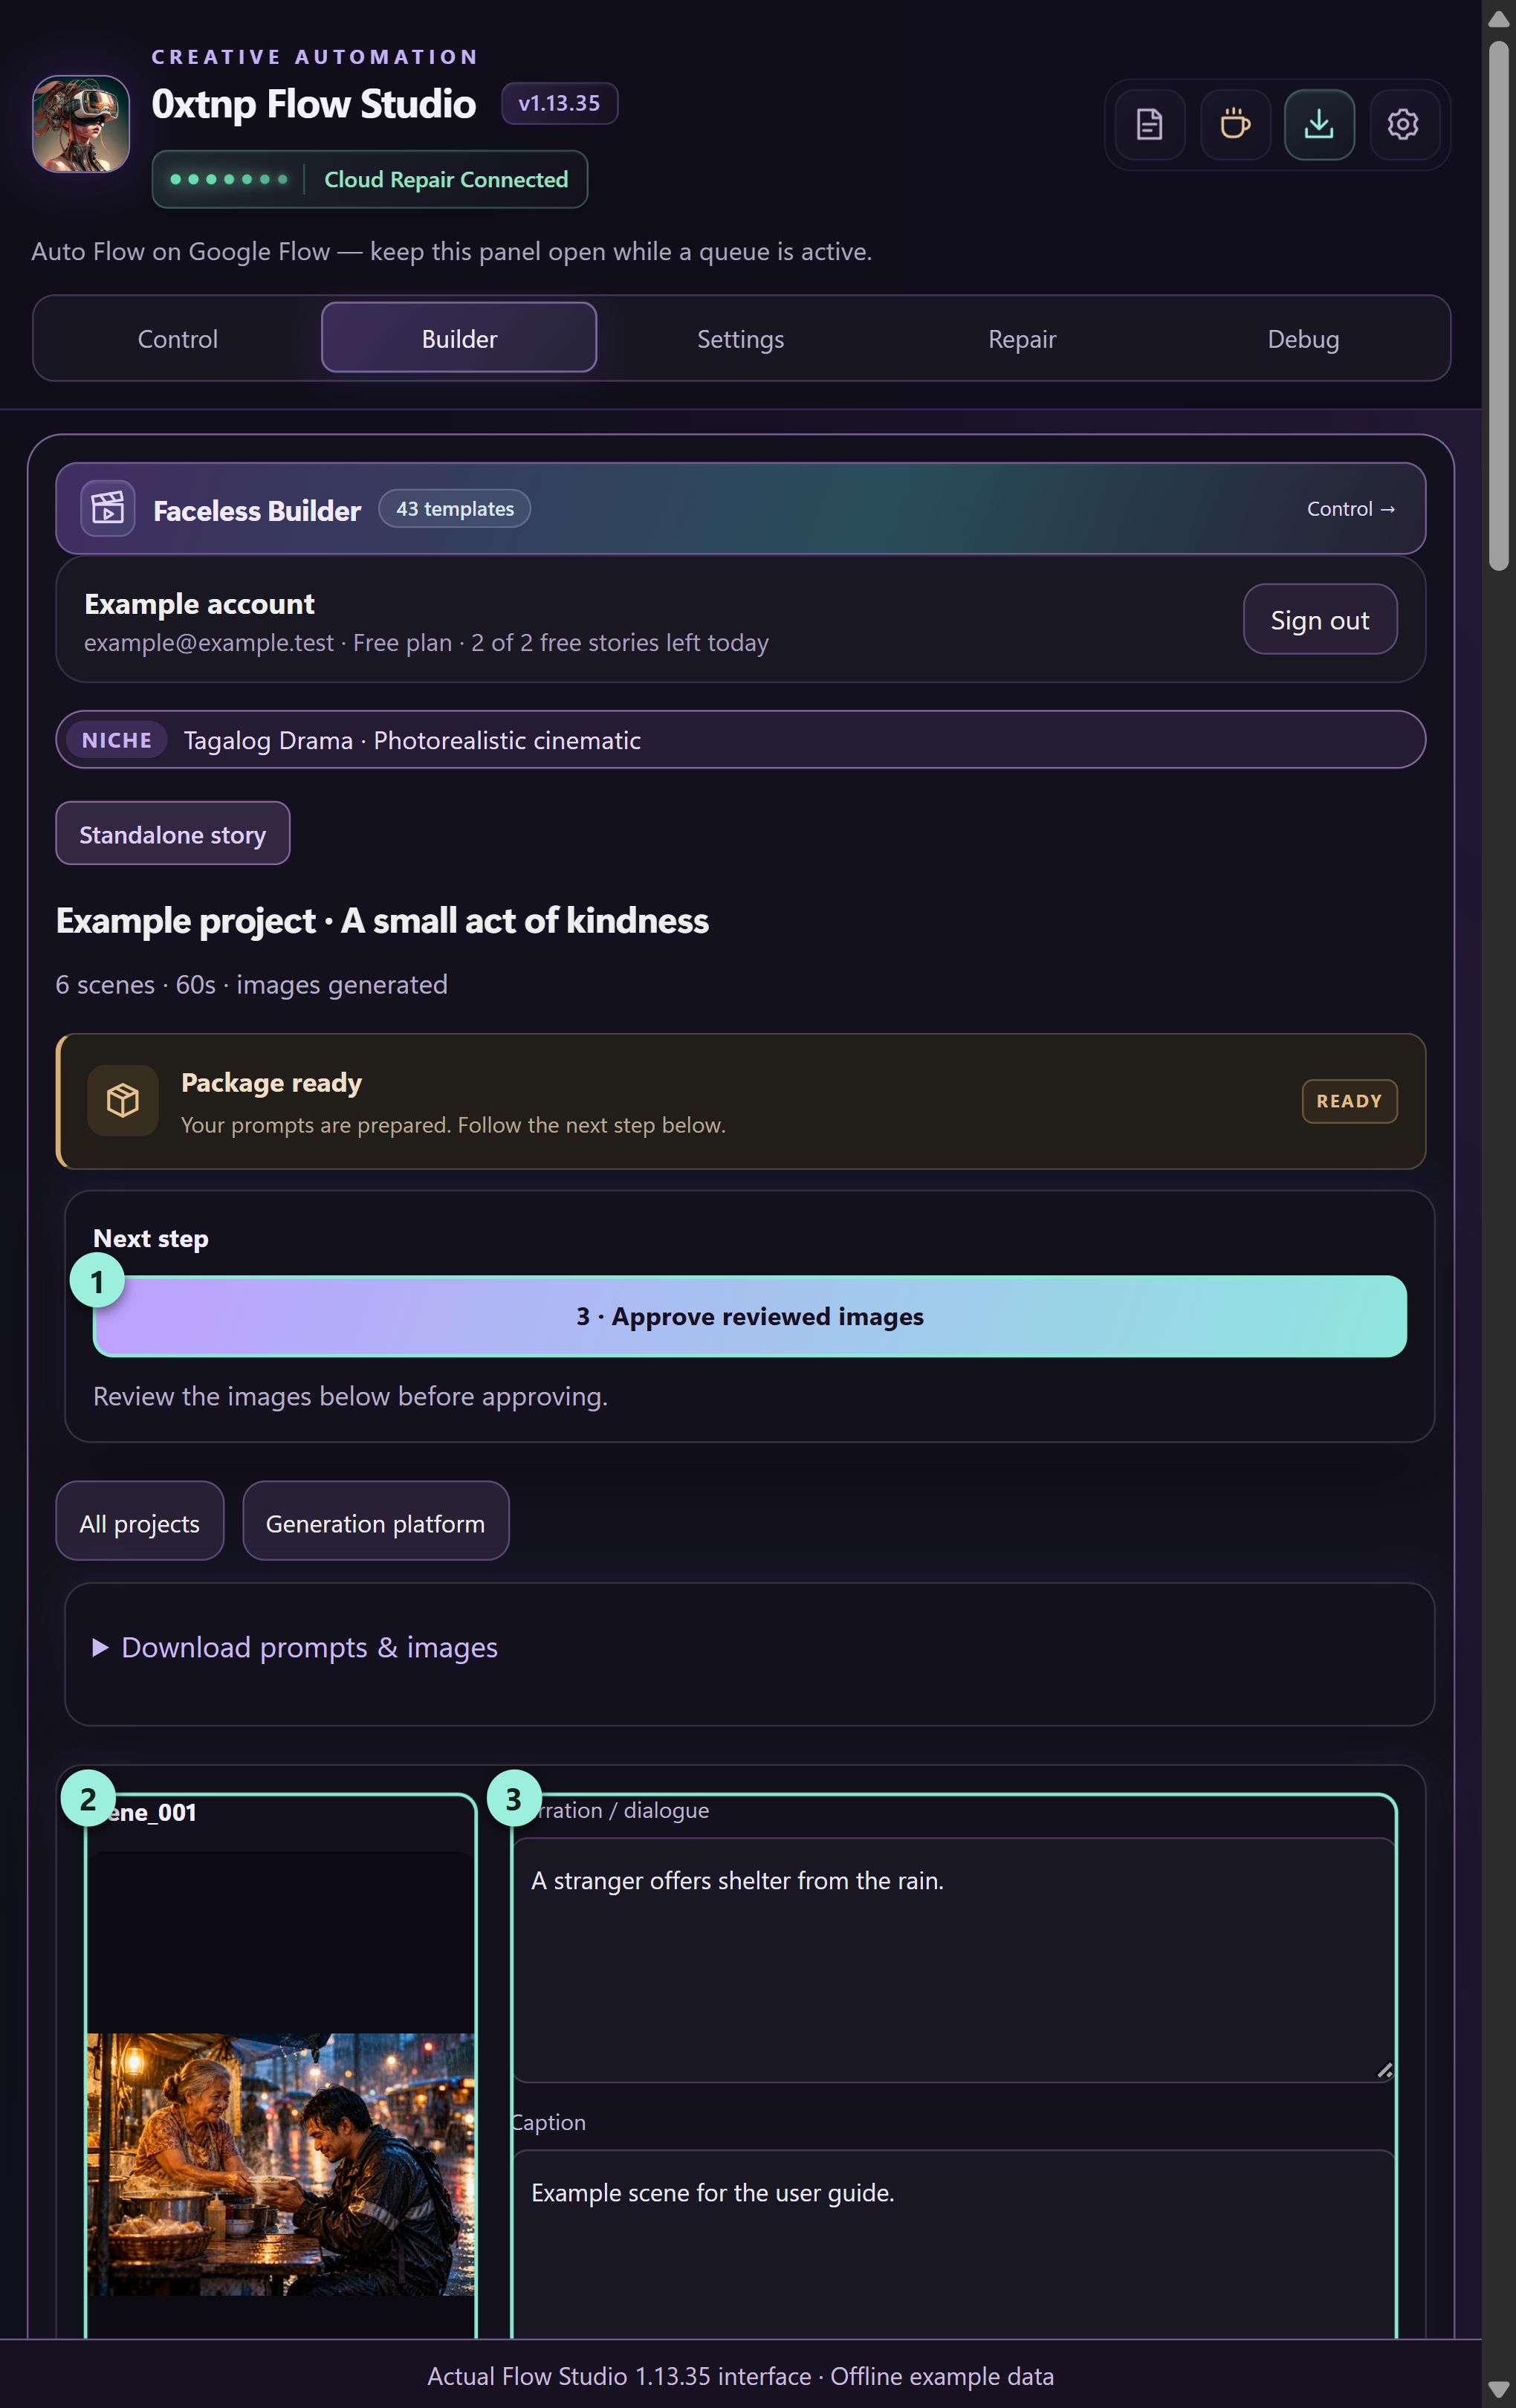
What you should seeThe project shows reviewed images and offers the video-prompt stage.
CREATE YOUR MEDIA
Turn approved frames into videos
The video stage uses your reviewed images and the matching scene prompts. It creates individual clips, rather than automatically editing them into one finished movie.
Confirm the video platform
Open Generation platform in the project if you need to check or change the service. Stop any active generation before changing platforms. Use a model compatible with the project’s scene duration.
Load the video queue
Click 4 · Load video prompts. The extension prepares the queue with the matching scene frames. Check Control to confirm that the intended platform and mode are selected.
Start and watch the queue
Click Start in Control. Each prompt moves from pending to running and then done or an error state. Keep the platform page and panel open while generation and saving are in progress.
Review each finished clip
Play the videos. Check dialogue, timing, motion, continuity and the ending. If a clip fails, review its specific queue message and retry only the unfinished or failed work.
Finish outside the generation queue
Once clips are complete, collect the downloaded files. If you want a single edited video, arrange the clips in your preferred video editor and add captions or music there as needed.
Turn approved frames into videos
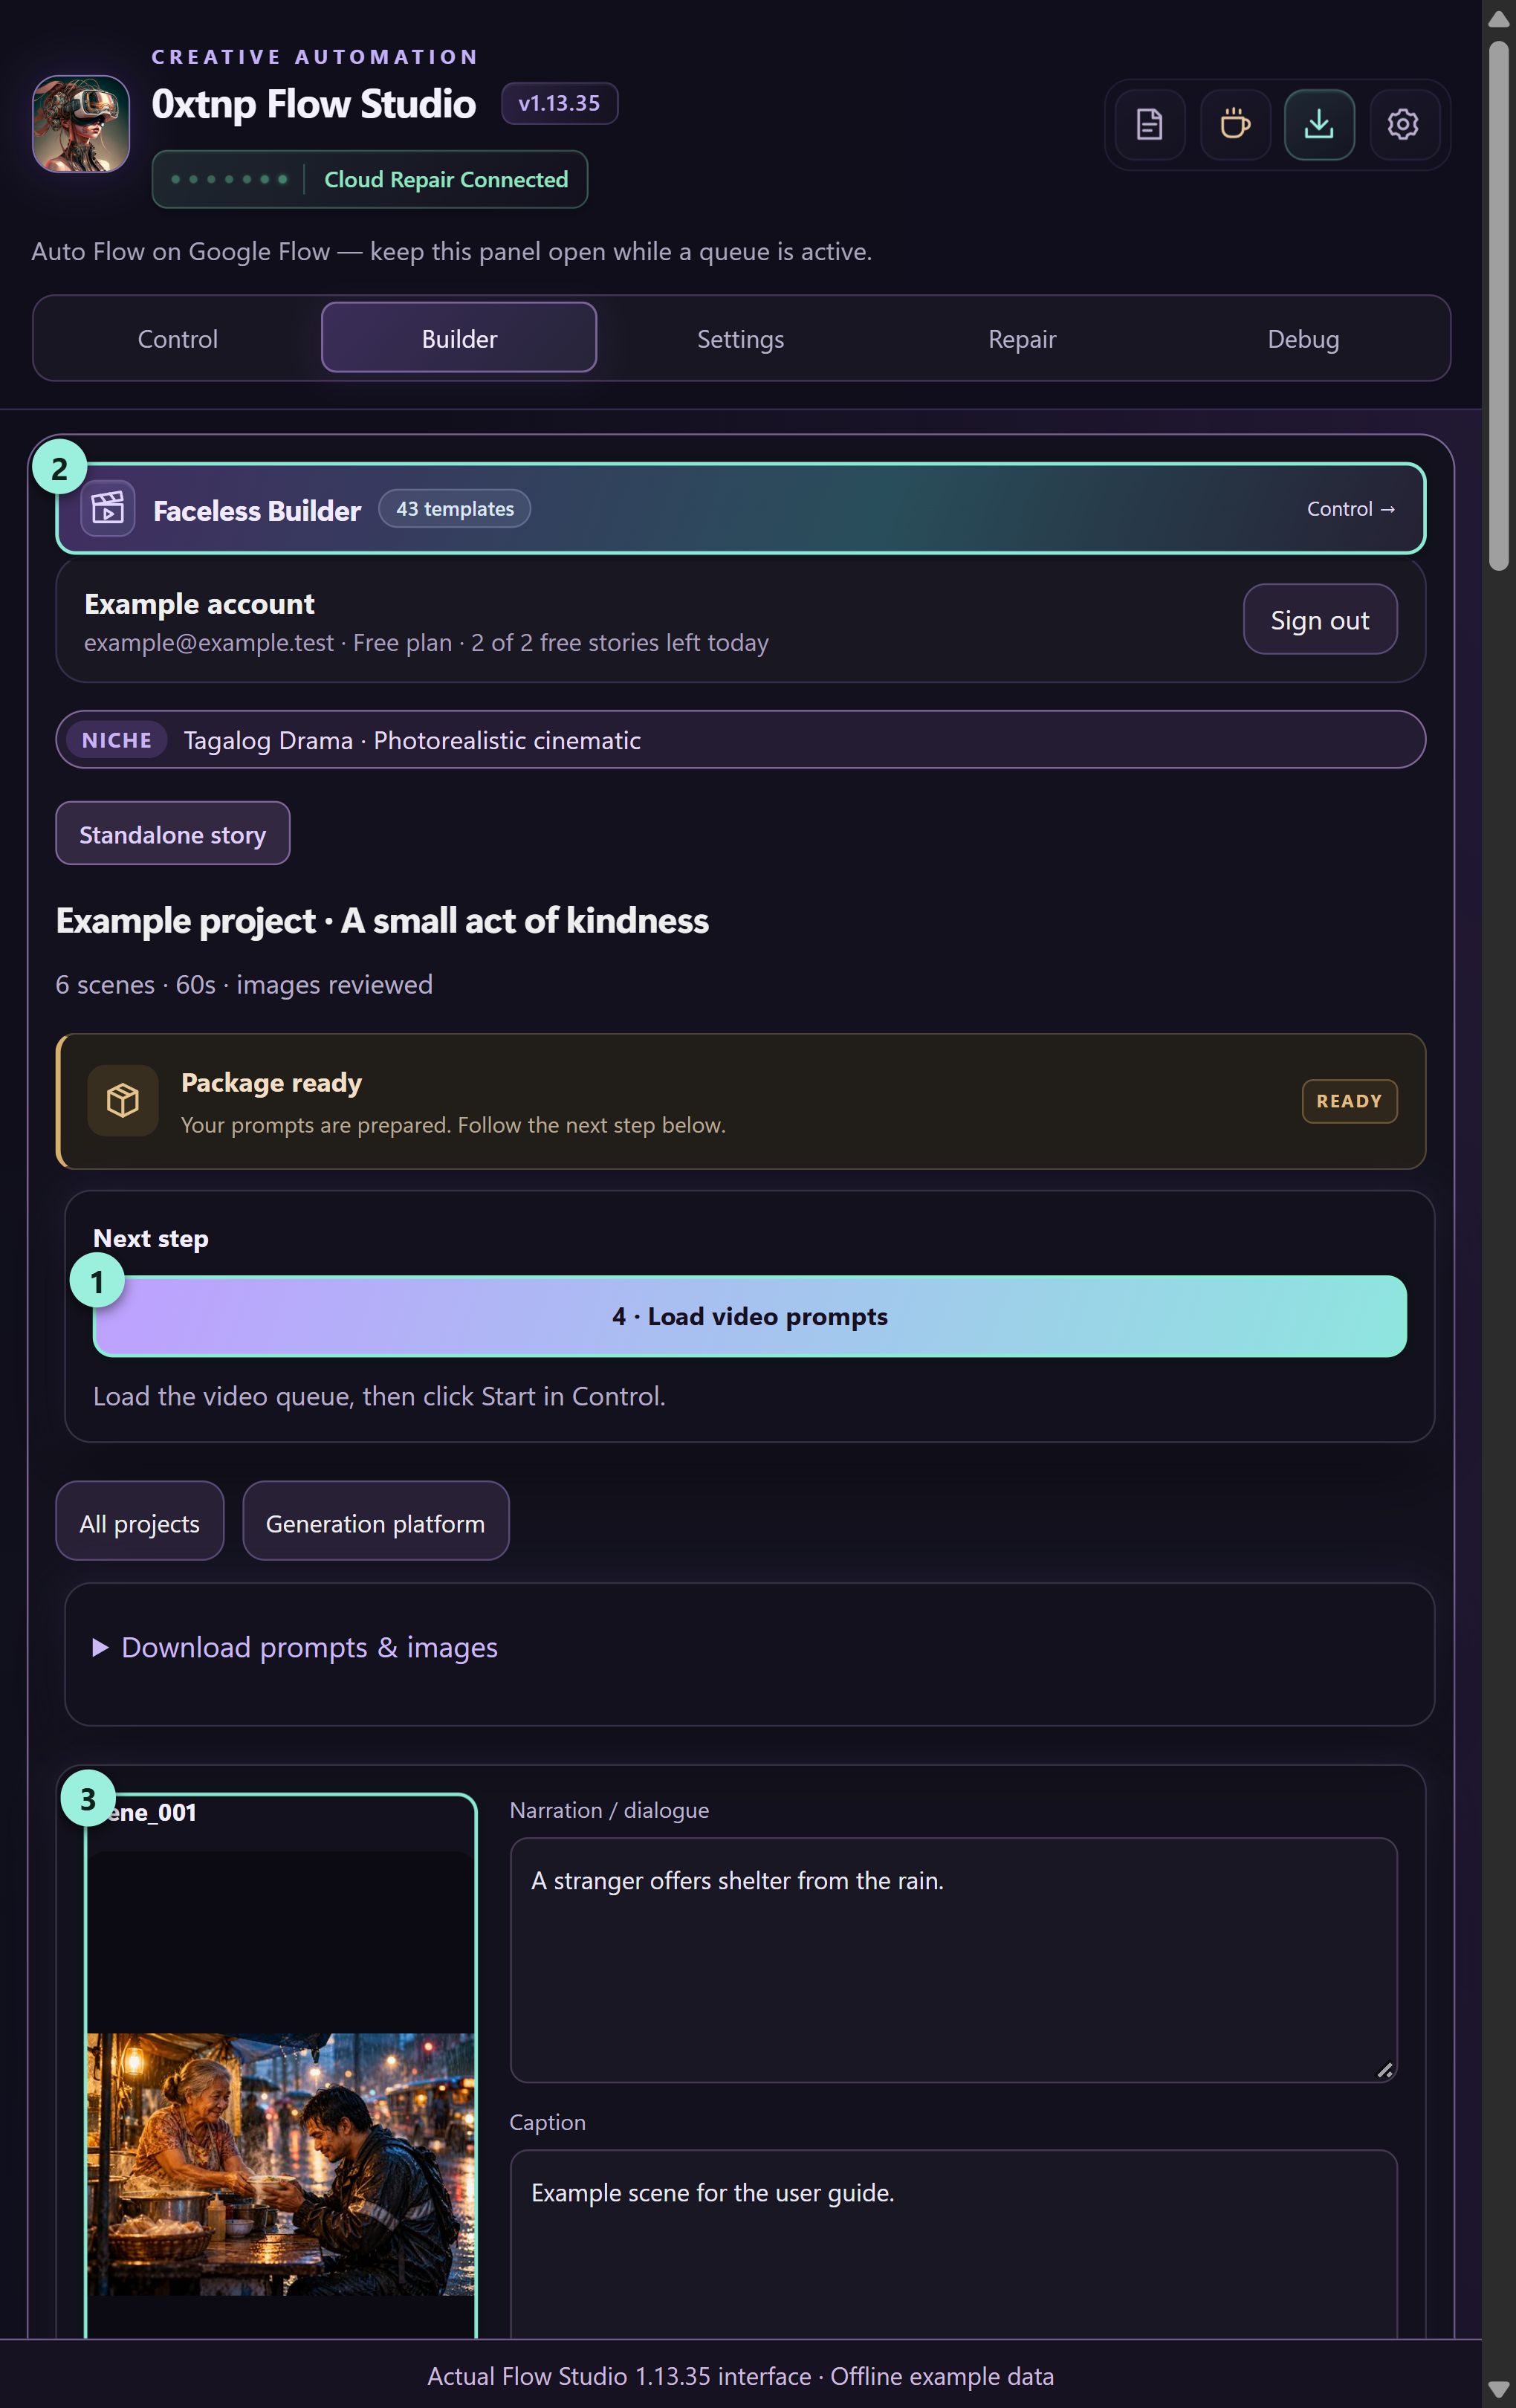
What you should seeThe project can show Videos complete after all its clips finish.
CREATE YOUR MEDIA
Run your own batch of prompts
Use Control directly when you already have prompts and do not need Builder to write a story.
Choose a platform and mode
Select the platform that is open in your browser, then choose the available mode: Text to Image, Text to Video, Frame to Video, Ingredients to Video, or Image to Image as supported.
Paste or import prompts
Paste text in Prompts with one blank line between separate prompts. Line breaks inside a prompt stay together. You can also use Upload .txt file or Upload .xlsx/.csv. Review the loaded prompt count.
Attach pictures if the mode needs them
Upload images in the Images area. Check the order and the image-processing setting for the selected mode. See Reference images below before starting a batch with recurring characters.
Choose conservative first-run settings
Set Concurrent Prompts to 1, Outputs per Prompt to 1, and a suitable random delay. Check model, aspect ratio, duration and download settings in the panel’s Settings tab, then click Save settings.
Start, stop or retry
Click Start and watch the Queue. Stop ends the active run; wait for it to settle before editing or replacing the queue. Use Retry errors for failed items after correcting their cause.
Run your own batch of prompts
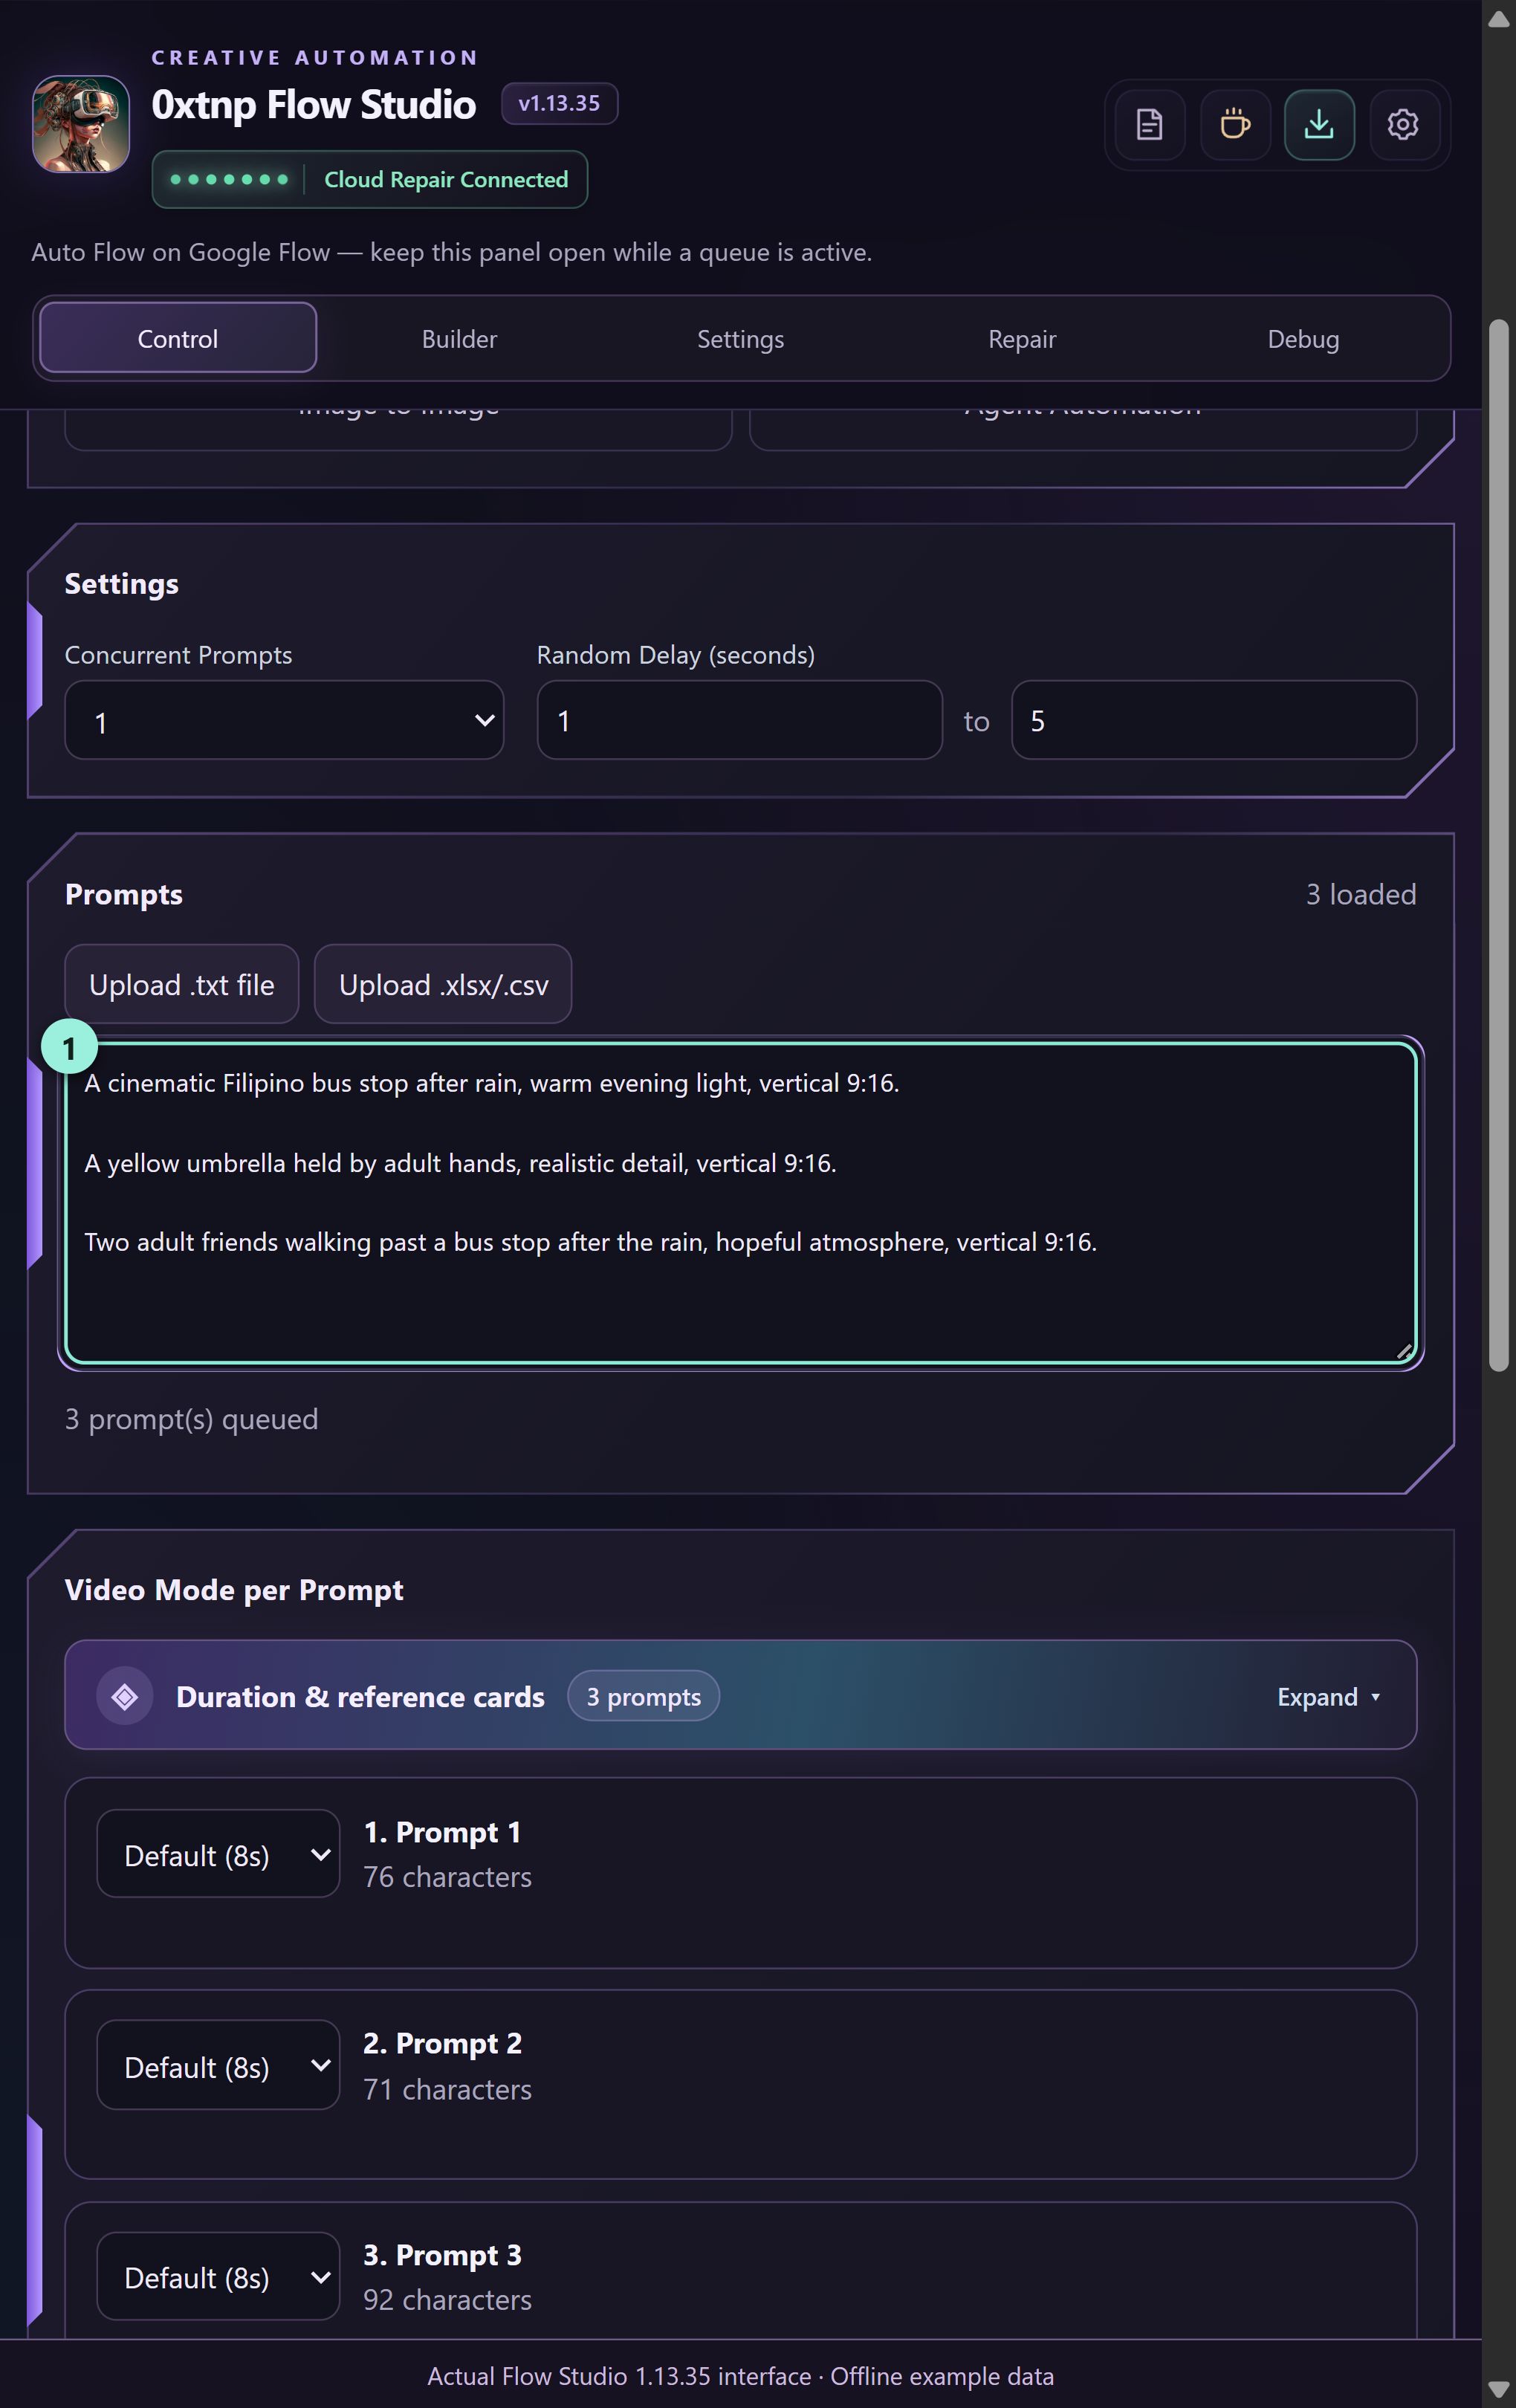
Then start the queue in Control
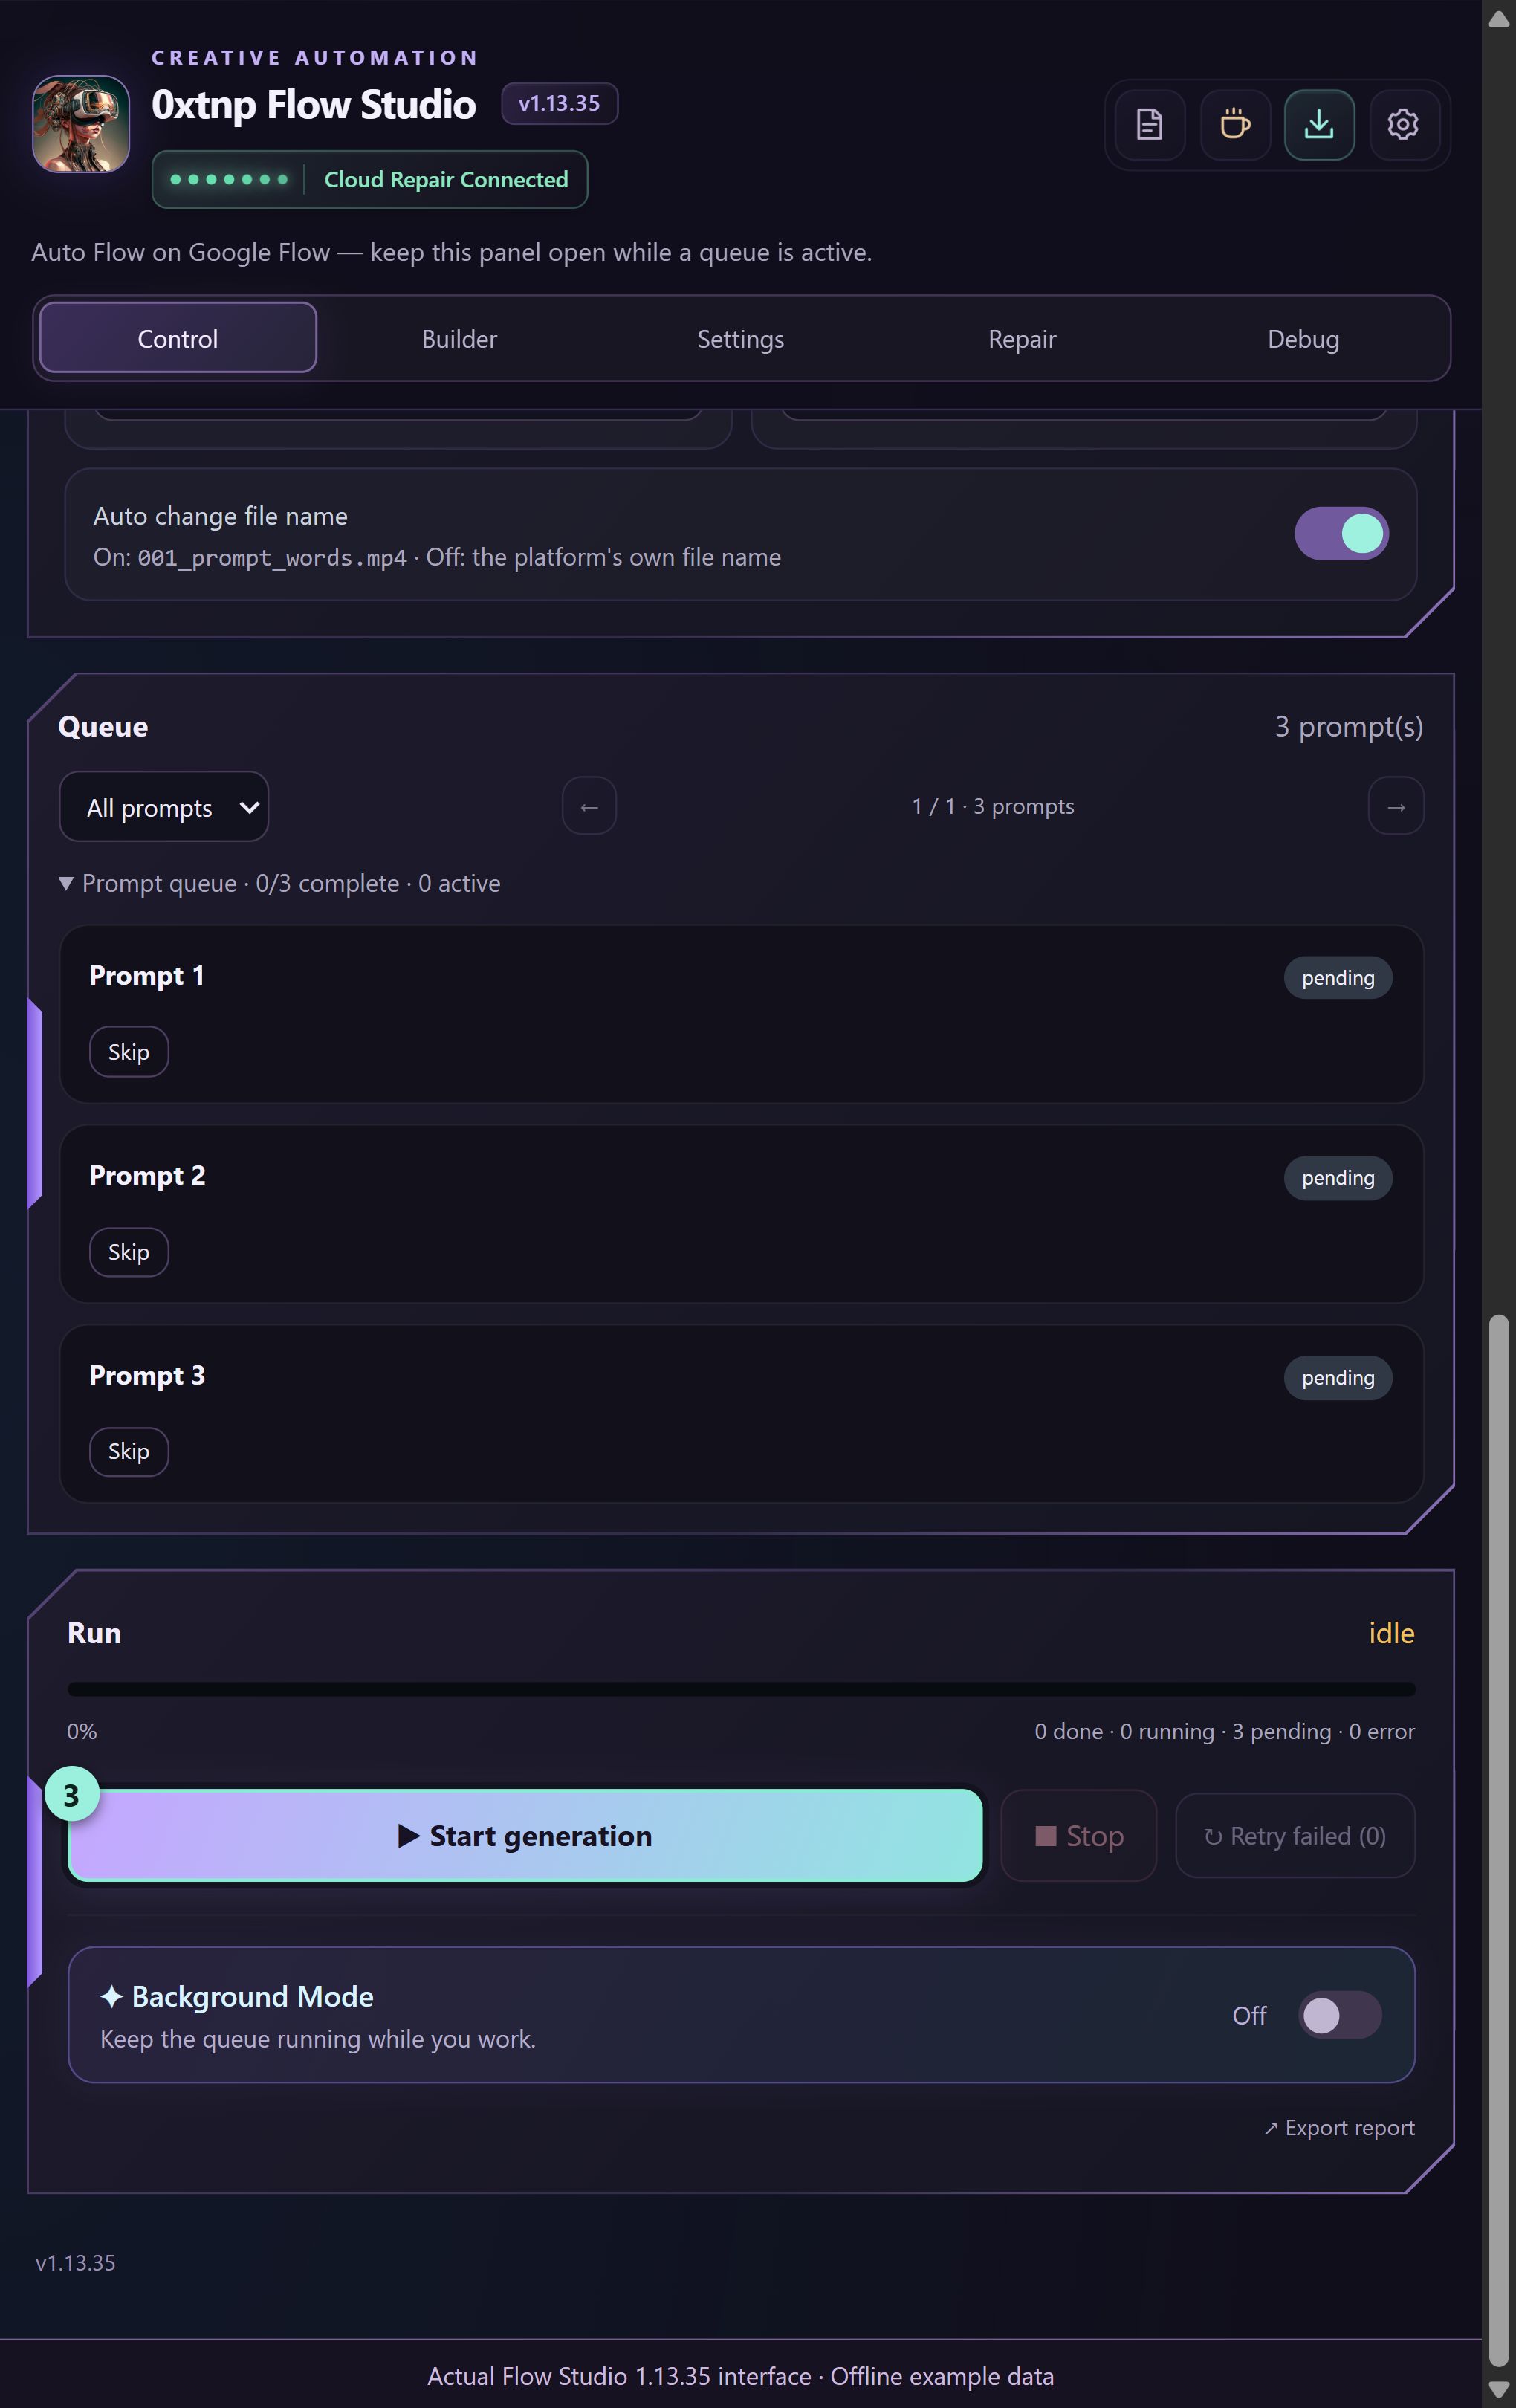
What you should seeEvery prompt has its own status and saved output, where downloading is enabled.
CREATE YOUR MEDIA
Use frames and reference images
A start frame, an ingredient image and an image-edit source have different jobs. Choose the mode that matches what you want the pictures to do.
Pick the right image mode
Frame to Video animates a starting image. Ingredients to Video uses reference pictures where supported. Image to Image uses pictures as sources for a new image. The available options depend on your platform.
Upload clear filenames
Use short, distinct names such as Maria.png, Kitchen.png and scene_001.png. Avoid near-duplicate names when matching several characters or locations.
Match references explicitly
With Automatically match reference images enabled, mention a matching filename or name in the prompt, for example @Maria for Maria.png. Check which uploaded pictures each prompt will use.
Check image processing and ordering
When available, choose all images, first image, one per prompt, or start-frame behavior deliberately. For ordered frames, put the images in scene order and confirm the thumbnail sequence before Start.
Keep Builder’s paired files together
For a Builder project, use its Load scene images and Load video prompts actions. Avoid manually mixing a scene’s prompt with a different scene’s frame.
Use frames and reference images
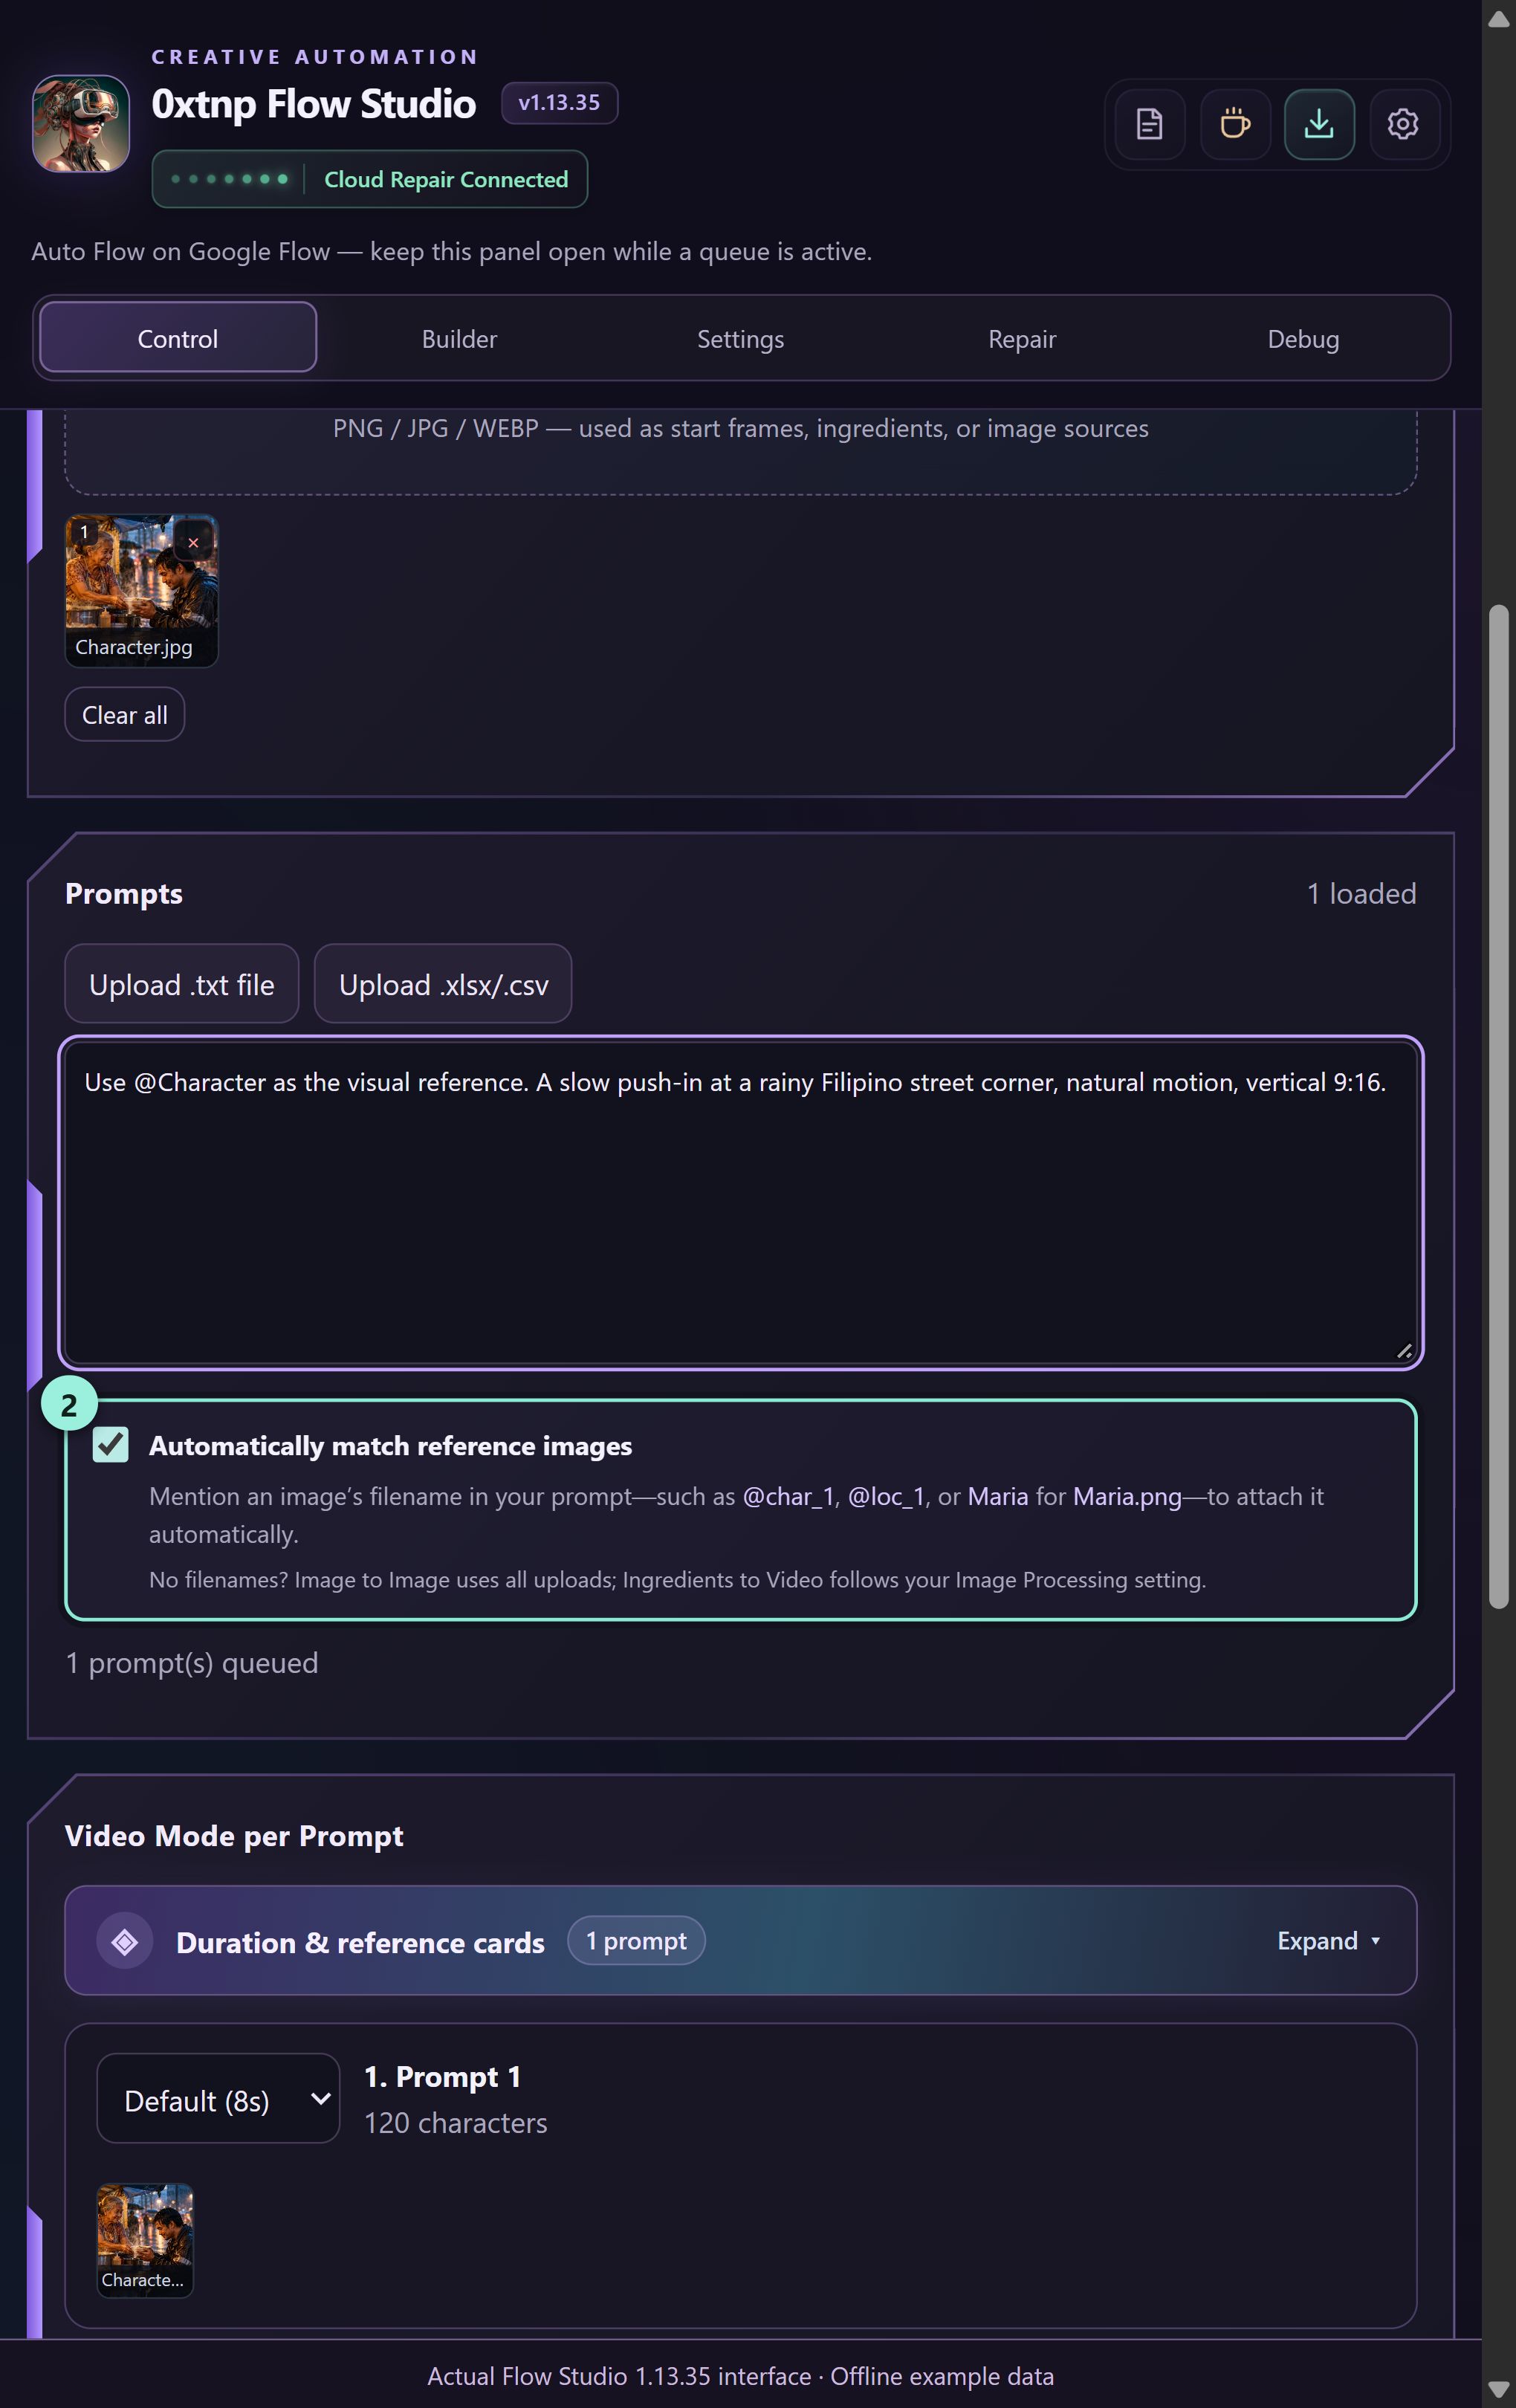
What you should seeEach prompt receives the intended frame or reference pictures.
Save images using reference names
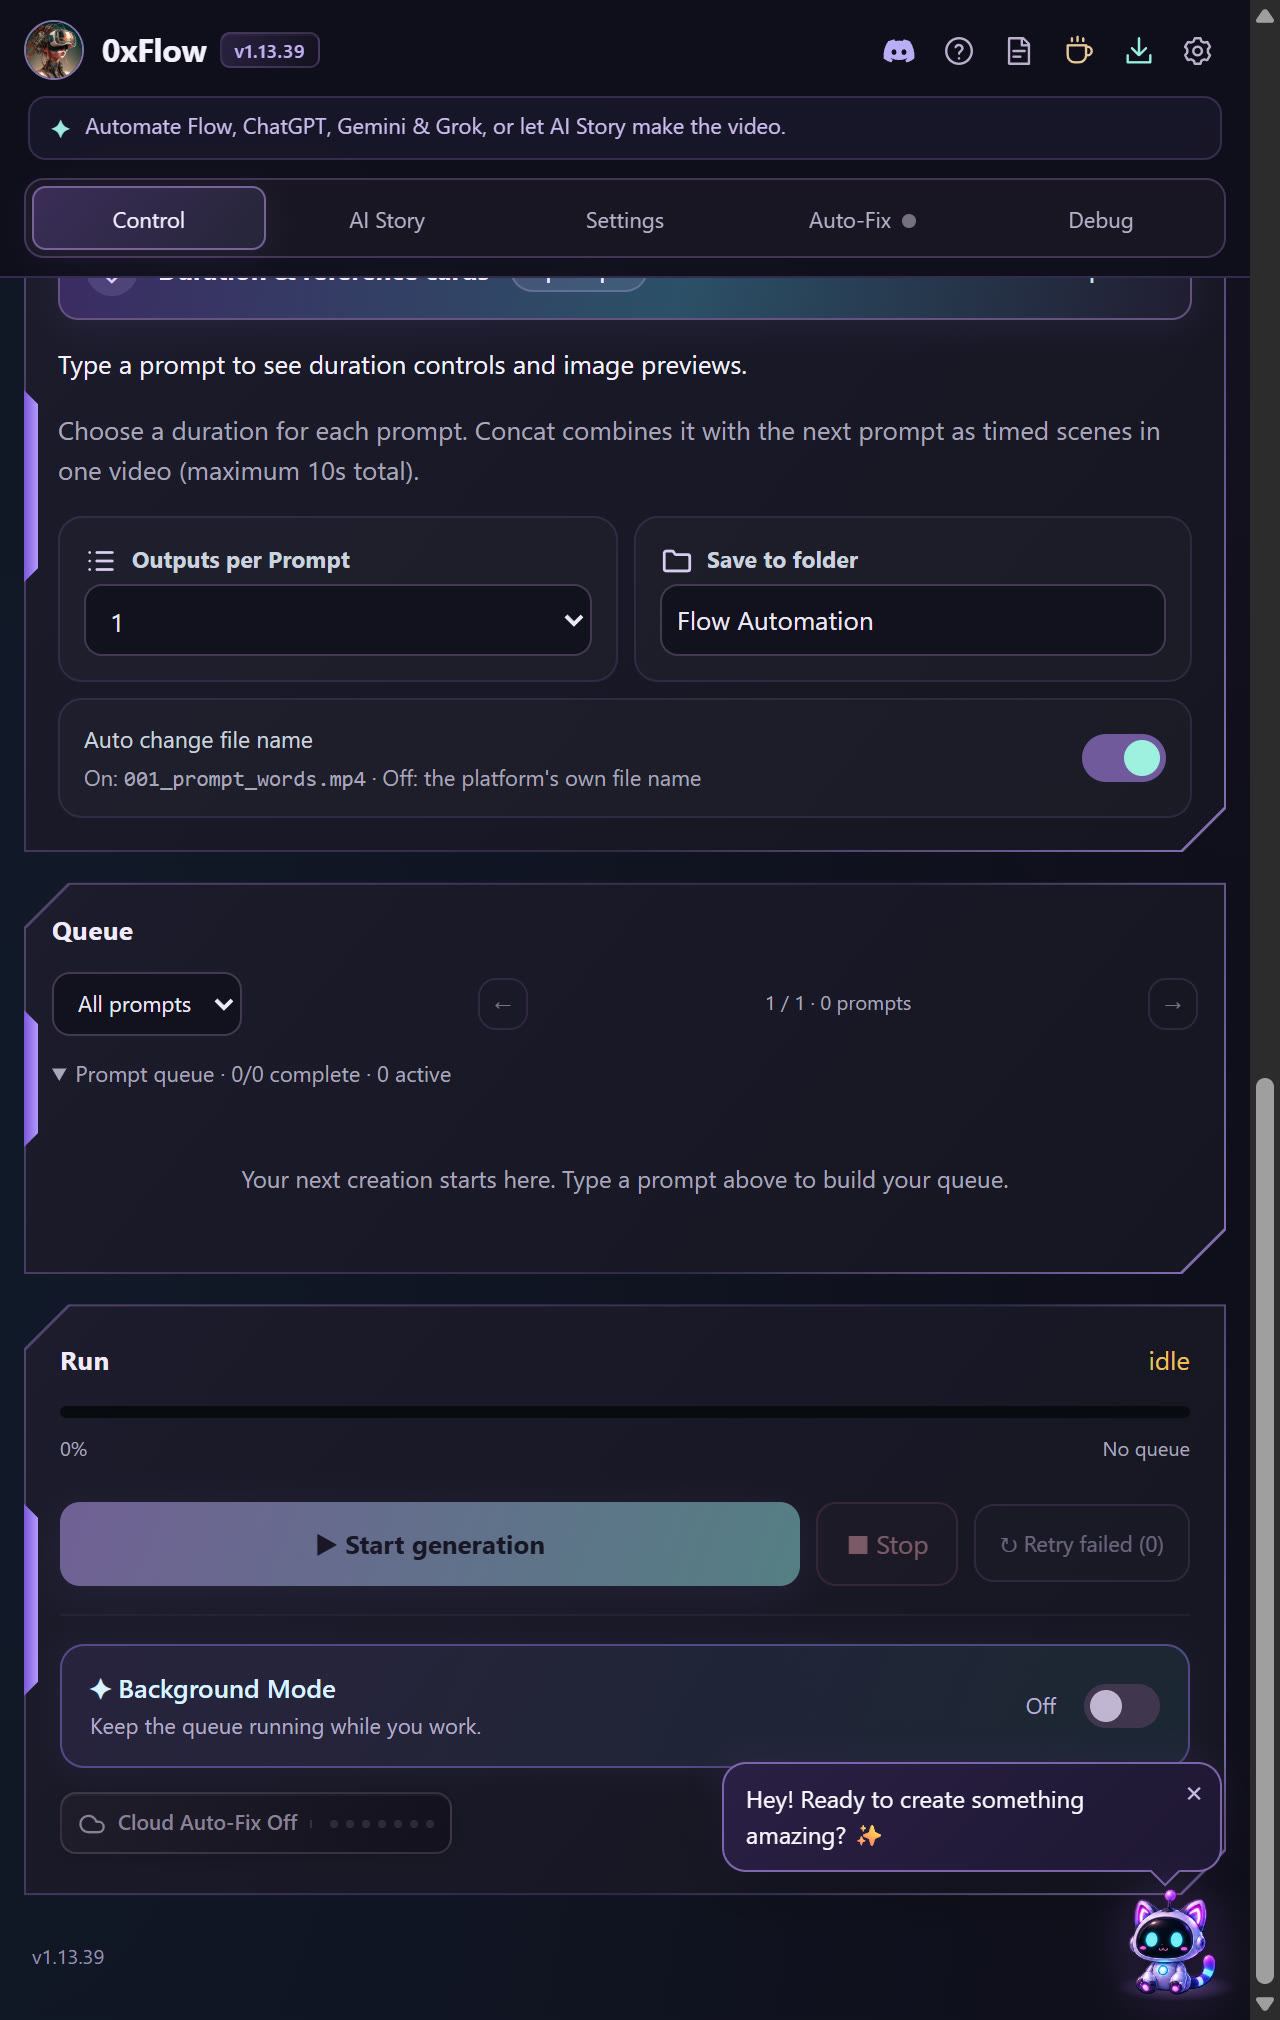
CREATE YOUR MEDIA
Choose a generation platform
Flow Studio controls supported platform pages. Models, credits and available generation options belong to those services.
Google Flow
Open the intended Flow project first. In Settings, check Model, Aspect ratio and Video duration. Veo options use eight-second scenes; use a compatible option for other durations.
ChatGPT and Gemini
Sign in to the platform and choose it in Control. Follow any sign-in or manual-action request shown by the platform. In Builder, images and videos have separate platform choices.
Grok
Allow Grok access when the extension requests it. For Grok image modes, choose Speed or Quality 2.0 before attachments are uploaded; Grok can hide that choice after images are attached.
Check a small test before switching a whole project
Generate one item and confirm that the result, aspect and download behavior are right. Stop active generation before switching the platform or editing the project’s generation targets.
Choose a generation platform
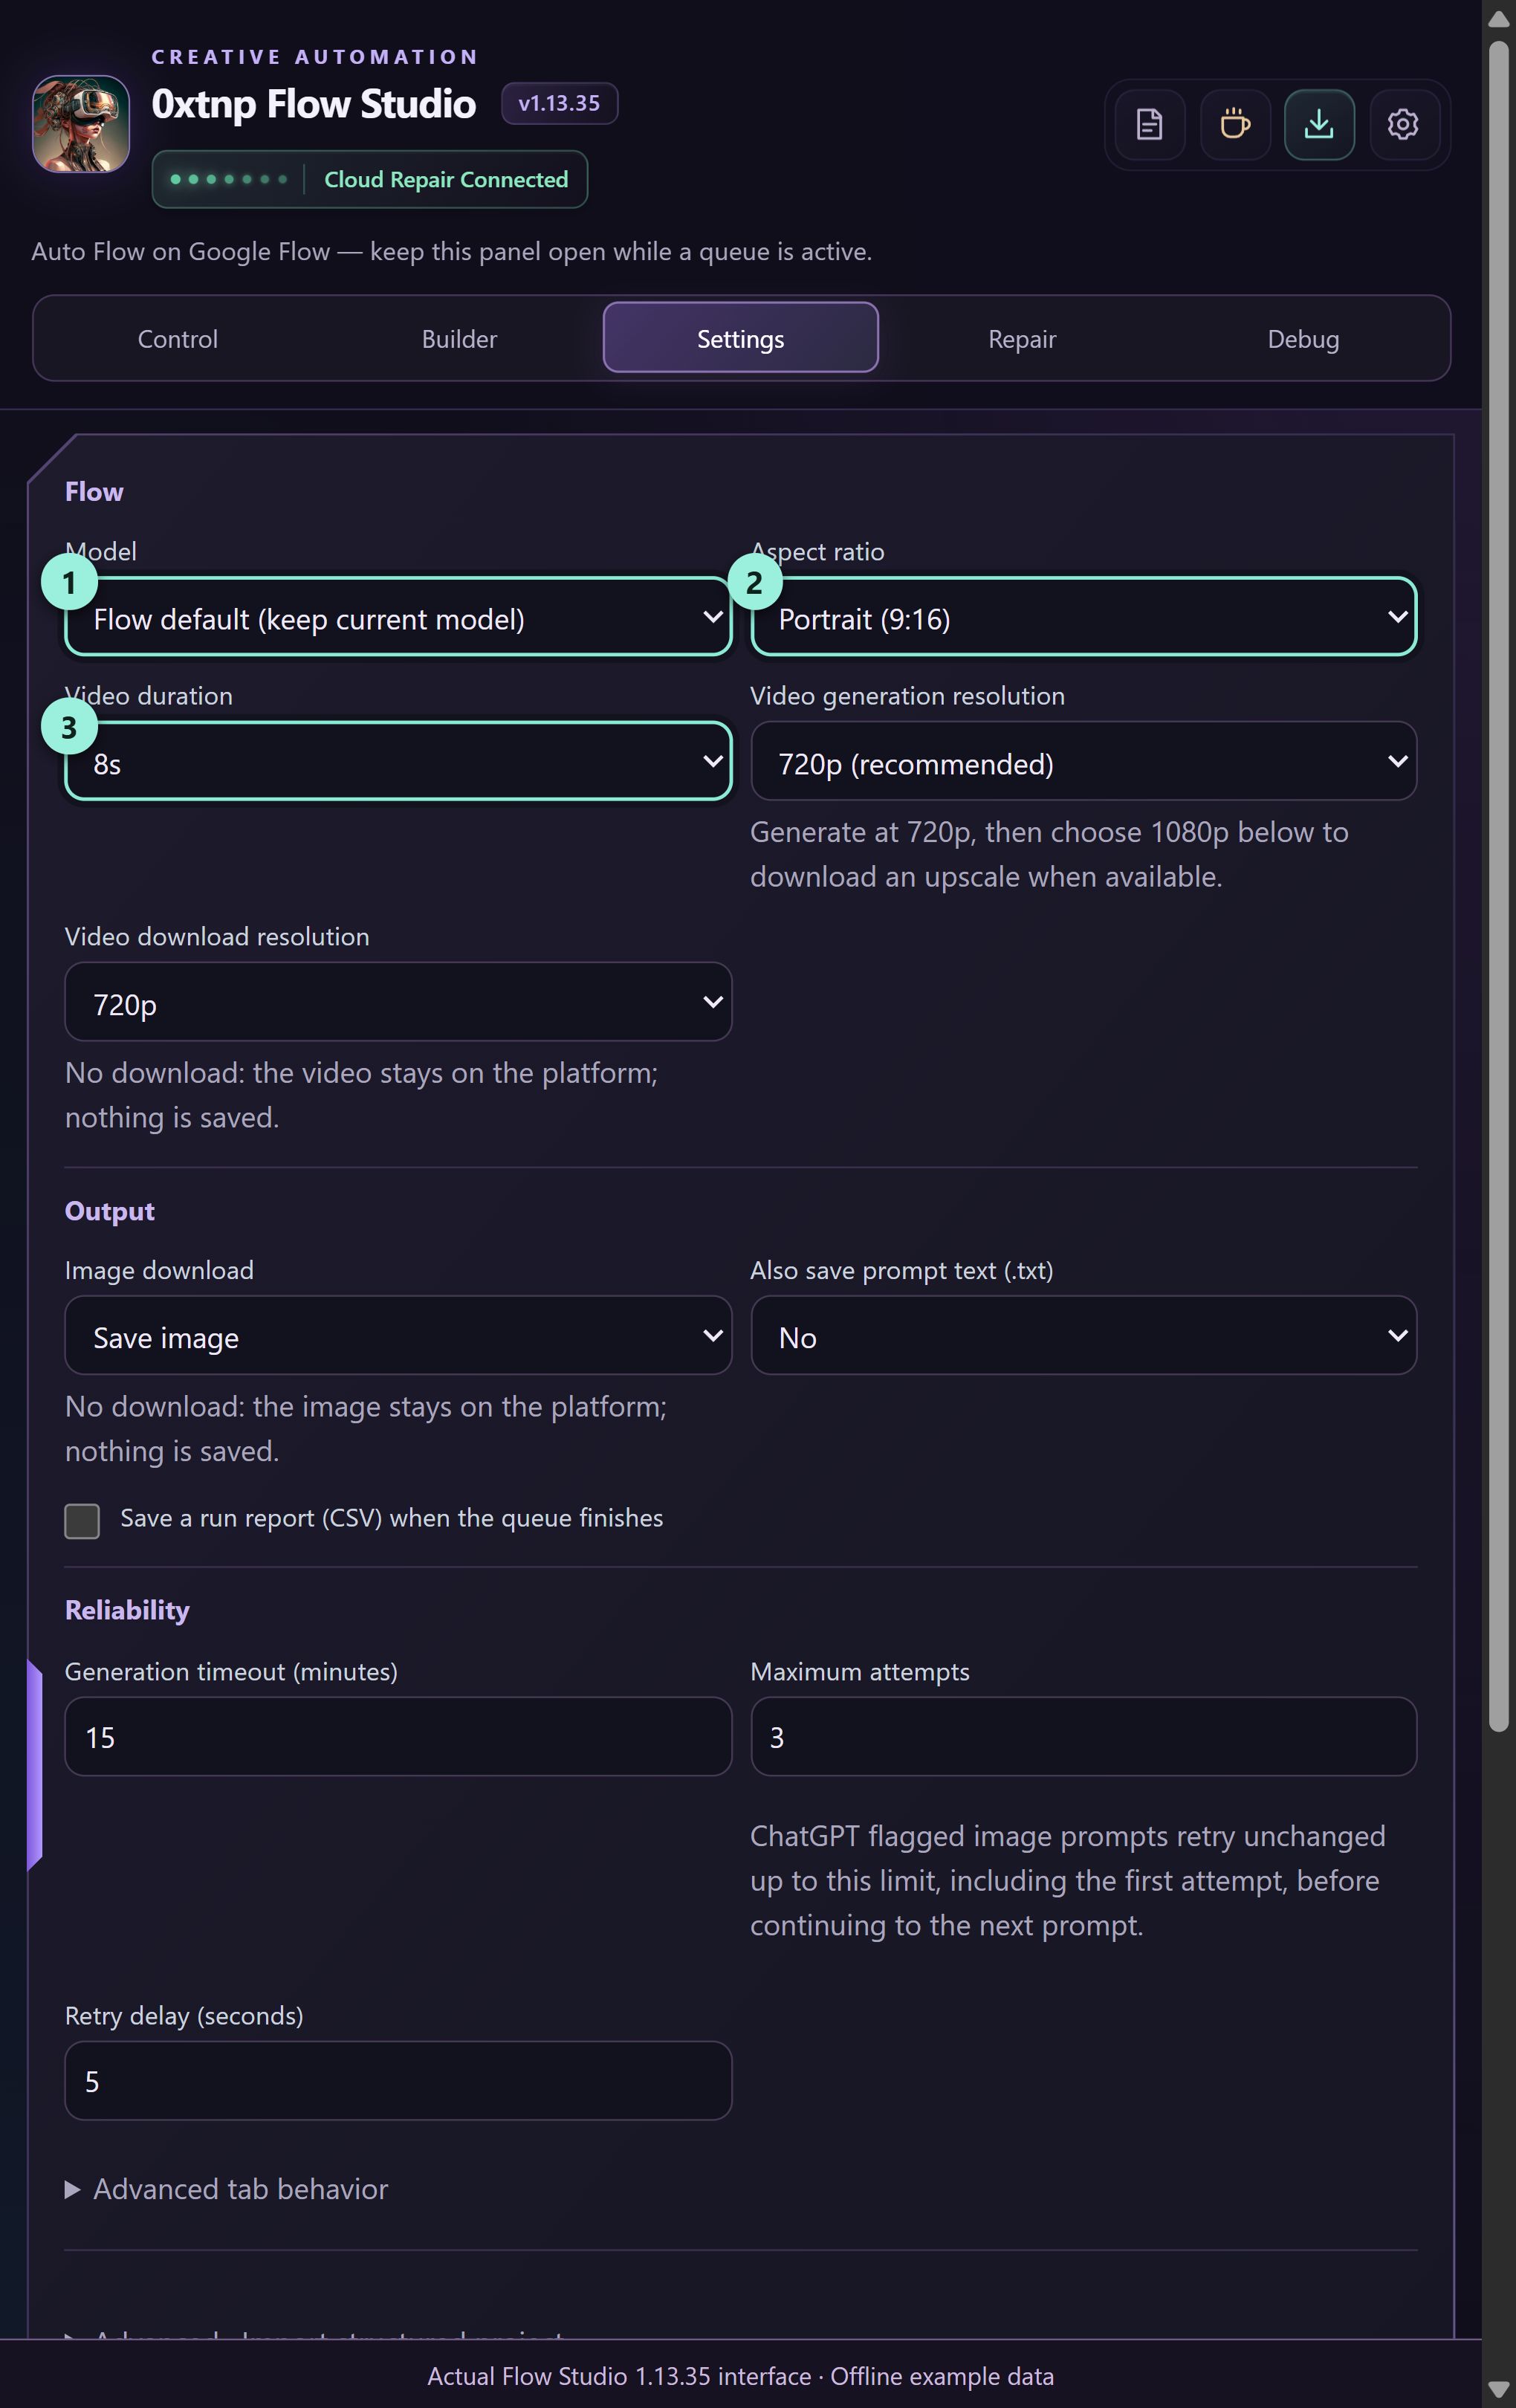
What you should seeYour selected platform, mode and scene duration agree with each other.
PLATFORM WALKTHROUGHS
Use ChatGPT step by step
Create pictures or edit source images using the extension’s ChatGPT workflow. ChatGPT video generation is not supported by this extension.
Sign in to ChatGPT
Open https://chatgpt.com/ in the same Chrome profile as Flow Studio and sign in. Leave a normal chat with its message box ready. Builder sign-in is separate from this website account.
ChatGPT WORKFLOW
Text to Image
Create a new picture from words.
Choose ChatGPT
Open Flow Studio → Control. In the Platform row, click ChatGPT. Confirm that ChatGPT is the selected platform.
Step 1 · Actual interface · example data · click to enlarge Choose Text to Image
Below the Platform row, click Text to Image. Check the highlighted mode before continuing.
Step 2 · Actual interface · example data · click to enlarge Add your text prompt
Click the Prompts text box and type or paste your instruction. Example: “Create a vertical claymation image of a cheerful Filipino cook preparing vegetables in a bright kitchen. No text.” For a batch, put one blank line between prompts. Check the displayed prompt count.
Step 3 · Actual interface · example data · click to enlarge Choose the save folder
In Control, scroll to Save to folder. Enter a subfolder name such as ChatGPT Images. Chrome saves inside its configured download location; this field is not a full disk path. Choose Auto change file name on for numbered prompt-based filenames, or off to keep platform filenames.
Step 4 · Actual interface · example data · click to enlarge Enable image saving
Open the panel’s Settings tab. Set Image download to Save image. Click Save settings, then return to Control. You can also check the gear → Settings auto-download preference.
Step 5 · Actual interface · example data · click to enlarge Check the generation options
Use Concurrent Prompts = 1 for the first run. ChatGPT uses the current task conversation, so earlier messages can affect the result. Wait for any existing reply to finish.
Step 6 · Actual interface · example data · click to enlarge Check one prompt is queued
Use one prompt for the first test. ChatGPT follows its image workflow in the shared task conversation.
Step 7 · Actual interface · example data · click to enlarge Click Generate
Scroll to the Run card and click Start generation (shown as Start in some versions). This is the Generate action. Keep the panel and platform tab open. Avoid typing into the platform while the queue runs.
Step 8 · Actual interface · example data · click to enlarge Check the result and saved file
Watch Queue until the item is done. Open the finished image and inspect it. Open Chrome Downloads to confirm the file is in your chosen subfolder. If the item fails, read its error, correct the cause, then click Retry failed.
Step 9 · Actual interface · example data · click to enlarge
ChatGPT WORKFLOW
Image to Image
Create or edit a picture using uploaded source images.
Choose ChatGPT
Open Flow Studio → Control. In the Platform row, click ChatGPT. Confirm that ChatGPT is the selected platform.
Step 1 · Actual interface · example data · click to enlarge Choose Image to Image
Below the Platform row, click Image to Image. Check the highlighted mode before continuing.
Step 2 · Actual interface · example data · click to enlarge Upload your reference pictures
In Images, click Upload images and select your source picture. Start with one file named Cook.png. For multiple references, give every file a distinct name and inspect its thumbnail.
Step 3 · Actual interface · example data · click to enlarge Add your text prompt
Click the Prompts text box and type or paste your instruction. Example: “Use @Cook as the character reference. Show the same cook smiling beside a bowl of vegetables in a bright kitchen. Keep the outfit and face consistent. No text.” For a batch, put one blank line between prompts. Check the displayed prompt count.
Step 4 · Actual interface · example data · click to enlarge Check which pictures this prompt uses
Enable Automatically match reference images if using @names. Cook.png matches @Cook; Kitchen.png matches @Kitchen. Inspect the per-prompt reference cards. Where Image Processing Option is shown, choose all images, first image, or ordered pairs to match your task. Do not start with an unmatched reference.
Step 5 · Actual interface · example data · click to enlarge Choose the save folder
In Control, scroll to Save to folder. Enter a subfolder name such as ChatGPT Images. Chrome saves inside its configured download location; this field is not a full disk path. Choose Auto change file name on for numbered prompt-based filenames, or off to keep platform filenames.
Step 6 · Actual interface · example data · click to enlarge Enable image saving
Open the panel’s Settings tab. Set Image download to Save image. Click Save settings, then return to Control. You can also check the gear → Settings auto-download preference.
Step 7 · Actual interface · example data · click to enlarge Check the generation options
Use Concurrent Prompts = 1 for the first run. ChatGPT uses the current task conversation, so earlier messages can affect the result. Wait for any existing reply to finish.
Step 8 · Actual interface · example data · click to enlarge Check one prompt is queued
Use one prompt for the first test. ChatGPT follows its image workflow in the shared task conversation.
Step 9 · Actual interface · example data · click to enlarge Click Generate
Scroll to the Run card and click Start generation (shown as Start in some versions). This is the Generate action. Keep the panel and platform tab open. Avoid typing into the platform while the queue runs.
Step 10 · Actual interface · example data · click to enlarge Check the result and saved file
Watch Queue until the item is done. Open the finished image and inspect it. Open Chrome Downloads to confirm the file is in your chosen subfolder. If the item fails, read its error, correct the cause, then click Retry failed.
Step 11 · Actual interface · example data · click to enlarge
Use ChatGPT step by step
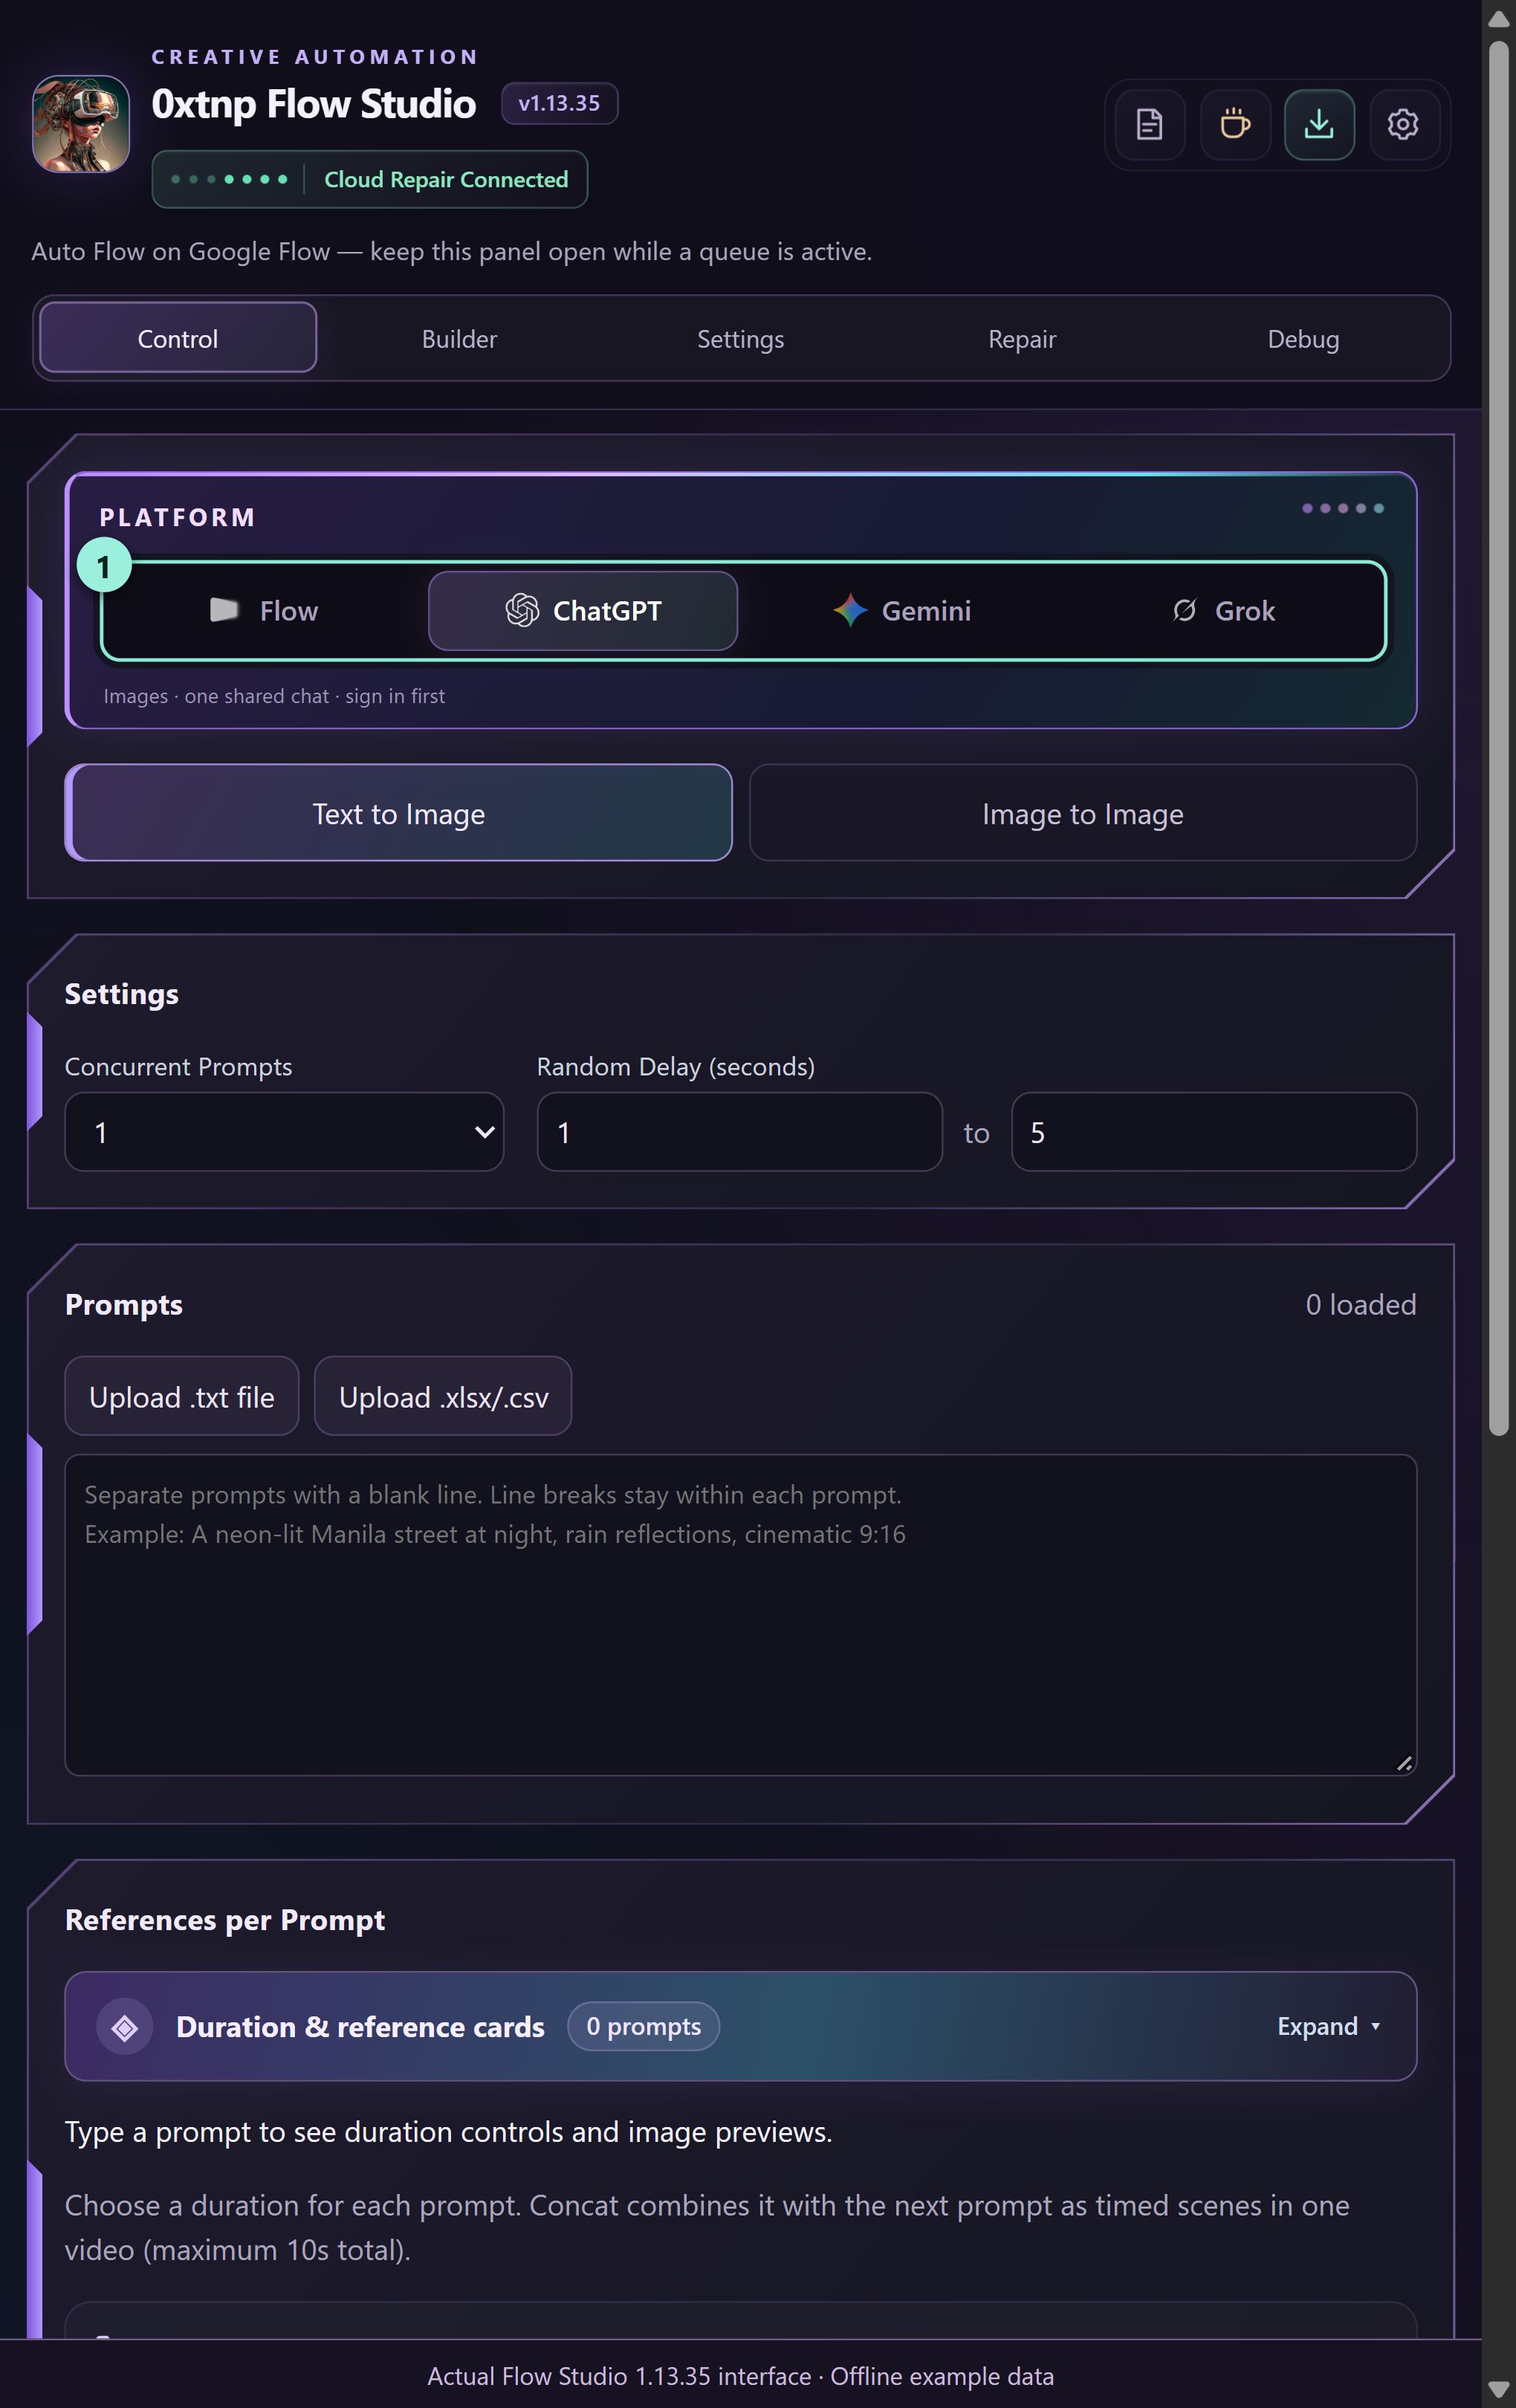
What you should seeAn image appears in the ChatGPT conversation and the corresponding queue item completes.
PLATFORM WALKTHROUGHS
Use Grok step by step
Use Grok Imagine for pictures, image editing and supported video workflows. Begin with one image to check your account and settings.
Open Grok Imagine
Open https://grok.com/imagine in Chrome and sign in. Confirm the Imagine composer is available to your account.
Grok WORKFLOW
Text to Image
Create a new picture from words.
Choose Grok
Open Flow Studio → Control. In the Platform row, click Grok. Confirm that Grok is the selected platform. If Chrome requests Grok site access for the extension, review and allow it to use this workflow.
Step 1 · Actual interface · example data · click to enlarge Choose Text to Image
Below the Platform row, click Text to Image. Check the highlighted mode before continuing.
Step 2 · Actual interface · example data · click to enlarge Add your text prompt
Click the Prompts text box and type or paste your instruction. Example: “Create a vertical claymation image of a cheerful Filipino cook preparing vegetables in a bright kitchen. No text.” For a batch, put one blank line between prompts. Check the displayed prompt count.
Step 3 · Actual interface · example data · click to enlarge Choose the save folder
In Control, scroll to Save to folder. Enter a subfolder name such as Grok Images. Chrome saves inside its configured download location; this field is not a full disk path. Choose Auto change file name on for numbered prompt-based filenames, or off to keep platform filenames.
Step 4 · Actual interface · example data · click to enlarge Enable image saving
Open the panel’s Settings tab. Set Image download to Save image. Click Save settings, then return to Control. You can also check the gear → Settings auto-download preference.
Step 5 · Actual interface · example data · click to enlarge Check the generation options
In Settings, choose Grok image quality: Speed or Quality 2.0. The extension applies that choice before uploading attachments. Save settings and return to Control. Use Concurrent Prompts = 1 for your first test.
Step 6 · Actual interface · example data · click to enlarge Choose how many outputs to make
In Control, set Outputs per Prompt to 1 for the first test. Increase it only after confirming one item works as expected.
Step 7 · Actual interface · example data · click to enlarge Click Generate
Scroll to the Run card and click Start generation (shown as Start in some versions). This is the Generate action. Keep the panel and platform tab open. Avoid typing into the platform while the queue runs.
Step 8 · Actual interface · example data · click to enlarge Check the result and saved file
Watch Queue until the item is done. Open the finished image and inspect it. Open Chrome Downloads to confirm the file is in your chosen subfolder. If the item fails, read its error, correct the cause, then click Retry failed.
Step 9 · Actual interface · example data · click to enlarge
Grok WORKFLOW
Image to Image
Create or edit a picture using uploaded source images.
Choose Grok
Open Flow Studio → Control. In the Platform row, click Grok. Confirm that Grok is the selected platform. If Chrome requests Grok site access for the extension, review and allow it to use this workflow.
Step 1 · Actual interface · example data · click to enlarge Choose Image to Image
Below the Platform row, click Image to Image. Check the highlighted mode before continuing.
Step 2 · Actual interface · example data · click to enlarge Upload your reference pictures
In Images, click Upload images and select your source picture. Start with one file named Cook.png. For multiple references, give every file a distinct name and inspect its thumbnail.
Step 3 · Actual interface · example data · click to enlarge Add your text prompt
Click the Prompts text box and type or paste your instruction. Example: “Use @Cook as the character reference. Show the same cook smiling beside a bowl of vegetables in a bright kitchen. Keep the outfit and face consistent. No text.” For a batch, put one blank line between prompts. Check the displayed prompt count.
Step 4 · Actual interface · example data · click to enlarge Check which pictures this prompt uses
Enable Automatically match reference images if using @names. Cook.png matches @Cook; Kitchen.png matches @Kitchen. Inspect the per-prompt reference cards. Where Image Processing Option is shown, choose all images, first image, or ordered pairs to match your task. Do not start with an unmatched reference.
Step 5 · Actual interface · example data · click to enlarge Choose the save folder
In Control, scroll to Save to folder. Enter a subfolder name such as Grok Images. Chrome saves inside its configured download location; this field is not a full disk path. Choose Auto change file name on for numbered prompt-based filenames, or off to keep platform filenames.
Step 6 · Actual interface · example data · click to enlarge Enable image saving
Open the panel’s Settings tab. Set Image download to Save image. Click Save settings, then return to Control. You can also check the gear → Settings auto-download preference.
Step 7 · Actual interface · example data · click to enlarge Check the generation options
In Settings, choose Grok image quality: Speed or Quality 2.0. The extension applies that choice before uploading attachments. Save settings and return to Control. Use Concurrent Prompts = 1 for your first test.
Step 8 · Actual interface · example data · click to enlarge Check Grok reference names
Matched @names can become Grok Image 1/Image 2 attachment chips. Make each instruction refer clearly to the intended picture; correct missing or incorrect matches before starting.
Step 9 · Actual interface · example data · click to enlarge Choose how many outputs to make
In Control, set Outputs per Prompt to 1 for the first test. Increase it only after confirming one item works as expected.
Step 10 · Actual interface · example data · click to enlarge Click Generate
Scroll to the Run card and click Start generation (shown as Start in some versions). This is the Generate action. Keep the panel and platform tab open. Avoid typing into the platform while the queue runs.
Step 11 · Actual interface · example data · click to enlarge Check the result and saved file
Watch Queue until the item is done. Open the finished image and inspect it. Open Chrome Downloads to confirm the file is in your chosen subfolder. If the item fails, read its error, correct the cause, then click Retry failed.
Step 12 · Actual interface · example data · click to enlarge
Grok WORKFLOW
Text to Video
Create a moving clip from a written description.
Choose Grok
Open Flow Studio → Control. In the Platform row, click Grok. Confirm that Grok is the selected platform. If Chrome requests Grok site access for the extension, review and allow it to use this workflow.
Step 1 · Actual interface · example data · click to enlarge Choose Text to Video
Below the Platform row, click Text to Video. Check the highlighted mode before continuing.
Step 2 · Actual interface · example data · click to enlarge Add your text prompt
Click the Prompts text box and type or paste your instruction. Example: “A cheerful claymation cook gently stirs a pot, then smiles at the camera. One continuous shot, slow push-in, natural kitchen sounds, no text.” For a batch, put one blank line between prompts. Check the displayed prompt count.
Step 3 · Actual interface · example data · click to enlarge Choose the save folder
In Control, scroll to Save to folder. Enter a subfolder name such as Grok Videos. Chrome saves inside its configured download location; this field is not a full disk path. Choose Auto change file name on for numbered prompt-based filenames, or off to keep platform filenames.
Step 4 · Actual interface · example data · click to enlarge Enable video saving
Open the panel’s Settings tab. Choose a video download resolution instead of No download. Click Save settings, then return to Control. You can also check the gear → Settings auto-download preference.
Step 5 · Actual interface · example data · click to enlarge Check the generation options
In Settings, check Grok video duration, aspect ratio and generation quality. Download quality can differ from generation quality. Save settings and return to Control. Use Concurrent Prompts = 1 for your first test.
Step 6 · Actual interface · example data · click to enlarge Choose how many outputs to make
In Control, set Outputs per Prompt to 1 for the first test. Increase it only after confirming one item works as expected.
Step 7 · Actual interface · example data · click to enlarge Click Generate
Scroll to the Run card and click Start generation (shown as Start in some versions). This is the Generate action. Keep the panel and platform tab open. Avoid typing into the platform while the queue runs.
Step 8 · Actual interface · example data · click to enlarge Check the result and saved file
Watch Queue until the item is done. Play the clip and check its motion, sound and ending. Open Chrome Downloads to confirm the file is in your chosen subfolder. If the item fails, read its error, correct the cause, then click Retry failed.
Step 9 · Actual interface · example data · click to enlarge
Grok WORKFLOW
Frame to Video
Animate an uploaded starting picture.
Choose Grok
Open Flow Studio → Control. In the Platform row, click Grok. Confirm that Grok is the selected platform. If Chrome requests Grok site access for the extension, review and allow it to use this workflow.
Step 1 · Actual interface · example data · click to enlarge Choose Frame to Video
Below the Platform row, click Frame to Video. Check the highlighted mode before continuing.
Step 2 · Actual interface · example data · click to enlarge Upload your starting frame
In Images, click Upload images (or drop a picture into the upload area). Begin with one clear starting frame. For several scenes, arrange the thumbnails in scene order and verify which frame is assigned to each prompt.
Step 3 · Actual interface · example data · click to enlarge Add your text prompt
Click the Prompts text box and type or paste your instruction. Example: “Animate the supplied starting frame. The cook gently stirs the pot and smiles. Keep the character, clothing and kitchen consistent. Slow push-in, no text.” For a batch, put one blank line between prompts. Check the displayed prompt count.
Step 4 · Actual interface · example data · click to enlarge Check which pictures this prompt uses
Check the assigned starting picture before generating. Where Image Processing Option is shown, select the intended start-frame or ordered-pair behavior. For your first test, use one frame and one prompt.
Step 5 · Actual interface · example data · click to enlarge Choose the save folder
In Control, scroll to Save to folder. Enter a subfolder name such as Grok Videos. Chrome saves inside its configured download location; this field is not a full disk path. Choose Auto change file name on for numbered prompt-based filenames, or off to keep platform filenames.
Step 6 · Actual interface · example data · click to enlarge Enable video saving
Open the panel’s Settings tab. Choose a video download resolution instead of No download. Click Save settings, then return to Control. You can also check the gear → Settings auto-download preference.
Step 7 · Actual interface · example data · click to enlarge Check the generation options
In Settings, check Grok video duration, aspect ratio and generation quality. Download quality can differ from generation quality. Save settings and return to Control. Use Concurrent Prompts = 1 for your first test.
Step 8 · Actual interface · example data · click to enlarge Choose how many outputs to make
In Control, set Outputs per Prompt to 1 for the first test. Increase it only after confirming one item works as expected.
Step 9 · Actual interface · example data · click to enlarge Click Generate
Scroll to the Run card and click Start generation (shown as Start in some versions). This is the Generate action. Keep the panel and platform tab open. Avoid typing into the platform while the queue runs.
Step 10 · Actual interface · example data · click to enlarge Check the result and saved file
Watch Queue until the item is done. Play the clip and check its motion, sound and ending. Open Chrome Downloads to confirm the file is in your chosen subfolder. If the item fails, read its error, correct the cause, then click Retry failed.
Step 11 · Actual interface · example data · click to enlarge
Grok WORKFLOW
Ingredients to Video
Create a clip using character, location or other reference pictures.
Choose Grok
Open Flow Studio → Control. In the Platform row, click Grok. Confirm that Grok is the selected platform. If Chrome requests Grok site access for the extension, review and allow it to use this workflow.
Step 1 · Actual interface · example data · click to enlarge Choose Ingredients to Video
Below the Platform row, click Ingredients to Video. Check the highlighted mode before continuing.
Step 2 · Actual interface · example data · click to enlarge Upload your reference pictures
In Images, click Upload images and add your references, for example Cook.png and Kitchen.png. Use distinct filenames so character and location references cannot be confused.
Step 3 · Actual interface · example data · click to enlarge Add your text prompt
Click the Prompts text box and type or paste your instruction. Example: “Use @Cook for the character and @Kitchen for the setting. The cook places a bowl on the counter and smiles. Gentle camera movement, no text.” For a batch, put one blank line between prompts. Check the displayed prompt count.
Step 4 · Actual interface · example data · click to enlarge Check which pictures this prompt uses
Enable Automatically match reference images if using @names. Cook.png matches @Cook; Kitchen.png matches @Kitchen. Inspect the per-prompt reference cards. Where Image Processing Option is shown, choose all images, first image, or ordered pairs to match your task. Do not start with an unmatched reference.
Step 5 · Actual interface · example data · click to enlarge Choose the save folder
In Control, scroll to Save to folder. Enter a subfolder name such as Grok Videos. Chrome saves inside its configured download location; this field is not a full disk path. Choose Auto change file name on for numbered prompt-based filenames, or off to keep platform filenames.
Step 6 · Actual interface · example data · click to enlarge Enable video saving
Open the panel’s Settings tab. Choose a video download resolution instead of No download. Click Save settings, then return to Control. You can also check the gear → Settings auto-download preference.
Step 7 · Actual interface · example data · click to enlarge Check the generation options
In Settings, check Grok video duration, aspect ratio and generation quality. Download quality can differ from generation quality. Save settings and return to Control. Use Concurrent Prompts = 1 for your first test.
Step 8 · Actual interface · example data · click to enlarge Choose how many outputs to make
In Control, set Outputs per Prompt to 1 for the first test. Increase it only after confirming one item works as expected.
Step 9 · Actual interface · example data · click to enlarge Click Generate
Scroll to the Run card and click Start generation (shown as Start in some versions). This is the Generate action. Keep the panel and platform tab open. Avoid typing into the platform while the queue runs.
Step 10 · Actual interface · example data · click to enlarge Check the result and saved file
Watch Queue until the item is done. Play the clip and check its motion, sound and ending. Open Chrome Downloads to confirm the file is in your chosen subfolder. If the item fails, read its error, correct the cause, then click Retry failed.
Step 11 · Actual interface · example data · click to enlarge
Use Grok step by step
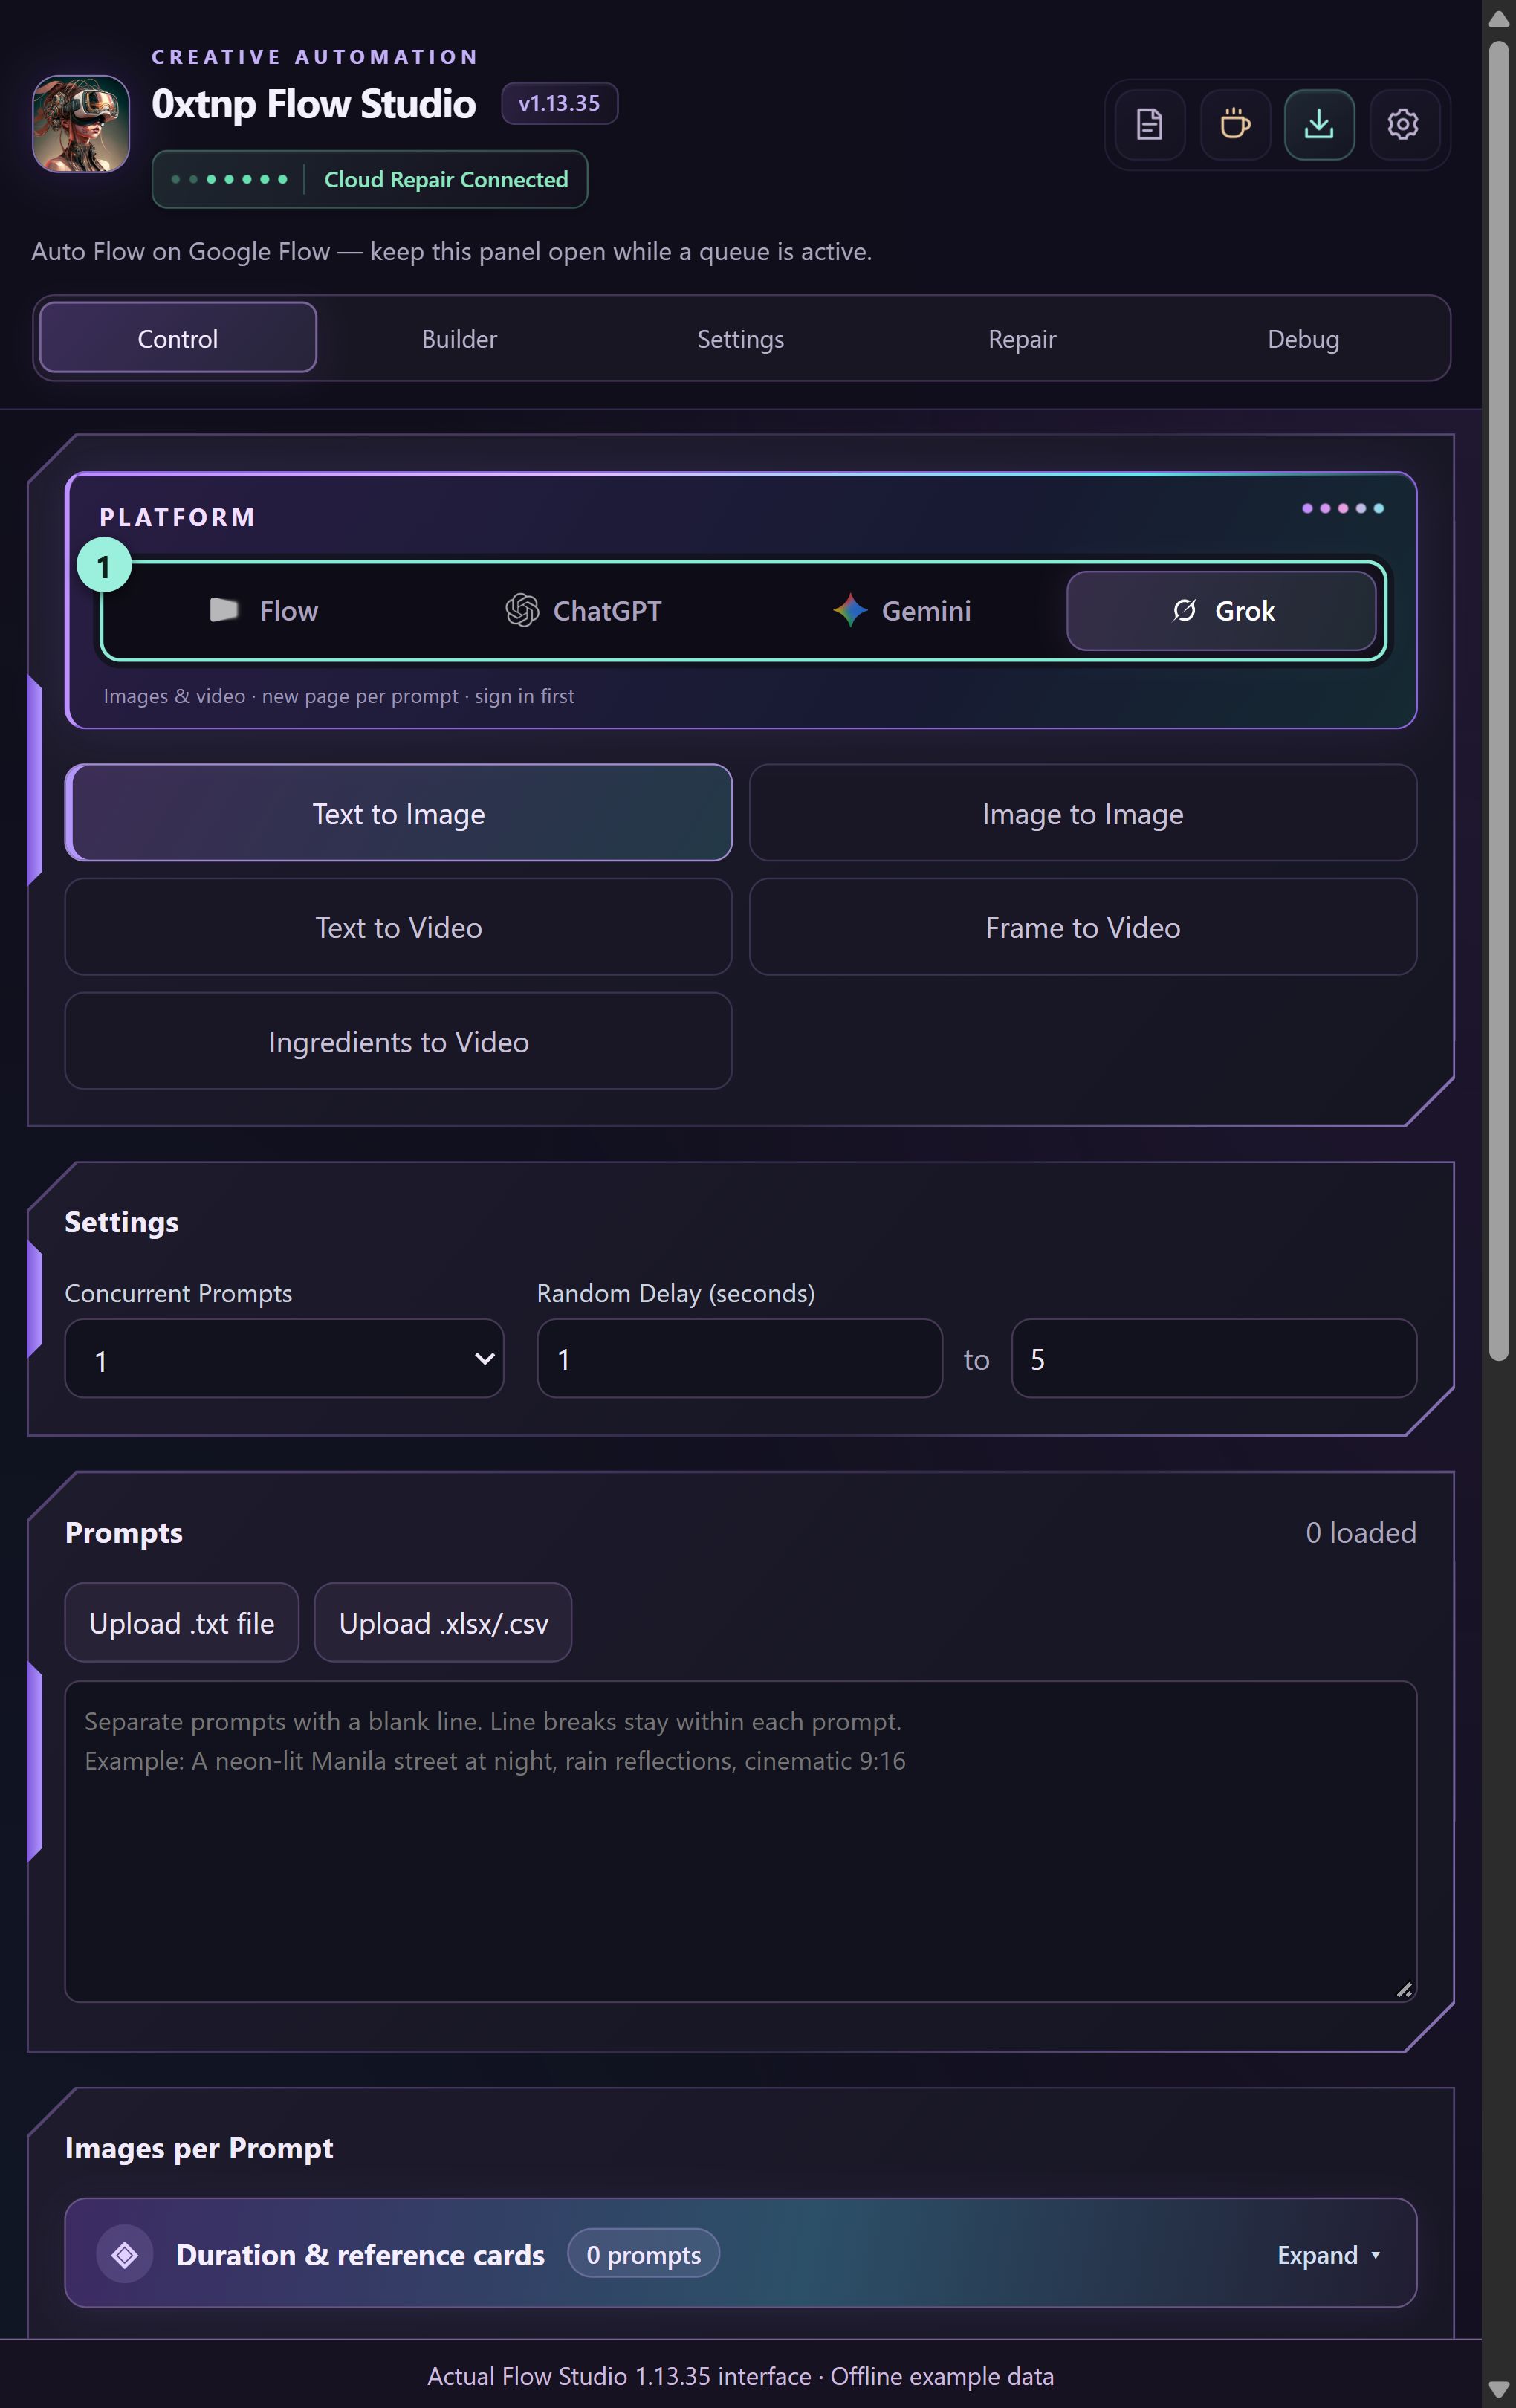
What you should seeCompleted items have their image or video result on Grok Imagine, with saved files when downloads are enabled.
PLATFORM WALKTHROUGHS
Use Gemini step by step
Image jobs use Gemini Images; video jobs use Gemini Videos. The required tool must be available on the Google account you use.
Sign in and check the tool
Open https://gemini.google.com/images for pictures or https://gemini.google.com/videos for clips. Sign in and confirm the needed composer loads.
Pick the model and thinking level
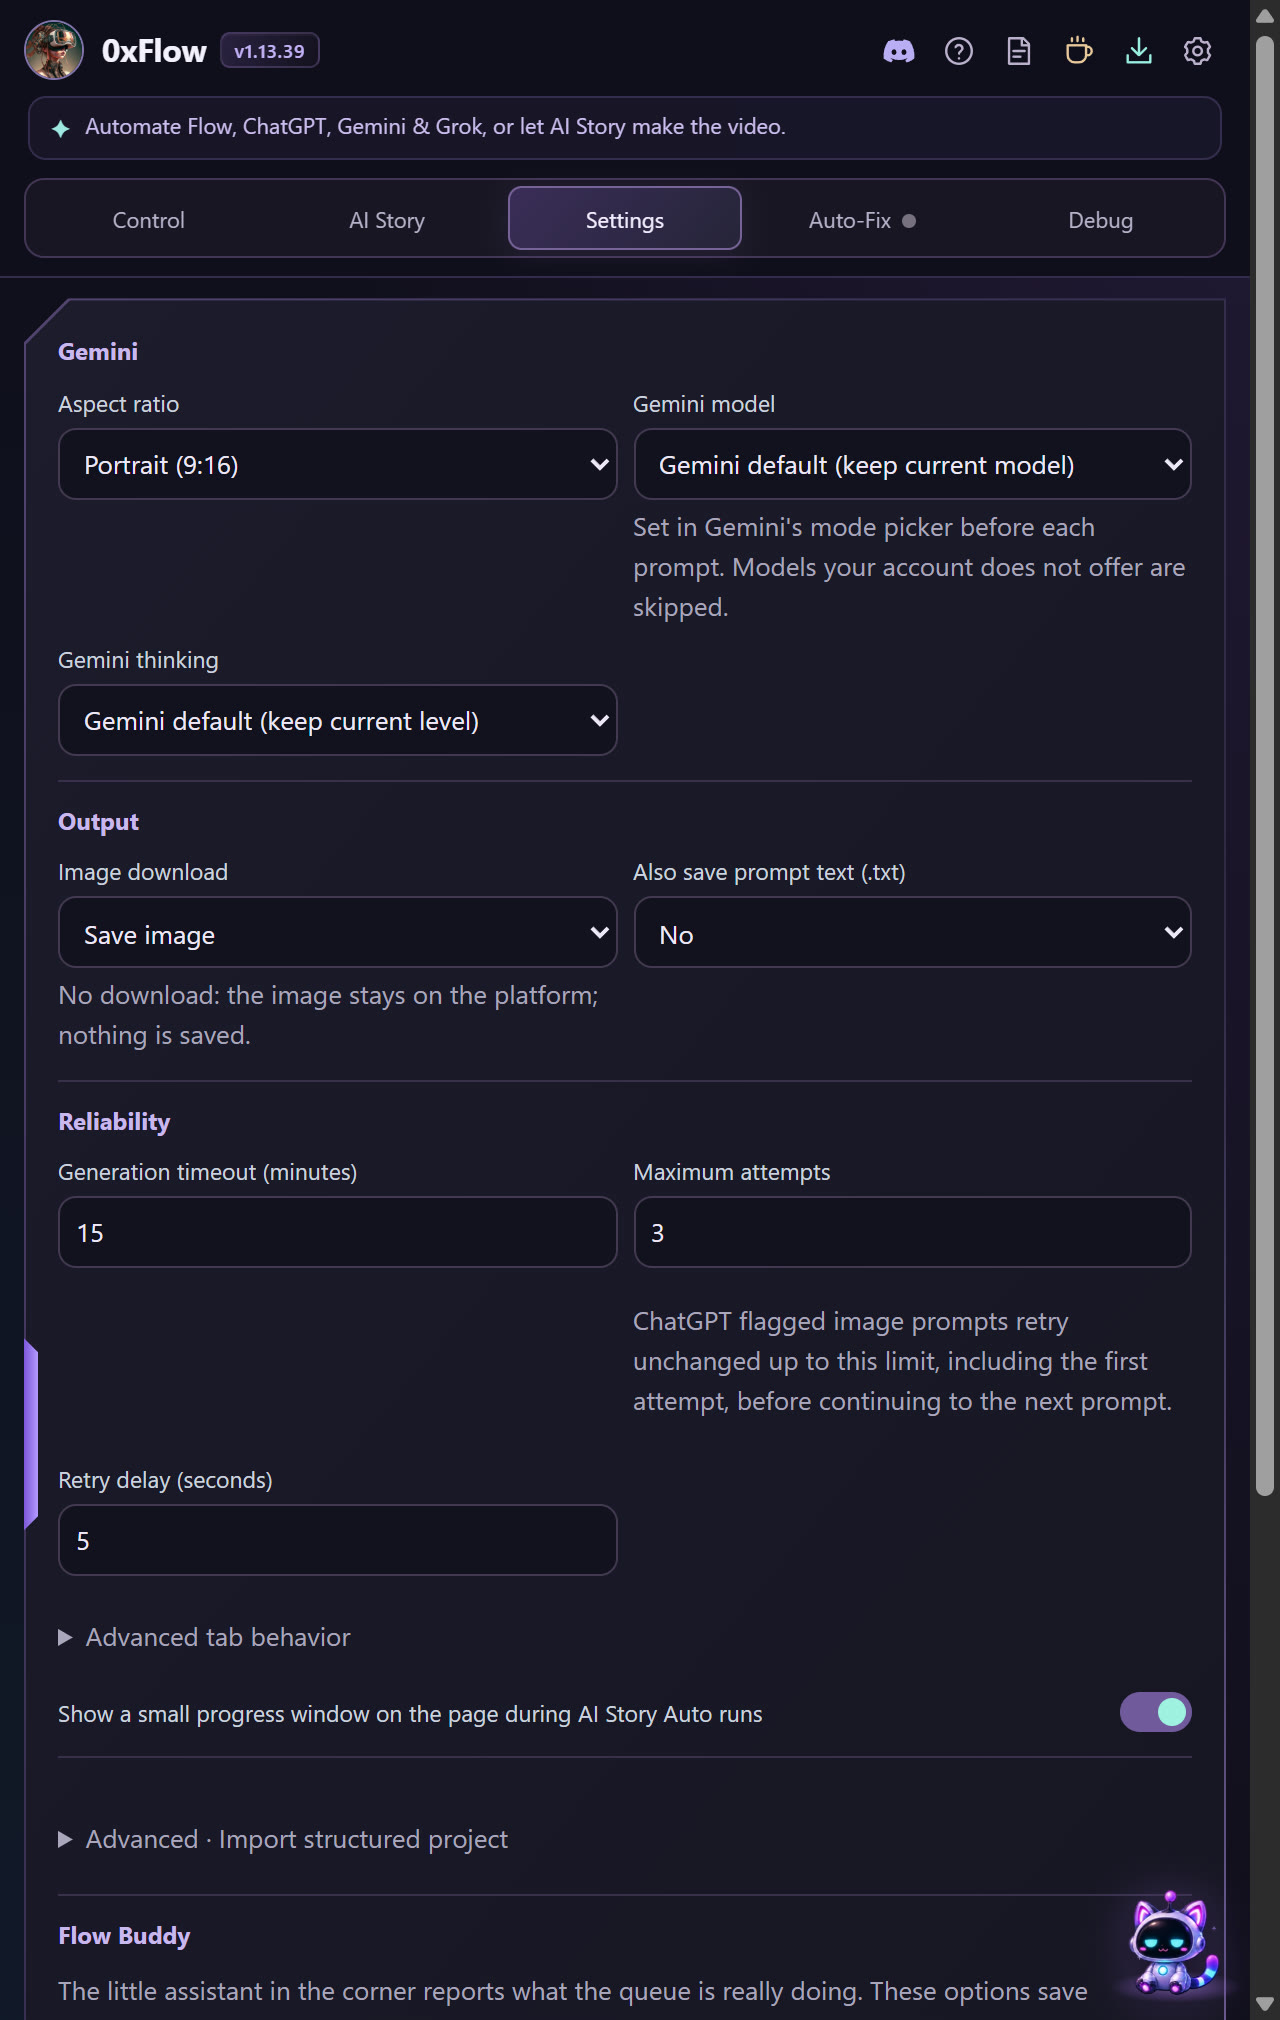
Optional. In panel Settings choose Gemini model — Flash-Lite · fastest, Flash · all-around, Pro · advanced reasoning or Argon · complex tasks — and a Gemini thinking level. Flow Studio sets the model in Gemini’s own mode picker before each prompt and skips models your account does not offer. Leave both on Gemini default to keep whatever is selected.
Gemini model and thinking picker
Gemini WORKFLOW
Text to Image
Create a new picture from words.
Choose Gemini
Open Flow Studio → Control. In the Platform row, click Gemini. Confirm that Gemini is the selected platform.
Step 1 · Actual interface · example data · click to enlarge Choose Text to Image
Below the Platform row, click Text to Image. Check the highlighted mode before continuing.
Step 2 · Actual interface · example data · click to enlarge Add your text prompt
Click the Prompts text box and type or paste your instruction. Example: “Create a vertical claymation image of a cheerful Filipino cook preparing vegetables in a bright kitchen. No text.” For a batch, put one blank line between prompts. Check the displayed prompt count.
Step 3 · Actual interface · example data · click to enlarge Choose the save folder
In Control, scroll to Save to folder. Enter a subfolder name such as Gemini Images. Chrome saves inside its configured download location; this field is not a full disk path. Choose Auto change file name on for numbered prompt-based filenames, or off to keep platform filenames.
Step 4 · Actual interface · example data · click to enlarge Enable image saving
Open the panel’s Settings tab. Set Image download to Save image. Click Save settings, then return to Control. You can also check the gear → Settings auto-download preference.
Step 5 · Actual interface · example data · click to enlarge Check the generation options
Check aspect ratio in Settings and save. Confirm Gemini Images is available on your account. Return to Control and use Concurrent Prompts = 1 for your first test.
Step 6 · Actual interface · example data · click to enlarge Choose how many outputs to make
In Control, set Outputs per Prompt to 1 for the first test. Increase it only after confirming one item works as expected.
Step 7 · Actual interface · example data · click to enlarge Click Generate
Scroll to the Run card and click Start generation (shown as Start in some versions). This is the Generate action. Keep the panel and platform tab open. Avoid typing into the platform while the queue runs.
Step 8 · Actual interface · example data · click to enlarge Check the result and saved file
Watch Queue until the item is done. Open the finished image and inspect it. Open Chrome Downloads to confirm the file is in your chosen subfolder. If the item fails, read its error, correct the cause, then click Retry failed.
Step 9 · Actual interface · example data · click to enlarge
Gemini WORKFLOW
Image to Image
Create or edit a picture using uploaded source images.
Choose Gemini
Open Flow Studio → Control. In the Platform row, click Gemini. Confirm that Gemini is the selected platform.
Step 1 · Actual interface · example data · click to enlarge Choose Image to Image
Below the Platform row, click Image to Image. Check the highlighted mode before continuing.
Step 2 · Actual interface · example data · click to enlarge Upload your reference pictures
In Images, click Upload images and select your source picture. Start with one file named Cook.png. For multiple references, give every file a distinct name and inspect its thumbnail.
Step 3 · Actual interface · example data · click to enlarge Add your text prompt
Click the Prompts text box and type or paste your instruction. Example: “Use @Cook as the character reference. Show the same cook smiling beside a bowl of vegetables in a bright kitchen. Keep the outfit and face consistent. No text.” For a batch, put one blank line between prompts. Check the displayed prompt count.
Step 4 · Actual interface · example data · click to enlarge Check which pictures this prompt uses
Enable Automatically match reference images if using @names. Cook.png matches @Cook; Kitchen.png matches @Kitchen. Inspect the per-prompt reference cards. Where Image Processing Option is shown, choose all images, first image, or ordered pairs to match your task. Do not start with an unmatched reference.
Step 5 · Actual interface · example data · click to enlarge Choose the save folder
In Control, scroll to Save to folder. Enter a subfolder name such as Gemini Images. Chrome saves inside its configured download location; this field is not a full disk path. Choose Auto change file name on for numbered prompt-based filenames, or off to keep platform filenames.
Step 6 · Actual interface · example data · click to enlarge Enable image saving
Open the panel’s Settings tab. Set Image download to Save image. Click Save settings, then return to Control. You can also check the gear → Settings auto-download preference.
Step 7 · Actual interface · example data · click to enlarge Check the generation options
Check aspect ratio in Settings and save. Confirm Gemini Images is available on your account. Return to Control and use Concurrent Prompts = 1 for your first test.
Step 8 · Actual interface · example data · click to enlarge Choose how many outputs to make
In Control, set Outputs per Prompt to 1 for the first test. Increase it only after confirming one item works as expected.
Step 9 · Actual interface · example data · click to enlarge Click Generate
Scroll to the Run card and click Start generation (shown as Start in some versions). This is the Generate action. Keep the panel and platform tab open. Avoid typing into the platform while the queue runs.
Step 10 · Actual interface · example data · click to enlarge Check the result and saved file
Watch Queue until the item is done. Open the finished image and inspect it. Open Chrome Downloads to confirm the file is in your chosen subfolder. If the item fails, read its error, correct the cause, then click Retry failed.
Step 11 · Actual interface · example data · click to enlarge
Gemini WORKFLOW
Text to Video
Create a moving clip from a written description.
Choose Gemini
Open Flow Studio → Control. In the Platform row, click Gemini. Confirm that Gemini is the selected platform.
Step 1 · Actual interface · example data · click to enlarge Choose Text to Video
Below the Platform row, click Text to Video. Check the highlighted mode before continuing.
Step 2 · Actual interface · example data · click to enlarge Add your text prompt
Click the Prompts text box and type or paste your instruction. Example: “A cheerful claymation cook gently stirs a pot, then smiles at the camera. One continuous shot, slow push-in, natural kitchen sounds, no text.” For a batch, put one blank line between prompts. Check the displayed prompt count.
Step 3 · Actual interface · example data · click to enlarge Choose the save folder
In Control, scroll to Save to folder. Enter a subfolder name such as Gemini Videos. Chrome saves inside its configured download location; this field is not a full disk path. Choose Auto change file name on for numbered prompt-based filenames, or off to keep platform filenames.
Step 4 · Actual interface · example data · click to enlarge Enable video saving
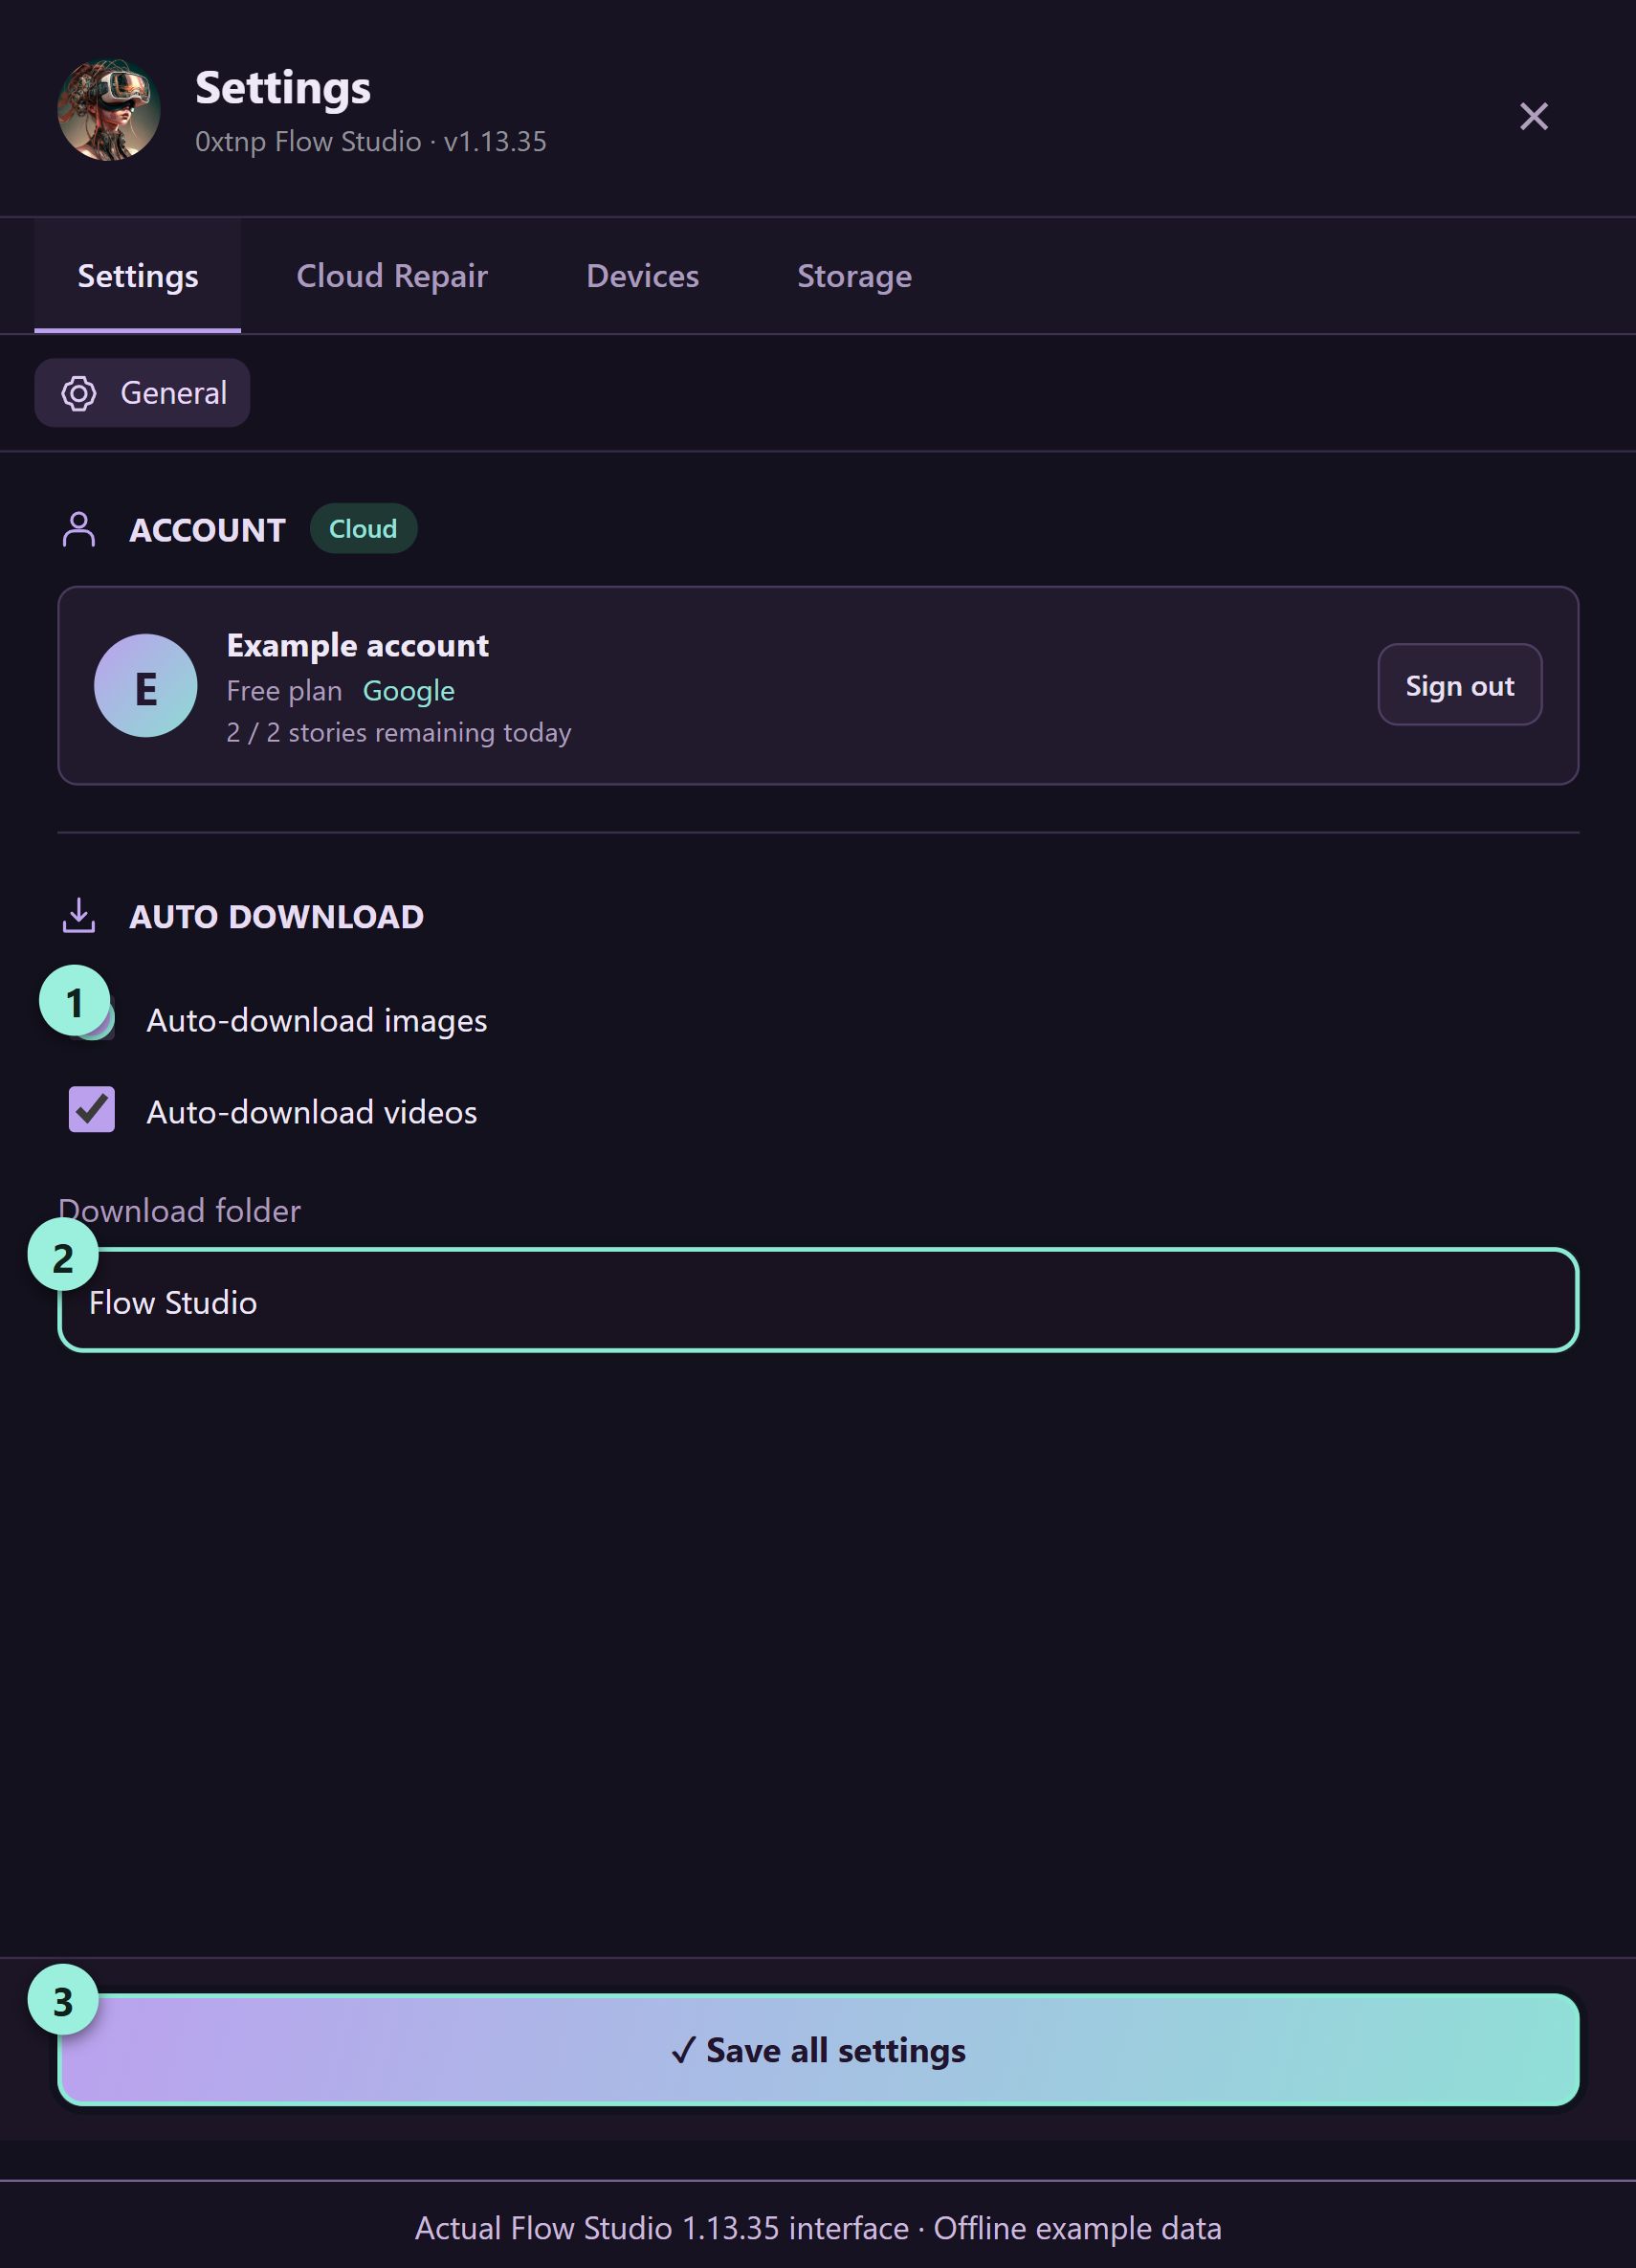
Click the gear icon to open Studio settings. In Settings → General, enable Auto-download videos and confirm the Download folder. Click Save all settings, close the window and return to Control. Gemini video download resolution is not shown in the panel’s Settings tab.
Step 5 · Actual interface · example data · click to enlarge Check the generation options
Check aspect ratio in Settings and save. Confirm Gemini Videos is available and that your requested scene length fits its available tool. Return to Control and use Concurrent Prompts = 1 for your first test.
Step 6 · Actual interface · example data · click to enlarge Choose how many outputs to make
In Control, set Outputs per Prompt to 1 for the first test. Increase it only after confirming one item works as expected.
Step 7 · Actual interface · example data · click to enlarge Click Generate
Scroll to the Run card and click Start generation (shown as Start in some versions). This is the Generate action. Keep the panel and platform tab open. Avoid typing into the platform while the queue runs.
Step 8 · Actual interface · example data · click to enlarge Check the result and saved file
Watch Queue until the item is done. Play the clip and check its motion, sound and ending. Open Chrome Downloads to confirm the file is in your chosen subfolder. If the item fails, read its error, correct the cause, then click Retry failed.
Step 9 · Actual interface · example data · click to enlarge
Gemini WORKFLOW
Frame to Video
Animate an uploaded starting picture.
Choose Gemini
Open Flow Studio → Control. In the Platform row, click Gemini. Confirm that Gemini is the selected platform.
Step 1 · Actual interface · example data · click to enlarge Choose Frame to Video
Below the Platform row, click Frame to Video. Check the highlighted mode before continuing.
Step 2 · Actual interface · example data · click to enlarge Upload your starting frame
In Images, click Upload images (or drop a picture into the upload area). Begin with one clear starting frame. For several scenes, arrange the thumbnails in scene order and verify which frame is assigned to each prompt.
Step 3 · Actual interface · example data · click to enlarge Add your text prompt
Click the Prompts text box and type or paste your instruction. Example: “Animate the supplied starting frame. The cook gently stirs the pot and smiles. Keep the character, clothing and kitchen consistent. Slow push-in, no text.” For a batch, put one blank line between prompts. Check the displayed prompt count.
Step 4 · Actual interface · example data · click to enlarge Check which pictures this prompt uses
Check the assigned starting picture before generating. Where Image Processing Option is shown, select the intended start-frame or ordered-pair behavior. For your first test, use one frame and one prompt.
Step 5 · Actual interface · example data · click to enlarge Choose the save folder
In Control, scroll to Save to folder. Enter a subfolder name such as Gemini Videos. Chrome saves inside its configured download location; this field is not a full disk path. Choose Auto change file name on for numbered prompt-based filenames, or off to keep platform filenames.
Step 6 · Actual interface · example data · click to enlarge Enable video saving
Click the gear icon to open Studio settings. In Settings → General, enable Auto-download videos and confirm the Download folder. Click Save all settings, close the window and return to Control. Gemini video download resolution is not shown in the panel’s Settings tab.
Step 7 · Actual interface · example data · click to enlarge Check the generation options
Check aspect ratio in Settings and save. Confirm Gemini Videos is available and that your requested scene length fits its available tool. Return to Control and use Concurrent Prompts = 1 for your first test.
Step 8 · Actual interface · example data · click to enlarge Choose how many outputs to make
In Control, set Outputs per Prompt to 1 for the first test. Increase it only after confirming one item works as expected.
Step 9 · Actual interface · example data · click to enlarge Click Generate
Scroll to the Run card and click Start generation (shown as Start in some versions). This is the Generate action. Keep the panel and platform tab open. Avoid typing into the platform while the queue runs.
Step 10 · Actual interface · example data · click to enlarge Check the result and saved file
Watch Queue until the item is done. Play the clip and check its motion, sound and ending. Open Chrome Downloads to confirm the file is in your chosen subfolder. If the item fails, read its error, correct the cause, then click Retry failed.
Step 11 · Actual interface · example data · click to enlarge
Gemini WORKFLOW
Ingredients to Video
Create a clip using character, location or other reference pictures.
Choose Gemini
Open Flow Studio → Control. In the Platform row, click Gemini. Confirm that Gemini is the selected platform.
Step 1 · Actual interface · example data · click to enlarge Choose Ingredients to Video
Below the Platform row, click Ingredients to Video. Check the highlighted mode before continuing.
Step 2 · Actual interface · example data · click to enlarge Upload your reference pictures
In Images, click Upload images and add your references, for example Cook.png and Kitchen.png. Use distinct filenames so character and location references cannot be confused.
Step 3 · Actual interface · example data · click to enlarge Add your text prompt
Click the Prompts text box and type or paste your instruction. Example: “Use @Cook for the character and @Kitchen for the setting. The cook places a bowl on the counter and smiles. Gentle camera movement, no text.” For a batch, put one blank line between prompts. Check the displayed prompt count.
Step 4 · Actual interface · example data · click to enlarge Check which pictures this prompt uses
Enable Automatically match reference images if using @names. Cook.png matches @Cook; Kitchen.png matches @Kitchen. Inspect the per-prompt reference cards. Where Image Processing Option is shown, choose all images, first image, or ordered pairs to match your task. Do not start with an unmatched reference.
Step 5 · Actual interface · example data · click to enlarge Choose the save folder
In Control, scroll to Save to folder. Enter a subfolder name such as Gemini Videos. Chrome saves inside its configured download location; this field is not a full disk path. Choose Auto change file name on for numbered prompt-based filenames, or off to keep platform filenames.
Step 6 · Actual interface · example data · click to enlarge Enable video saving
Click the gear icon to open Studio settings. In Settings → General, enable Auto-download videos and confirm the Download folder. Click Save all settings, close the window and return to Control. Gemini video download resolution is not shown in the panel’s Settings tab.
Step 7 · Actual interface · example data · click to enlarge Check the generation options
Check aspect ratio in Settings and save. Confirm Gemini Videos is available and that your requested scene length fits its available tool. Return to Control and use Concurrent Prompts = 1 for your first test.
Step 8 · Actual interface · example data · click to enlarge Choose how many outputs to make
In Control, set Outputs per Prompt to 1 for the first test. Increase it only after confirming one item works as expected.
Step 9 · Actual interface · example data · click to enlarge Click Generate
Scroll to the Run card and click Start generation (shown as Start in some versions). This is the Generate action. Keep the panel and platform tab open. Avoid typing into the platform while the queue runs.
Step 10 · Actual interface · example data · click to enlarge Check the result and saved file
Watch Queue until the item is done. Play the clip and check its motion, sound and ending. Open Chrome Downloads to confirm the file is in your chosen subfolder. If the item fails, read its error, correct the cause, then click Retry failed.
Step 11 · Actual interface · example data · click to enlarge
Use Gemini step by step
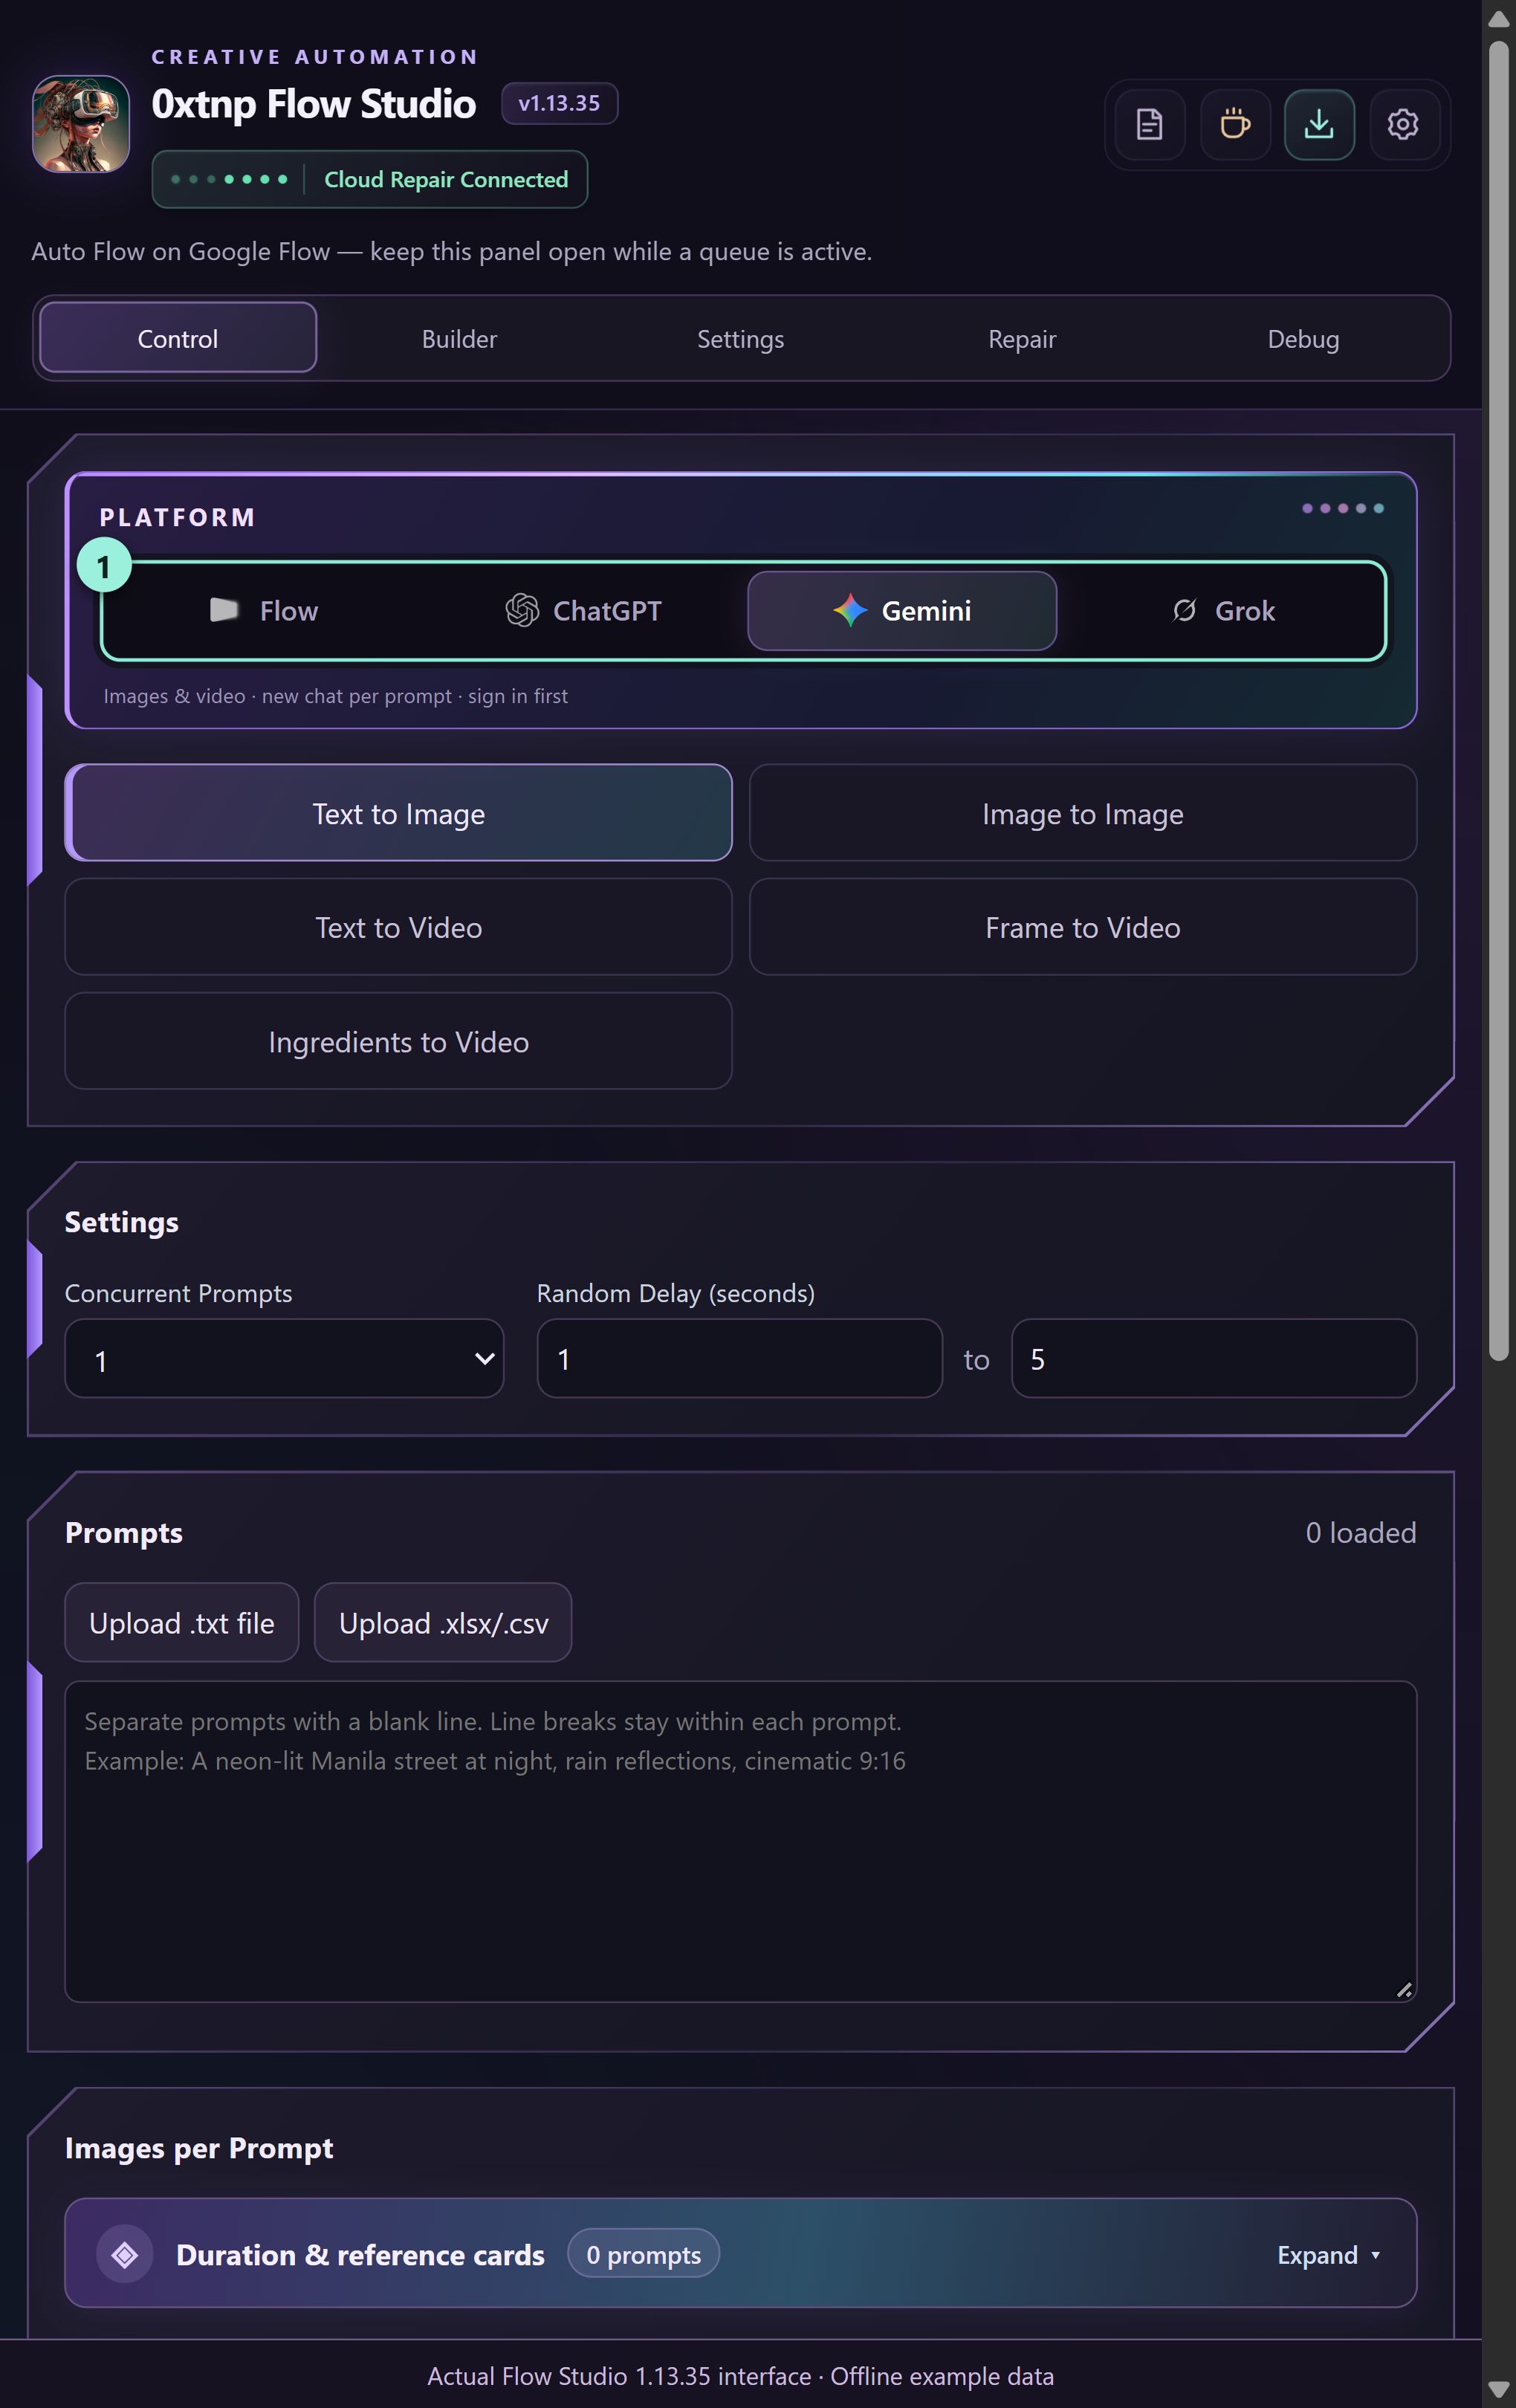
What you should seeEach item runs against the matching Gemini image or video tool, using a fresh chat per prompt.
PLATFORM WALKTHROUGHS
Use Google Flow step by step
Run image and video queues inside your chosen Google Flow project. Check the project, model and scene duration before using generation credits.
Open the correct Flow project
Open https://labs.google/fx/tools/flow in Chrome and sign in. Create or open the project that should receive your media, then leave that project tab open.
Use Max Speed and the image model
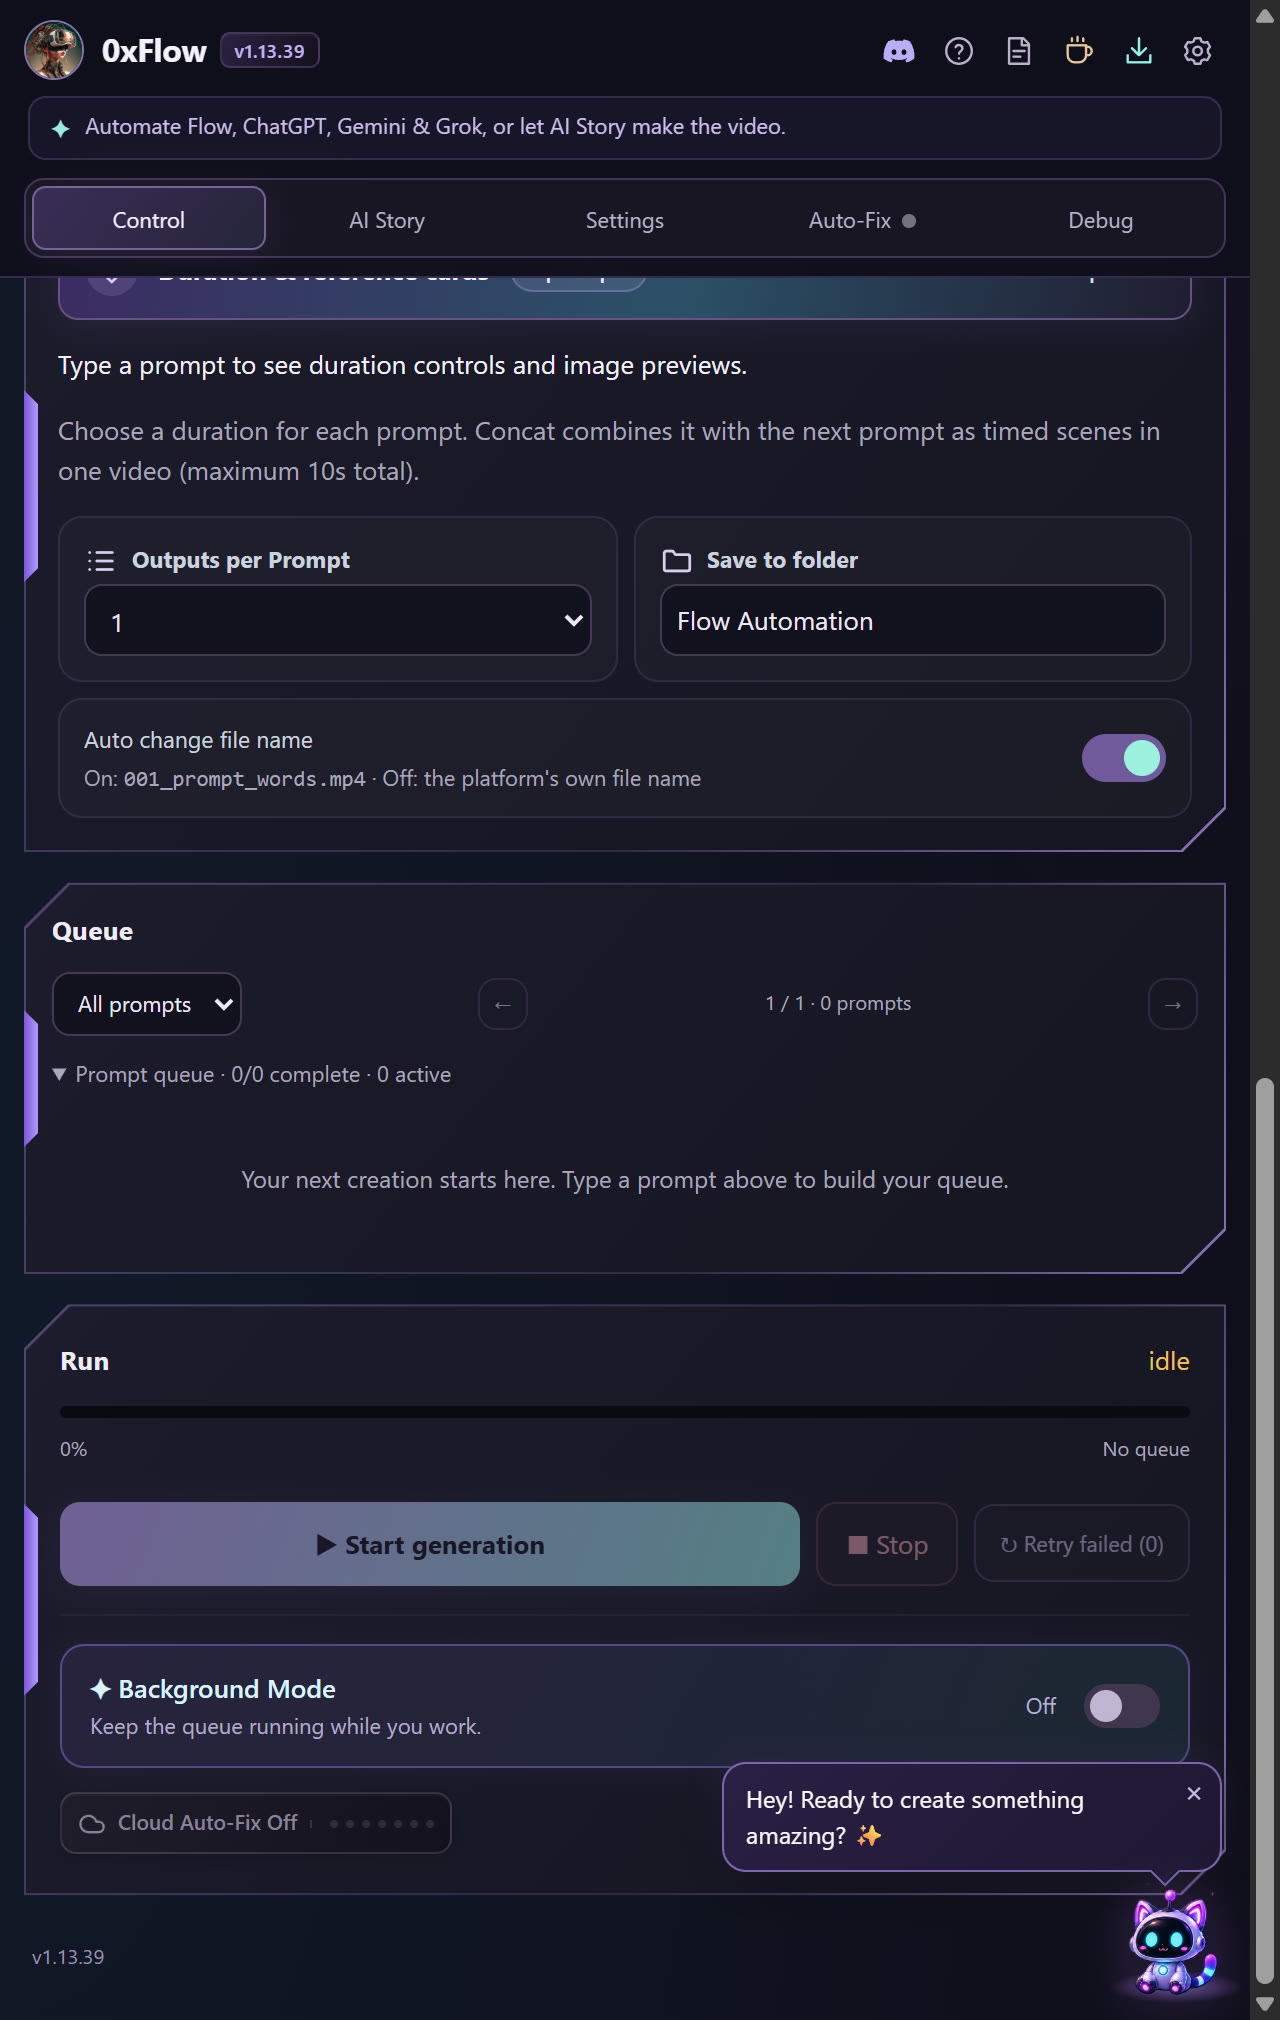
Max Speed in the Run card (Flow only) runs three prompts at once; switched off it runs one at a time. Last-frame chaining always runs one at a time. For Text to Image and Image to Image you can also pick the image model in Flow settings — Nano Banana Pro, Nano Banana 2 or Nano Banana 2 Lite; leaving it unset keeps Flow’s current image model.
Max Speed in the Run card
Google Flow WORKFLOW
Text to Image
Create a new picture from words.
Choose Google Flow
Open Flow Studio → Control. In the Platform row, click Flow. Confirm that Flow is the selected platform.
Step 1 · Actual interface · example data · click to enlarge Choose Text to Image
Below the Platform row, click Text to Image. Check the highlighted mode before continuing.
Step 2 · Actual interface · example data · click to enlarge Add your text prompt
Click the Prompts text box and type or paste your instruction. Example: “Create a vertical claymation image of a cheerful Filipino cook preparing vegetables in a bright kitchen. No text.” For a batch, put one blank line between prompts. Check the displayed prompt count.
Step 3 · Actual interface · example data · click to enlarge Choose the save folder
In Control, scroll to Save to folder. Enter a subfolder name such as Flow Images. Chrome saves inside its configured download location; this field is not a full disk path. Choose Auto change file name on for numbered prompt-based filenames, or off to keep platform filenames.
Step 4 · Actual interface · example data · click to enlarge Enable image saving
Open the panel’s Settings tab. Set Image download to Save image. Click Save settings, then return to Control. You can also check the gear → Settings auto-download preference.
Step 5 · Actual interface · example data · click to enlarge Check the generation options
In Settings, check the image model and aspect ratio. Save settings and return to Control. Use Concurrent Prompts = 1 for your first test.
Step 6 · Actual interface · example data · click to enlarge Choose how many outputs to make
In Control, set Outputs per Prompt to 1 for the first test. Increase it only after confirming one item works as expected.
Step 7 · Actual interface · example data · click to enlarge Click Generate
Scroll to the Run card and click Start generation (shown as Start in some versions). This is the Generate action. Keep the panel and platform tab open. Avoid typing into the platform while the queue runs.
Step 8 · Actual interface · example data · click to enlarge Check the result and saved file
Watch Queue until the item is done. Open the finished image and inspect it. Open Chrome Downloads to confirm the file is in your chosen subfolder. If the item fails, read its error, correct the cause, then click Retry failed.
Step 9 · Actual interface · example data · click to enlarge
Google Flow WORKFLOW
Image to Image
Create or edit a picture using uploaded source images.
Choose Google Flow
Open Flow Studio → Control. In the Platform row, click Flow. Confirm that Flow is the selected platform.
Step 1 · Actual interface · example data · click to enlarge Choose Image to Image
Below the Platform row, click Image to Image. Check the highlighted mode before continuing.
Step 2 · Actual interface · example data · click to enlarge Upload your reference pictures
In Images, click Upload images and select your source picture. Start with one file named Cook.png. For multiple references, give every file a distinct name and inspect its thumbnail.
Step 3 · Actual interface · example data · click to enlarge Add your text prompt
Click the Prompts text box and type or paste your instruction. Example: “Use @Cook as the character reference. Show the same cook smiling beside a bowl of vegetables in a bright kitchen. Keep the outfit and face consistent. No text.” For a batch, put one blank line between prompts. Check the displayed prompt count.
Step 4 · Actual interface · example data · click to enlarge Check which pictures this prompt uses
Enable Automatically match reference images if using @names. Cook.png matches @Cook; Kitchen.png matches @Kitchen. Inspect the per-prompt reference cards. Where Image Processing Option is shown, choose all images, first image, or ordered pairs to match your task. Do not start with an unmatched reference.
Step 5 · Actual interface · example data · click to enlarge Choose the save folder
In Control, scroll to Save to folder. Enter a subfolder name such as Flow Images. Chrome saves inside its configured download location; this field is not a full disk path. Choose Auto change file name on for numbered prompt-based filenames, or off to keep platform filenames.
Step 6 · Actual interface · example data · click to enlarge Enable image saving
Open the panel’s Settings tab. Set Image download to Save image. Click Save settings, then return to Control. You can also check the gear → Settings auto-download preference.
Step 7 · Actual interface · example data · click to enlarge Check the generation options
In Settings, check the image model and aspect ratio. Save settings and return to Control. Use Concurrent Prompts = 1 for your first test.
Step 8 · Actual interface · example data · click to enlarge Choose how many outputs to make
In Control, set Outputs per Prompt to 1 for the first test. Increase it only after confirming one item works as expected.
Step 9 · Actual interface · example data · click to enlarge Click Generate
Scroll to the Run card and click Start generation (shown as Start in some versions). This is the Generate action. Keep the panel and platform tab open. Avoid typing into the platform while the queue runs.
Step 10 · Actual interface · example data · click to enlarge Check the result and saved file
Watch Queue until the item is done. Open the finished image and inspect it. Open Chrome Downloads to confirm the file is in your chosen subfolder. If the item fails, read its error, correct the cause, then click Retry failed.
Step 11 · Actual interface · example data · click to enlarge
Google Flow WORKFLOW
Text to Video
Create a moving clip from a written description.
Choose Google Flow
Open Flow Studio → Control. In the Platform row, click Flow. Confirm that Flow is the selected platform.
Step 1 · Actual interface · example data · click to enlarge Choose Text to Video
Below the Platform row, click Text to Video. Check the highlighted mode before continuing.
Step 2 · Actual interface · example data · click to enlarge Add your text prompt
Click the Prompts text box and type or paste your instruction. Example: “A cheerful claymation cook gently stirs a pot, then smiles at the camera. One continuous shot, slow push-in, natural kitchen sounds, no text.” For a batch, put one blank line between prompts. Check the displayed prompt count.
Step 3 · Actual interface · example data · click to enlarge Choose the save folder
In Control, scroll to Save to folder. Enter a subfolder name such as Flow Videos. Chrome saves inside its configured download location; this field is not a full disk path. Choose Auto change file name on for numbered prompt-based filenames, or off to keep platform filenames.
Step 4 · Actual interface · example data · click to enlarge Enable video saving
Open the panel’s Settings tab. Choose a video download resolution instead of No download. Click Save settings, then return to Control. You can also check the gear → Settings auto-download preference.
Step 5 · Actual interface · example data · click to enlarge Check the generation options
In Settings, check the video model, aspect ratio and duration. Save settings and return to Control. Use eight-second scenes with the Flow Veo options described in this release; check compatibility before loading other durations. Use Concurrent Prompts = 1 for your first test.
Step 6 · Actual interface · example data · click to enlarge Choose how many outputs to make
In Control, set Outputs per Prompt to 1 for the first test. Increase it only after confirming one item works as expected.
Step 7 · Actual interface · example data · click to enlarge Click Generate
Scroll to the Run card and click Start generation (shown as Start in some versions). This is the Generate action. Keep the panel and platform tab open. Avoid typing into the platform while the queue runs.
Step 8 · Actual interface · example data · click to enlarge Check the result and saved file
Watch Queue until the item is done. Play the clip and check its motion, sound and ending. Open Chrome Downloads to confirm the file is in your chosen subfolder. If the item fails, read its error, correct the cause, then click Retry failed.
Step 9 · Actual interface · example data · click to enlarge
Google Flow WORKFLOW
Frame to Video
Animate an uploaded starting picture.
Choose Google Flow
Open Flow Studio → Control. In the Platform row, click Flow. Confirm that Flow is the selected platform.
Step 1 · Actual interface · example data · click to enlarge Choose Frame to Video
Below the Platform row, click Frame to Video. Check the highlighted mode before continuing.
Step 2 · Actual interface · example data · click to enlarge Upload your starting frame
In Images, click Upload images (or drop a picture into the upload area). Begin with one clear starting frame. For several scenes, arrange the thumbnails in scene order and verify which frame is assigned to each prompt.
Step 3 · Actual interface · example data · click to enlarge Add your text prompt
Click the Prompts text box and type or paste your instruction. Example: “Animate the supplied starting frame. The cook gently stirs the pot and smiles. Keep the character, clothing and kitchen consistent. Slow push-in, no text.” For a batch, put one blank line between prompts. Check the displayed prompt count.
Step 4 · Actual interface · example data · click to enlarge Check which pictures this prompt uses
Check the assigned starting picture before generating. Where Image Processing Option is shown, select the intended start-frame or ordered-pair behavior. For your first test, use one frame and one prompt.
Step 5 · Actual interface · example data · click to enlarge Choose the save folder
In Control, scroll to Save to folder. Enter a subfolder name such as Flow Videos. Chrome saves inside its configured download location; this field is not a full disk path. Choose Auto change file name on for numbered prompt-based filenames, or off to keep platform filenames.
Step 6 · Actual interface · example data · click to enlarge Enable video saving
Open the panel’s Settings tab. Choose a video download resolution instead of No download. Click Save settings, then return to Control. You can also check the gear → Settings auto-download preference.
Step 7 · Actual interface · example data · click to enlarge Check the generation options
In Settings, check the video model, aspect ratio and duration. Save settings and return to Control. Use eight-second scenes with the Flow Veo options described in this release; check compatibility before loading other durations. Use Concurrent Prompts = 1 for your first test.
Step 8 · Actual interface · example data · click to enlarge Choose how many outputs to make
In Control, set Outputs per Prompt to 1 for the first test. Increase it only after confirming one item works as expected.
Step 9 · Actual interface · example data · click to enlarge Click Generate
Scroll to the Run card and click Start generation (shown as Start in some versions). This is the Generate action. Keep the panel and platform tab open. Avoid typing into the platform while the queue runs.
Step 10 · Actual interface · example data · click to enlarge Check the result and saved file
Watch Queue until the item is done. Play the clip and check its motion, sound and ending. Open Chrome Downloads to confirm the file is in your chosen subfolder. If the item fails, read its error, correct the cause, then click Retry failed.
Step 11 · Actual interface · example data · click to enlarge
Google Flow WORKFLOW
Ingredients to Video
Create a clip using character, location or other reference pictures.
Choose Google Flow
Open Flow Studio → Control. In the Platform row, click Flow. Confirm that Flow is the selected platform.
Step 1 · Actual interface · example data · click to enlarge Choose Ingredients to Video
Below the Platform row, click Ingredients to Video. Check the highlighted mode before continuing.
Step 2 · Actual interface · example data · click to enlarge Upload your reference pictures
In Images, click Upload images and add your references, for example Cook.png and Kitchen.png. Use distinct filenames so character and location references cannot be confused.
Step 3 · Actual interface · example data · click to enlarge Add your text prompt
Click the Prompts text box and type or paste your instruction. Example: “Use @Cook for the character and @Kitchen for the setting. The cook places a bowl on the counter and smiles. Gentle camera movement, no text.” For a batch, put one blank line between prompts. Check the displayed prompt count.
Step 4 · Actual interface · example data · click to enlarge Check which pictures this prompt uses
Enable Automatically match reference images if using @names. Cook.png matches @Cook; Kitchen.png matches @Kitchen. Inspect the per-prompt reference cards. Where Image Processing Option is shown, choose all images, first image, or ordered pairs to match your task. Do not start with an unmatched reference.
Step 5 · Actual interface · example data · click to enlarge Choose the save folder
In Control, scroll to Save to folder. Enter a subfolder name such as Flow Videos. Chrome saves inside its configured download location; this field is not a full disk path. Choose Auto change file name on for numbered prompt-based filenames, or off to keep platform filenames.
Step 6 · Actual interface · example data · click to enlarge Enable video saving
Open the panel’s Settings tab. Choose a video download resolution instead of No download. Click Save settings, then return to Control. You can also check the gear → Settings auto-download preference.
Step 7 · Actual interface · example data · click to enlarge Check the generation options
In Settings, check the video model, aspect ratio and duration. Save settings and return to Control. Use eight-second scenes with the Flow Veo options described in this release; check compatibility before loading other durations. Use Concurrent Prompts = 1 for your first test.
Step 8 · Actual interface · example data · click to enlarge Choose how many outputs to make
In Control, set Outputs per Prompt to 1 for the first test. Increase it only after confirming one item works as expected.
Step 9 · Actual interface · example data · click to enlarge Click Generate
Scroll to the Run card and click Start generation (shown as Start in some versions). This is the Generate action. Keep the panel and platform tab open. Avoid typing into the platform while the queue runs.
Step 10 · Actual interface · example data · click to enlarge Check the result and saved file
Watch Queue until the item is done. Play the clip and check its motion, sound and ending. Open Chrome Downloads to confirm the file is in your chosen subfolder. If the item fails, read its error, correct the cause, then click Retry failed.
Step 11 · Actual interface · example data · click to enlarge
Google Flow WORKFLOW
Agent Automation
Submit an instruction through the Flow Agent option when it is available in your project.
Choose Google Flow
Open Flow Studio → Control. In the Platform row, click Flow. Confirm that Flow is the selected platform.
Step 1 · Actual interface · example data · click to enlarge Choose Agent Automation
Below the Platform row, click Agent Automation. Check the highlighted mode before continuing.
Step 2 · Actual interface · example data · click to enlarge Add your text prompt
Click the Prompts text box and type or paste your instruction. Example: “Create a short clip of a claymation cook stirring a pot in a bright kitchen, with gentle camera movement and no text.” For a batch, put one blank line between prompts. Check the displayed prompt count.
Step 3 · Actual interface · example data · click to enlarge Choose the save folder
In Control, scroll to Save to folder. Enter a subfolder name such as Flow Videos. Chrome saves inside its configured download location; this field is not a full disk path. Choose Auto change file name on for numbered prompt-based filenames, or off to keep platform filenames.
Step 4 · Actual interface · example data · click to enlarge Enable video saving
Open the panel’s Settings tab. Choose a video download resolution instead of No download. Click Save settings, then return to Control. You can also check the gear → Settings auto-download preference.
Step 5 · Actual interface · example data · click to enlarge Check the generation options
In Settings, check the video model, aspect ratio and duration. Save settings and return to Control. Use eight-second scenes with the Flow Veo options described in this release; check compatibility before loading other durations. Use Concurrent Prompts = 1 for your first test.
Step 6 · Actual interface · example data · click to enlarge Choose how many outputs to make
In Control, set Outputs per Prompt to 1 for the first test. Increase it only after confirming one item works as expected.
Step 7 · Actual interface · example data · click to enlarge Click Generate
Scroll to the Run card and click Start generation (shown as Start in some versions). This is the Generate action. Keep the panel and platform tab open. Avoid typing into the platform while the queue runs.
Step 8 · Actual interface · example data · click to enlarge Check the result and saved file
Watch Queue until the item is done. Play the clip and check its motion, sound and ending. Open Chrome Downloads to confirm the file is in your chosen subfolder. If the item fails, read its error, correct the cause, then click Retry failed.
Step 9 · Actual interface · example data · click to enlarge
Use Google Flow step by step
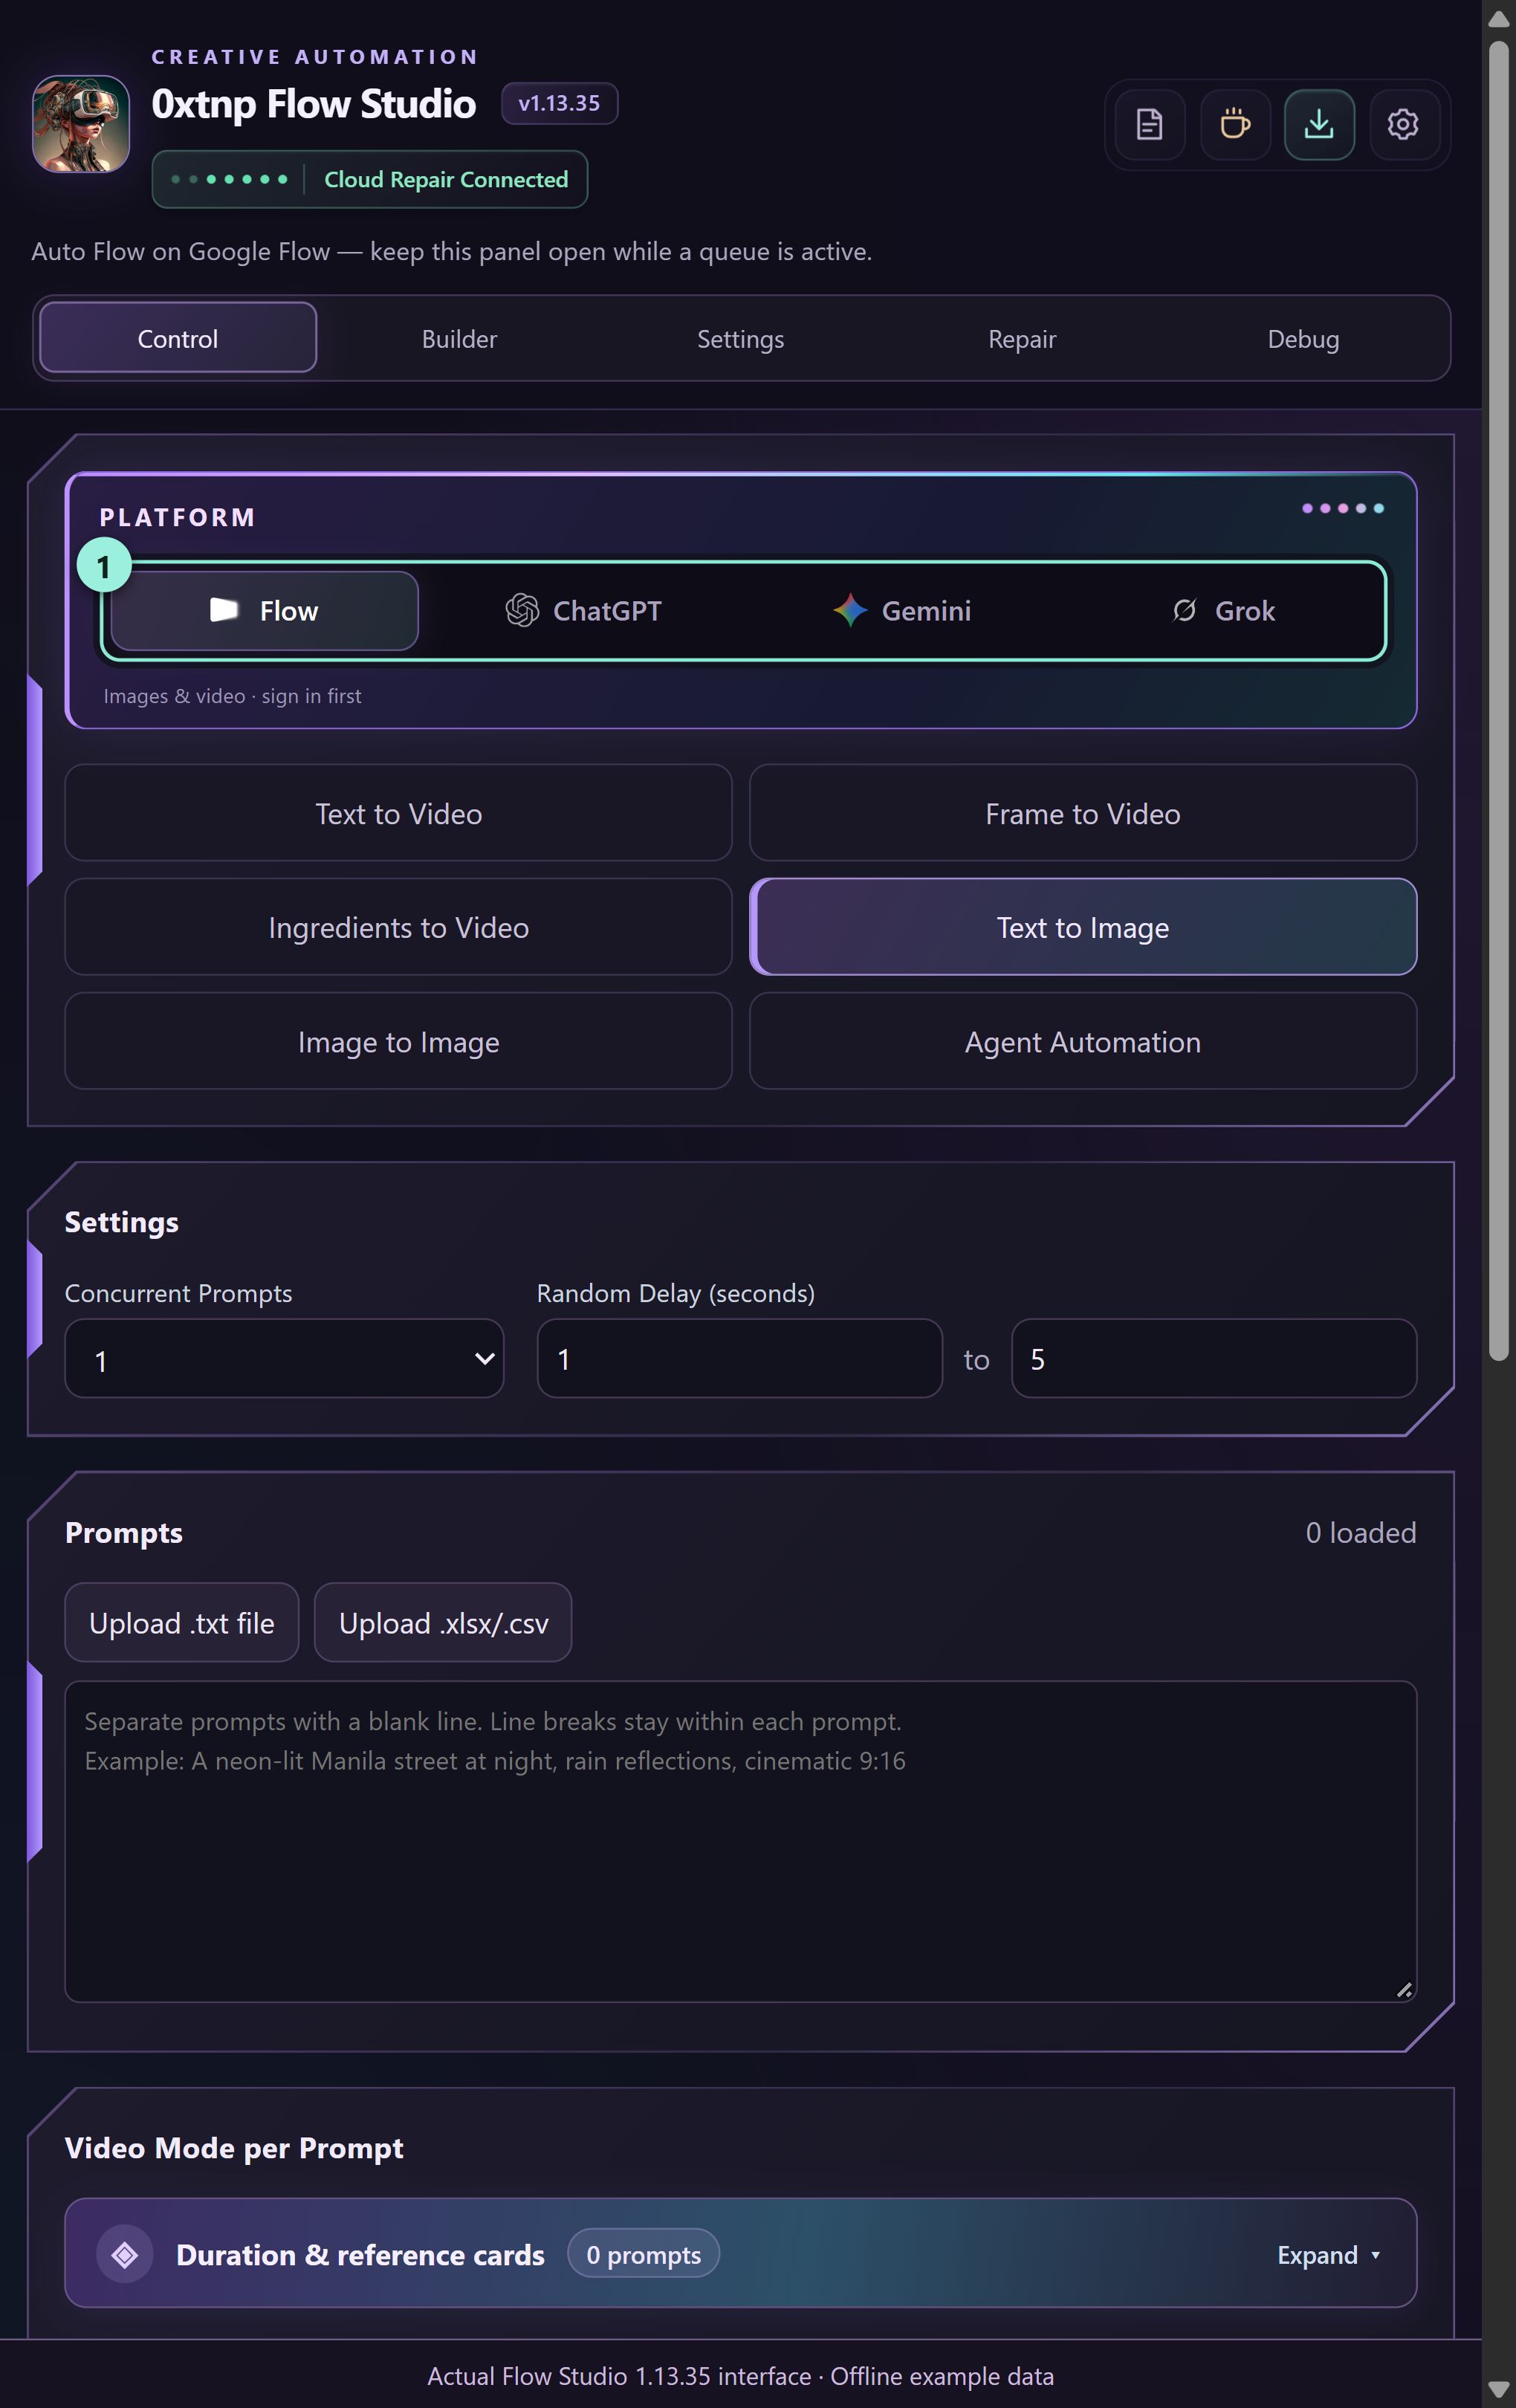
What you should seeMedia appears in your selected Flow project and the matching queue item completes.
MANAGE & FIX
Connect and use Cloud Repair
Cloud Repair can rewrite a flagged prompt and return it for another generation attempt. It cannot guarantee that a platform will accept a prompt or reference image. In Builder stories, the Auto-Fix dialogue may change a few words of written dialogue as a last resort from repair round 2 on — the project’s speech and subtitles follow the corrected words.
Connect cloud repair
Select Repair, then click Connect cloud repair. Wait for the connected message. No Google or Discord login is needed for this installation connection. Click Check allowance to see your current daily repair allowance. The public server is repair.corethea.com.
Enable automatic repair
Enable automatic repair, choose the repair limit per prompt, then Save preferences. Use Test connection to confirm the server is reachable.
Let a flagged prompt report its result
When a supported generation attempt is rejected, the queue may request a text revision from the connected repair server and retry. Check the queue message for the current round and result.
Know what repair can inspect
The repair request includes prompt text, Flow warnings and repair history. The image and video files remain on the generation platform; a repair response is not proof that an AI visually inspected your reference image.
Handle Needs human repair
If the queue asks for human repair, read the message. Review the actual scene, prompt and reference image, make an appropriate edit, then use Retry. Do not keep retrying an unchanged rejected input.
Connect and use Cloud Repair
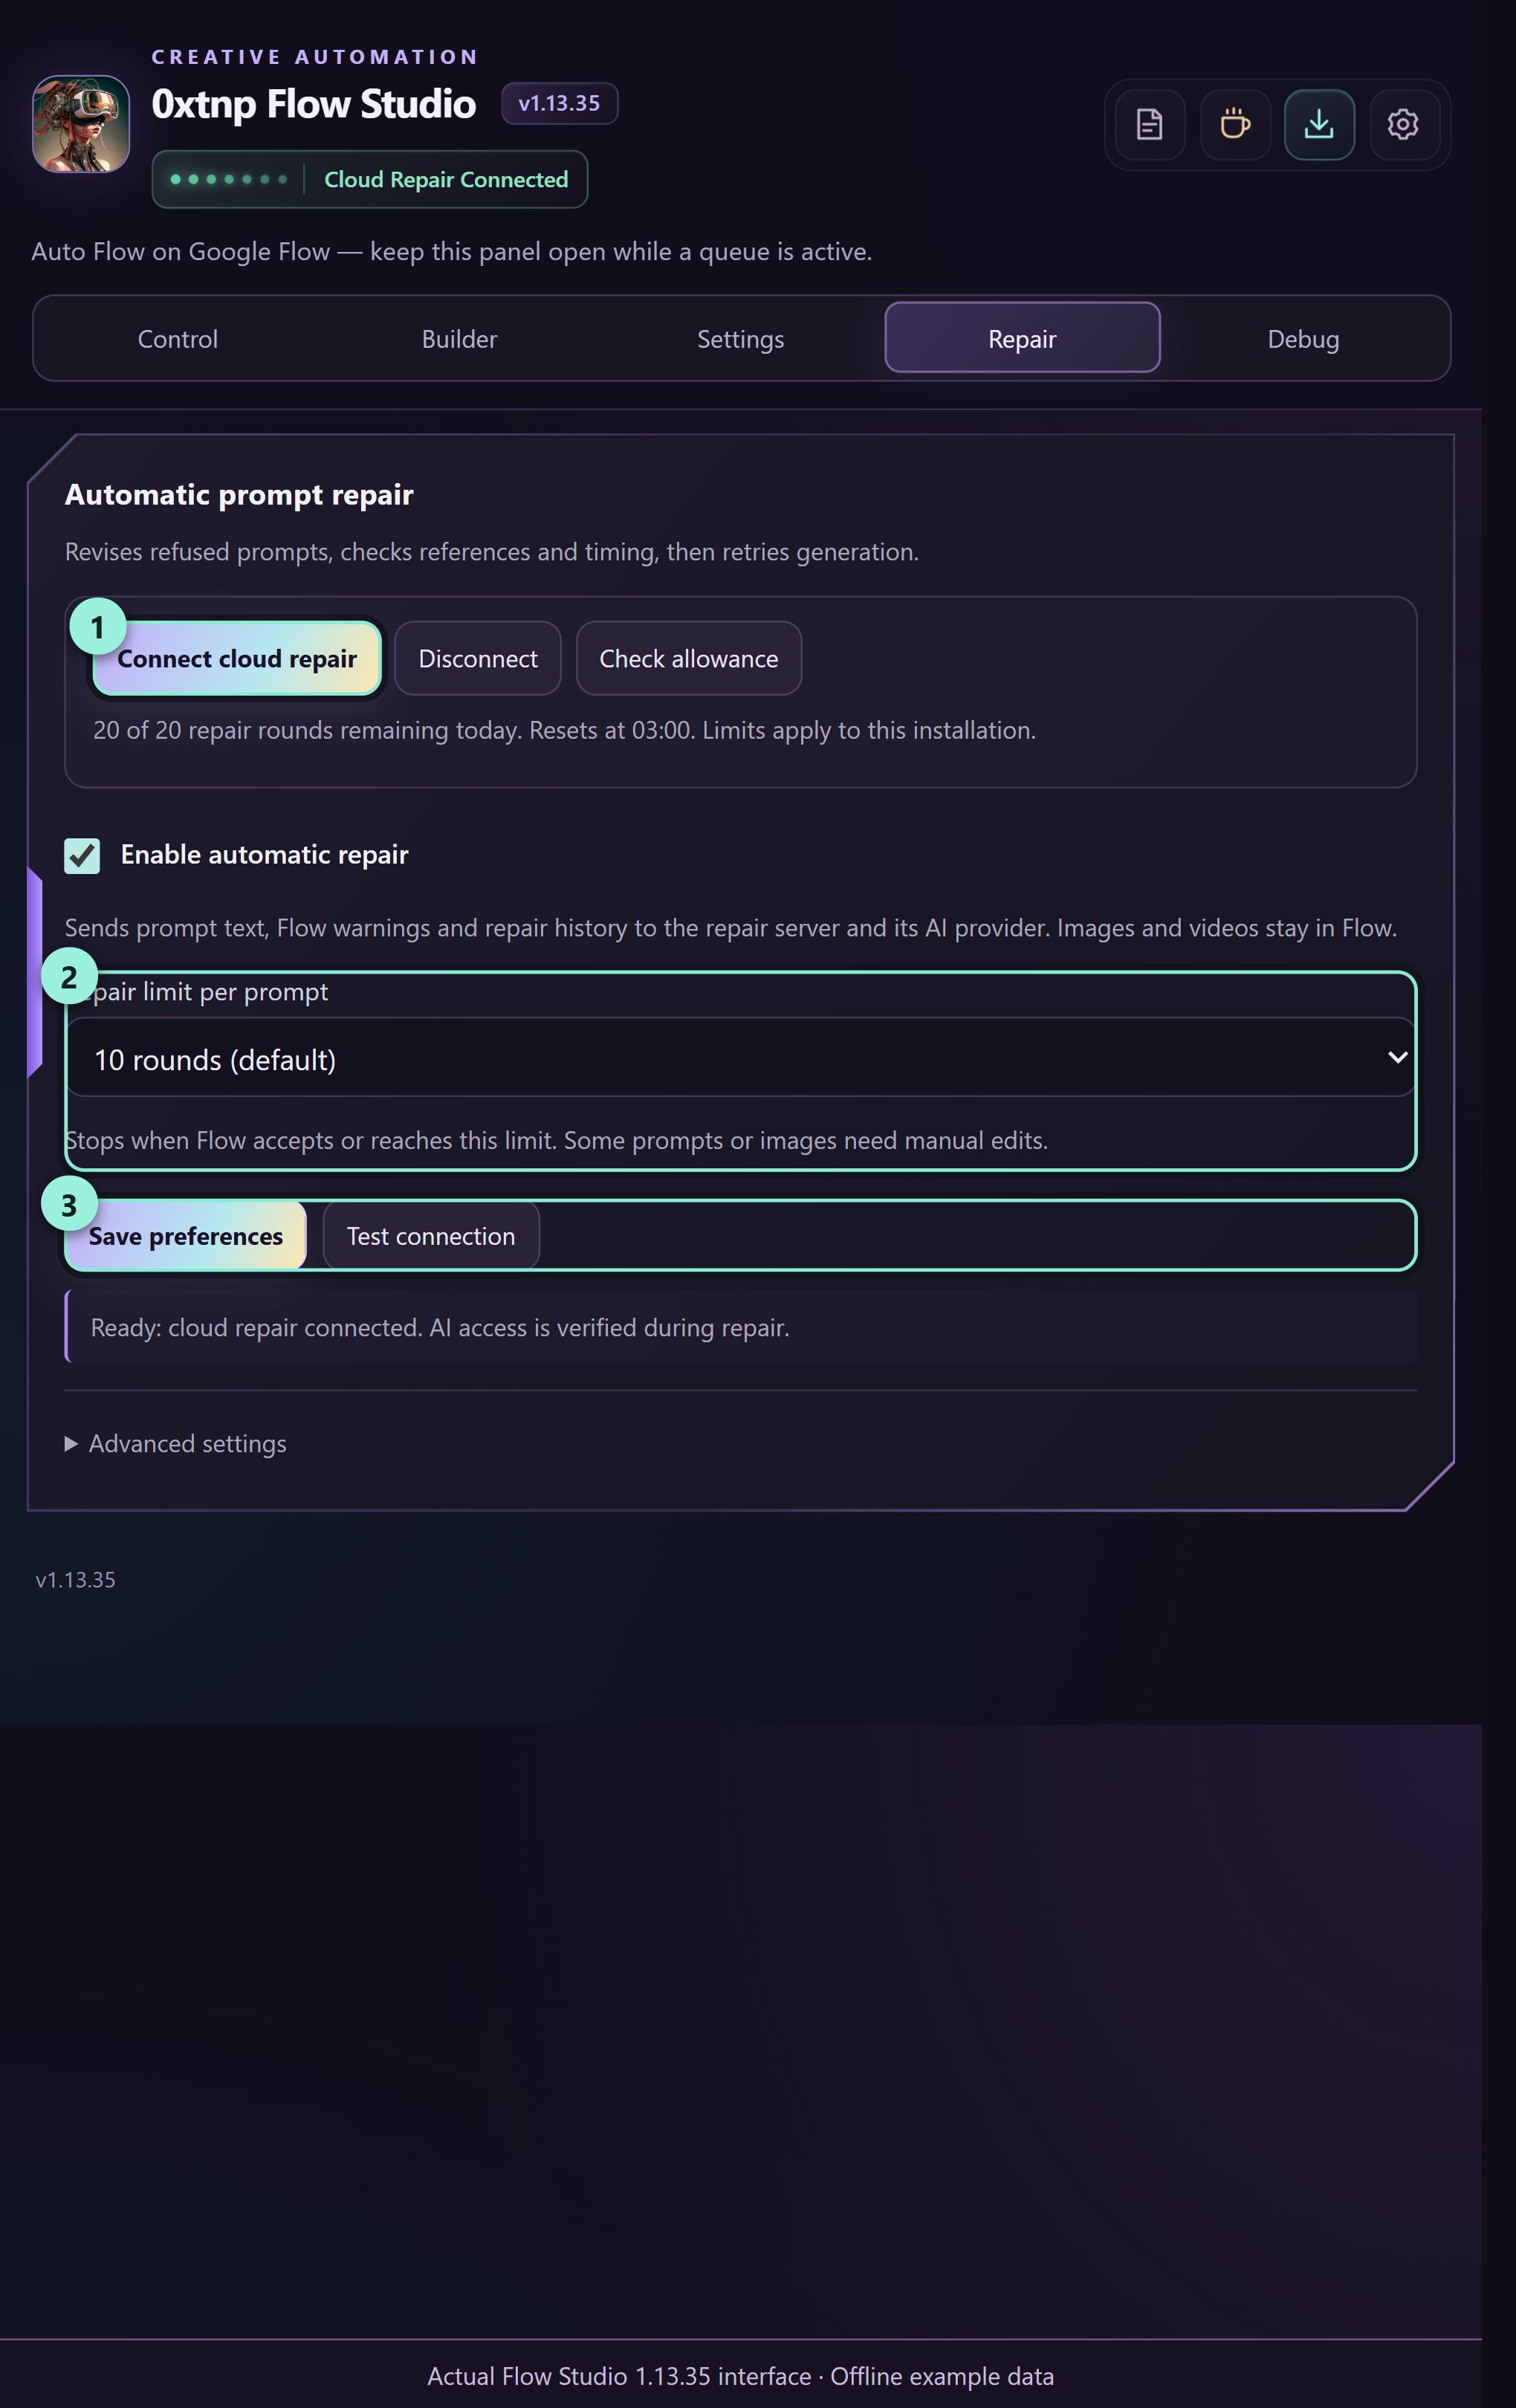
What you should seeThe connection indicator reports its state, and repair activity appears in the affected queue item.
MANAGE & FIX
Save and export your work
Set your download choices before a run. Keep a copy of important prompts and media outside the browser profile.
Choose auto-download behavior
Open the gear icon → Settings. Enable Auto-download images and Auto-download videos as needed, choose a Download folder, then Save all settings.
Check Control output settings
Review Save to folder, Auto change file name and Outputs per Prompt in Control. In Settings, confirm image/video download choices. No download leaves the result on the platform.
Make a cover and caption for a story
In an AI Story project, open Cover & caption. Generate makes one promotional cover for the complete story — using its beats, premise and characters — with an editable title and caption. Download the JPG or copy the caption for posting.
Find saved files
Open Chrome Downloads to inspect the actual filename and location. The extension’s folder is a subfolder of the download location Chrome is allowed to use, not an arbitrary absolute filesystem path.
Export a Builder package
Open the project → Download prompts & images. Choose JSON project, Text prompts, CSV prompts or Save images. Choose the format you need; these are separate export actions.
Back up saved projects
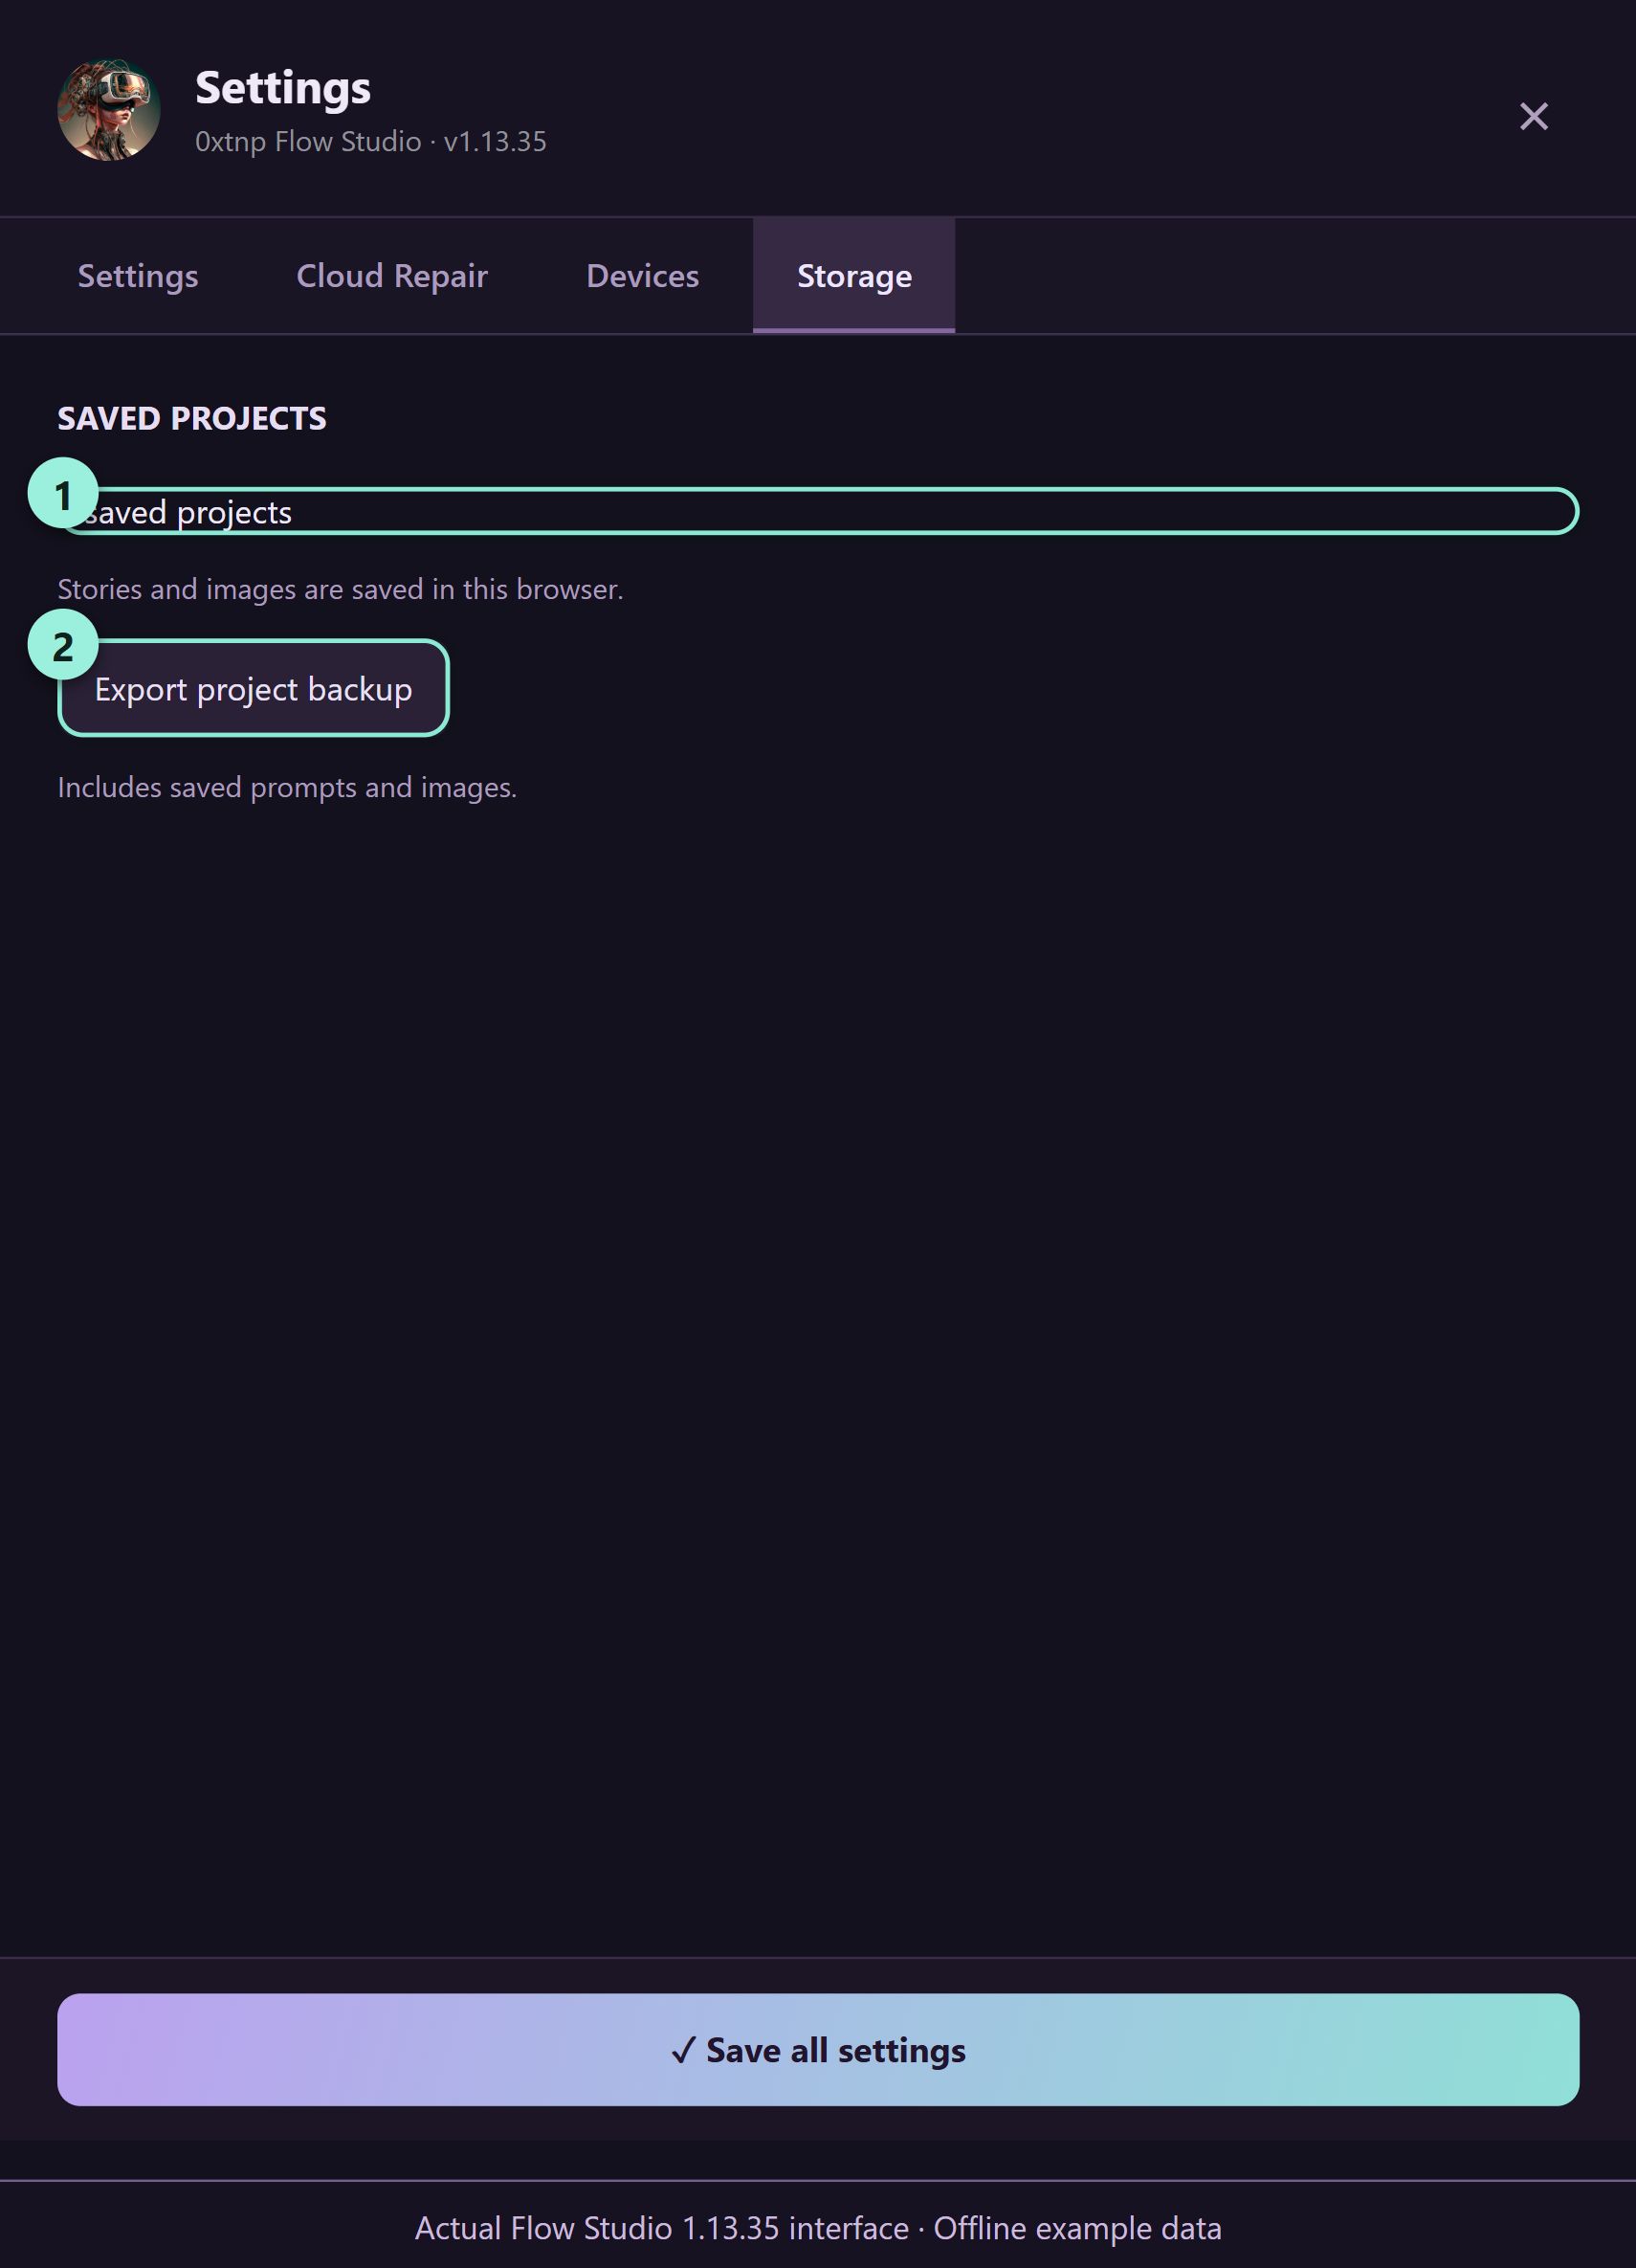
In Studio settings → Storage, use the project export control to save a backup file. Confirm it exists before clearing browser data, removing the extension or moving to a different Chrome profile.
Save and export your work
Back up your saved projects from Storage
What you should seeYour downloaded clips/images and exported prompt files are available outside the extension.
MANAGE & FIX
Resume projects and continue a series
Projects keep your saved scene package and captured media in this browser profile. A series has ordered parts within one project family.
Open your saved work
Choose Builder → Projects, then Open on the project you need. Use the search box if the list is long. For a series, open the relevant Part tab.
Resume from the next step
Follow the project’s next-step button. Saved images and completed work are kept; do not start a duplicate story just because a later media stage is incomplete.
Continue a planned series
After the current part reaches the required stage, use the offered next-part action. Continuing a part uses another Builder allowance. The supported series options are two or three parts.
Retry a failed text build
If writing failed or was cancelled, use Try again. Review the cause first. Delete this part removes that failed part; deleting a project requires confirmation and removes local records/media for the selected project family.
Back up before removing data
Export important projects from Storage before uninstalling the extension or clearing its data. Already downloaded files are separate from the local project list.
Resume projects and continue a series
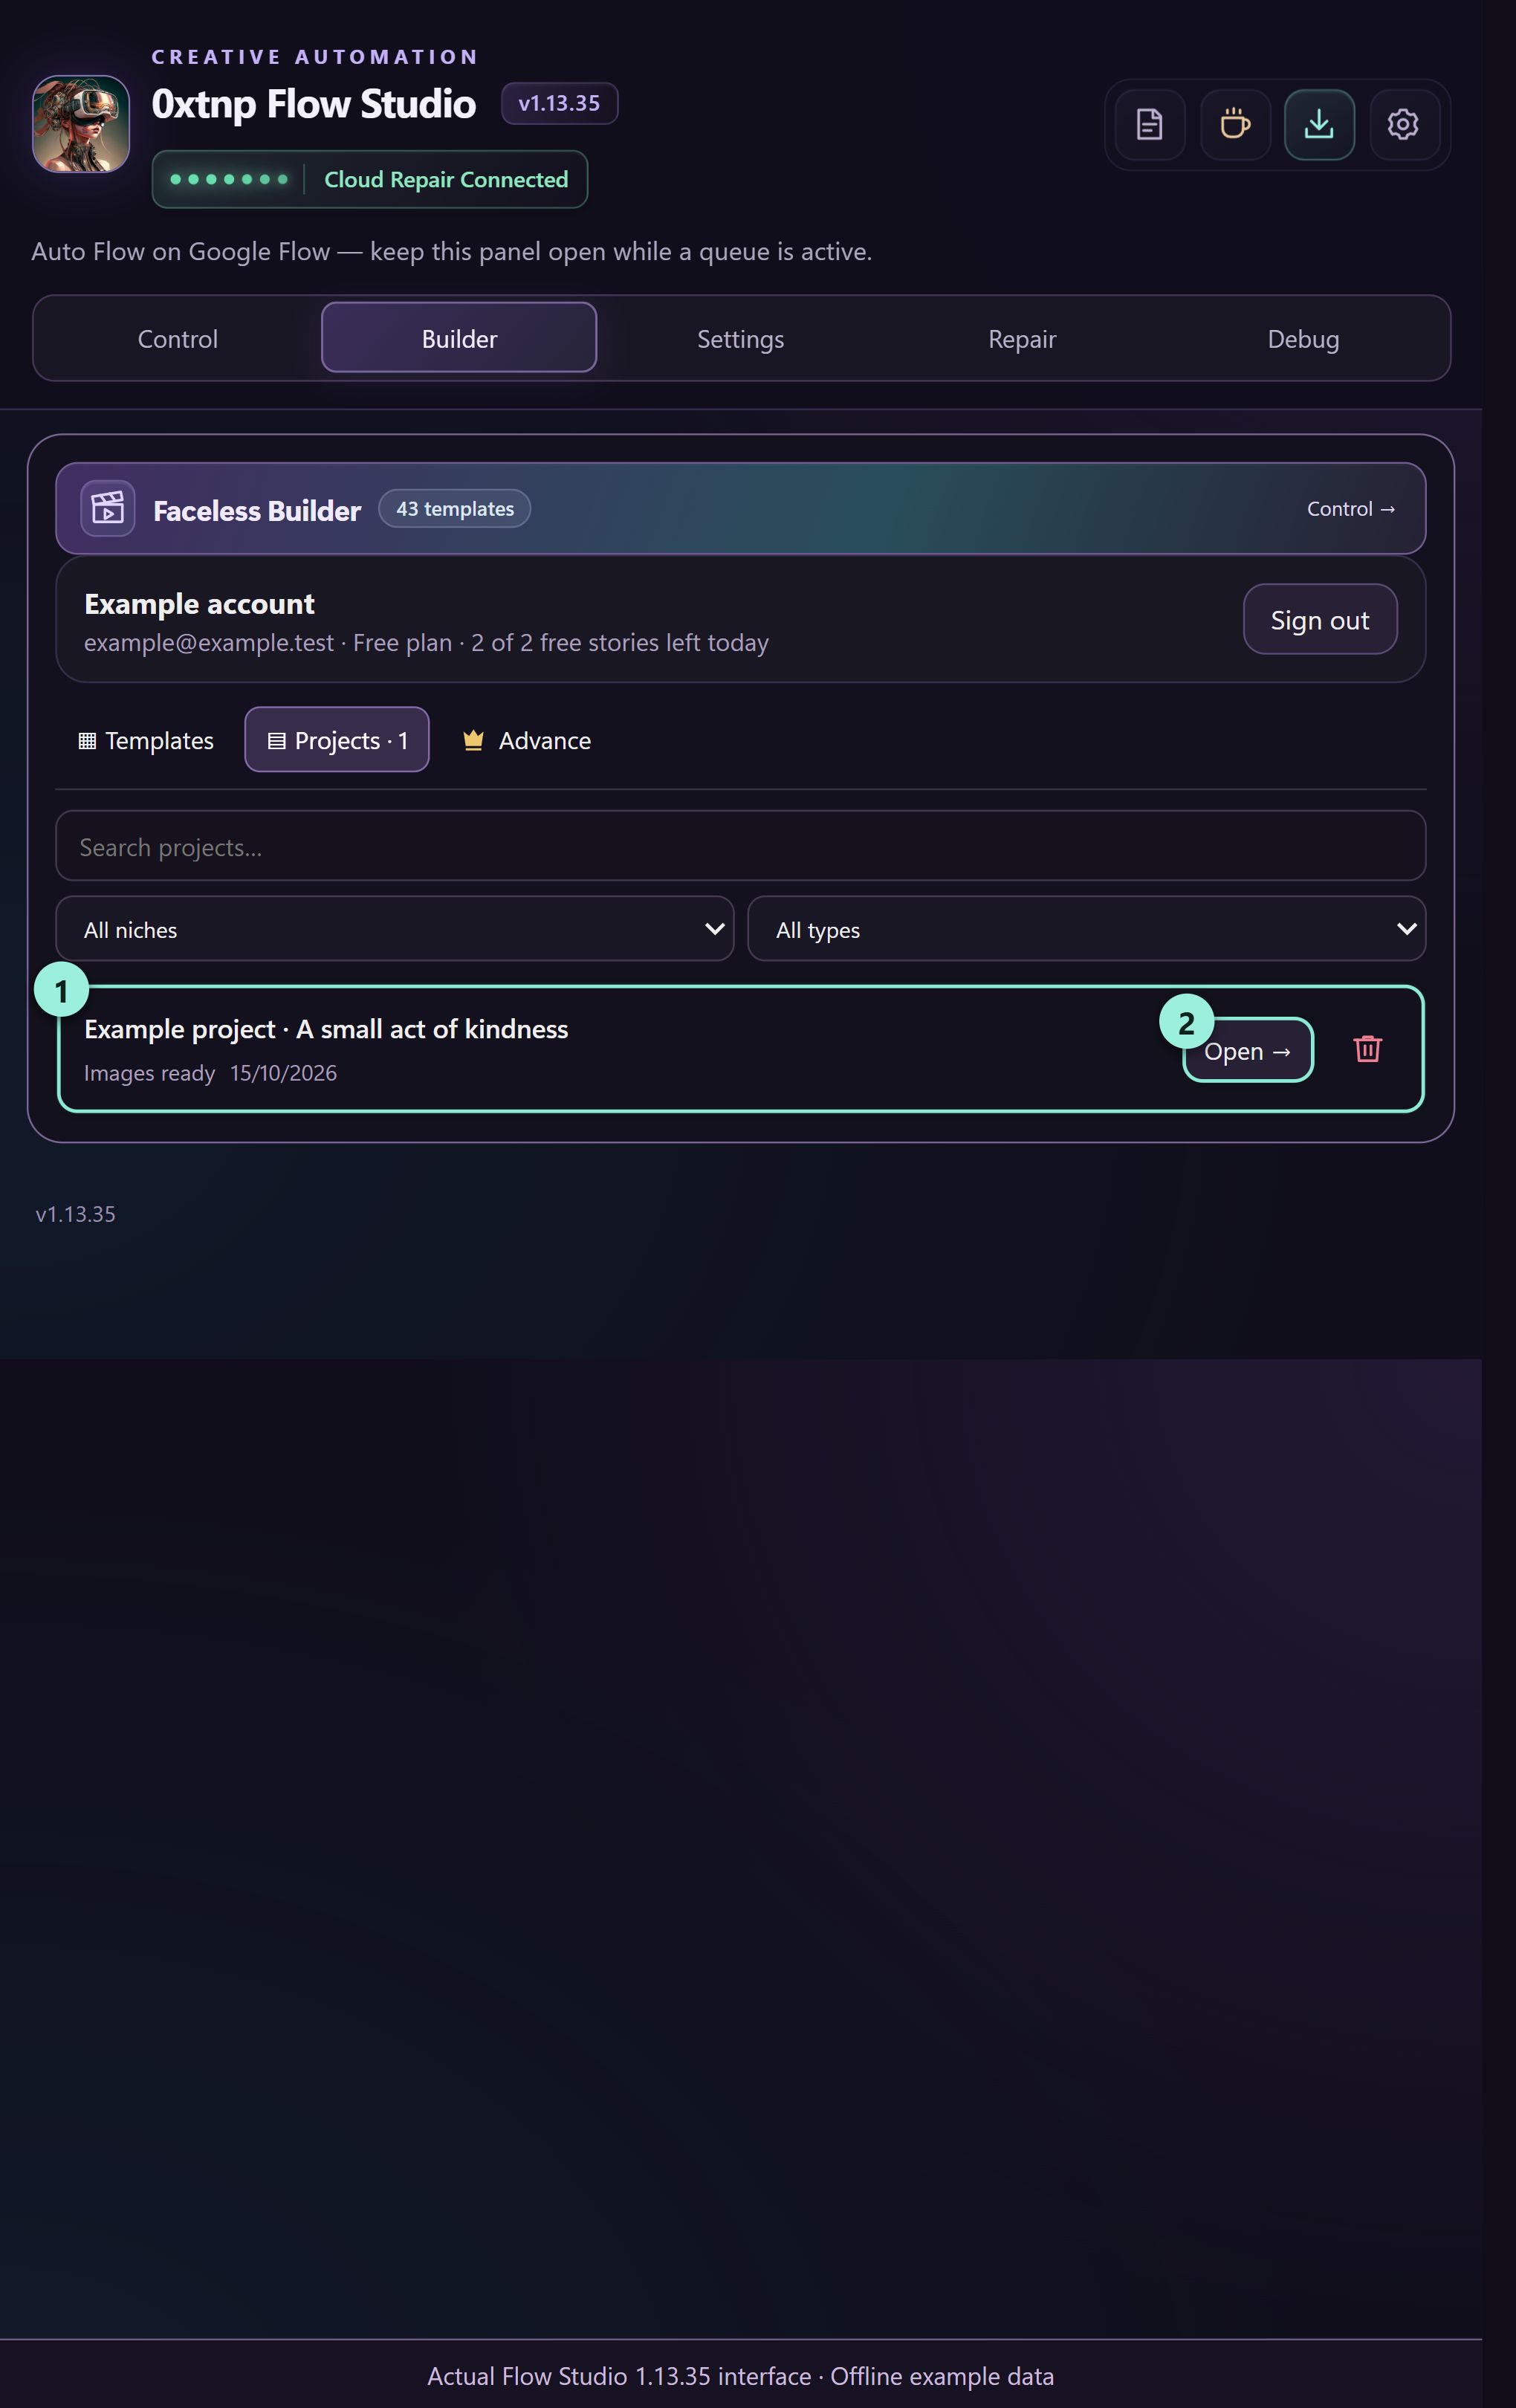
What you should seeYou continue the saved project or the next planned part instead of rebuilding completed work.
MANAGE & FIX
Understand the settings window
Use the gear icon for Studio settings. Generation-specific controls also live in the panel’s Settings tab.
Account and downloads
Studio settings → Settings shows your current sign-in, plan and allowance, plus auto-download choices. Save all settings after changing preferences.
Cloud Repair details
Cloud Repair shows the connected server, remaining repair rounds and saved repair-memory information. Use Check connection to refresh the displayed connection details.
This browser’s device
Devices shows this browser installation and offers Rename. This identifies the current installation; it is not a full remote-device management or account-sync screen.
Storage and advanced setup
Storage provides the local project export. Advanced local companion setup is optional and intended for users who specifically need a local helper. Ordinary cloud users should use the cloud connection flow.
Panel Settings for generation
Use the panel’s Settings tab to choose model, aspect ratio, duration and download resolution. Check those choices each time you change platform or move between image and video generation.
Understand the settings window
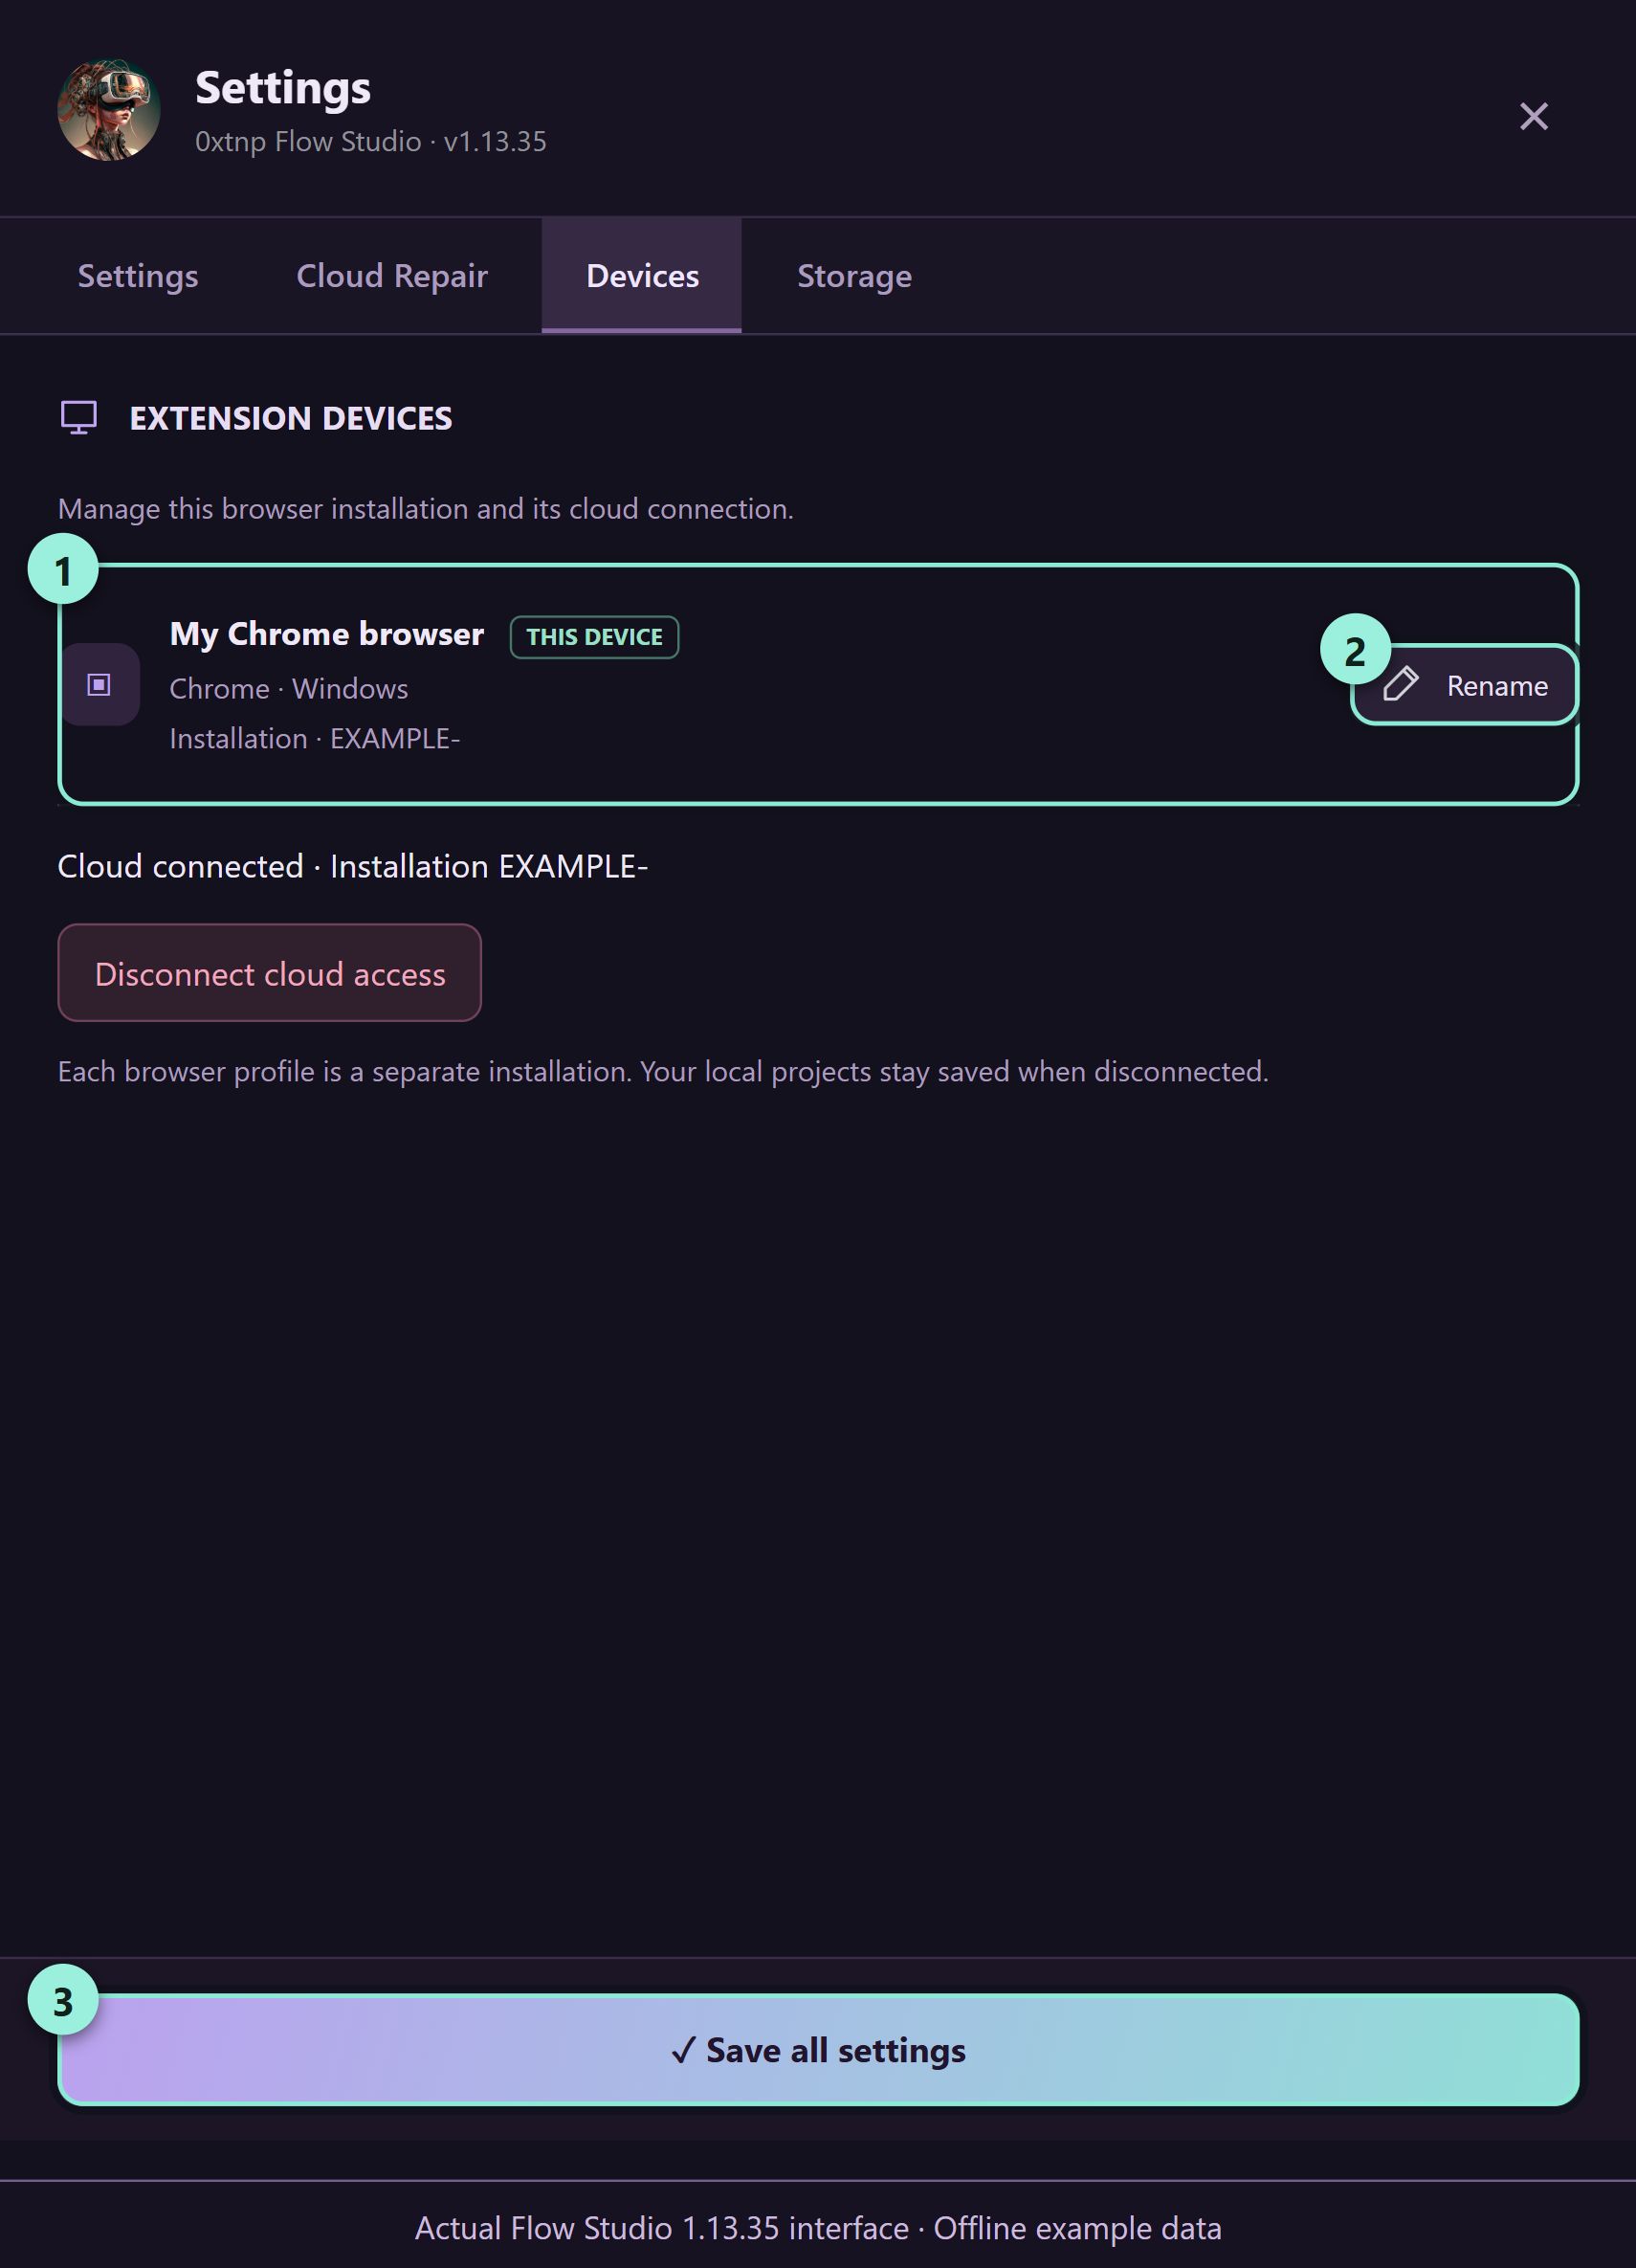
What you should seeYour account, download preferences and connection details are easy to locate.
BUILDER
Make storyboard sheets
Storyboard sheets combine four scenes into one larger image and cut it back into scene frames automatically — the same story with about 70% fewer image credits. Pro feature, arrives in the next extension update.
Check the requirements
Sheets need Flow or ChatGPT as the image platform. On ChatGPT the story must be created with “Reference images first” so its characters are known.
Turn sheets on
When loading scene images in AI Story, choose Storyboard sheets in the Scene images picker — or tick “Storyboard sheets (about 70% fewer image credits)” when starting the Factory.
Generate and let it cut
Each sheet is generated as one 2K image covering four scenes (its prompt starts with “Storyboard sheet:”), downloaded automatically, and cut into the four scene frames. Sheet files are named like p01_sheet_001-004.jpg.
Review as usual
Approve or Regenerate the cut frames exactly like normal scene images, then continue to the video queue.
Storyboard sheets option in AI Story
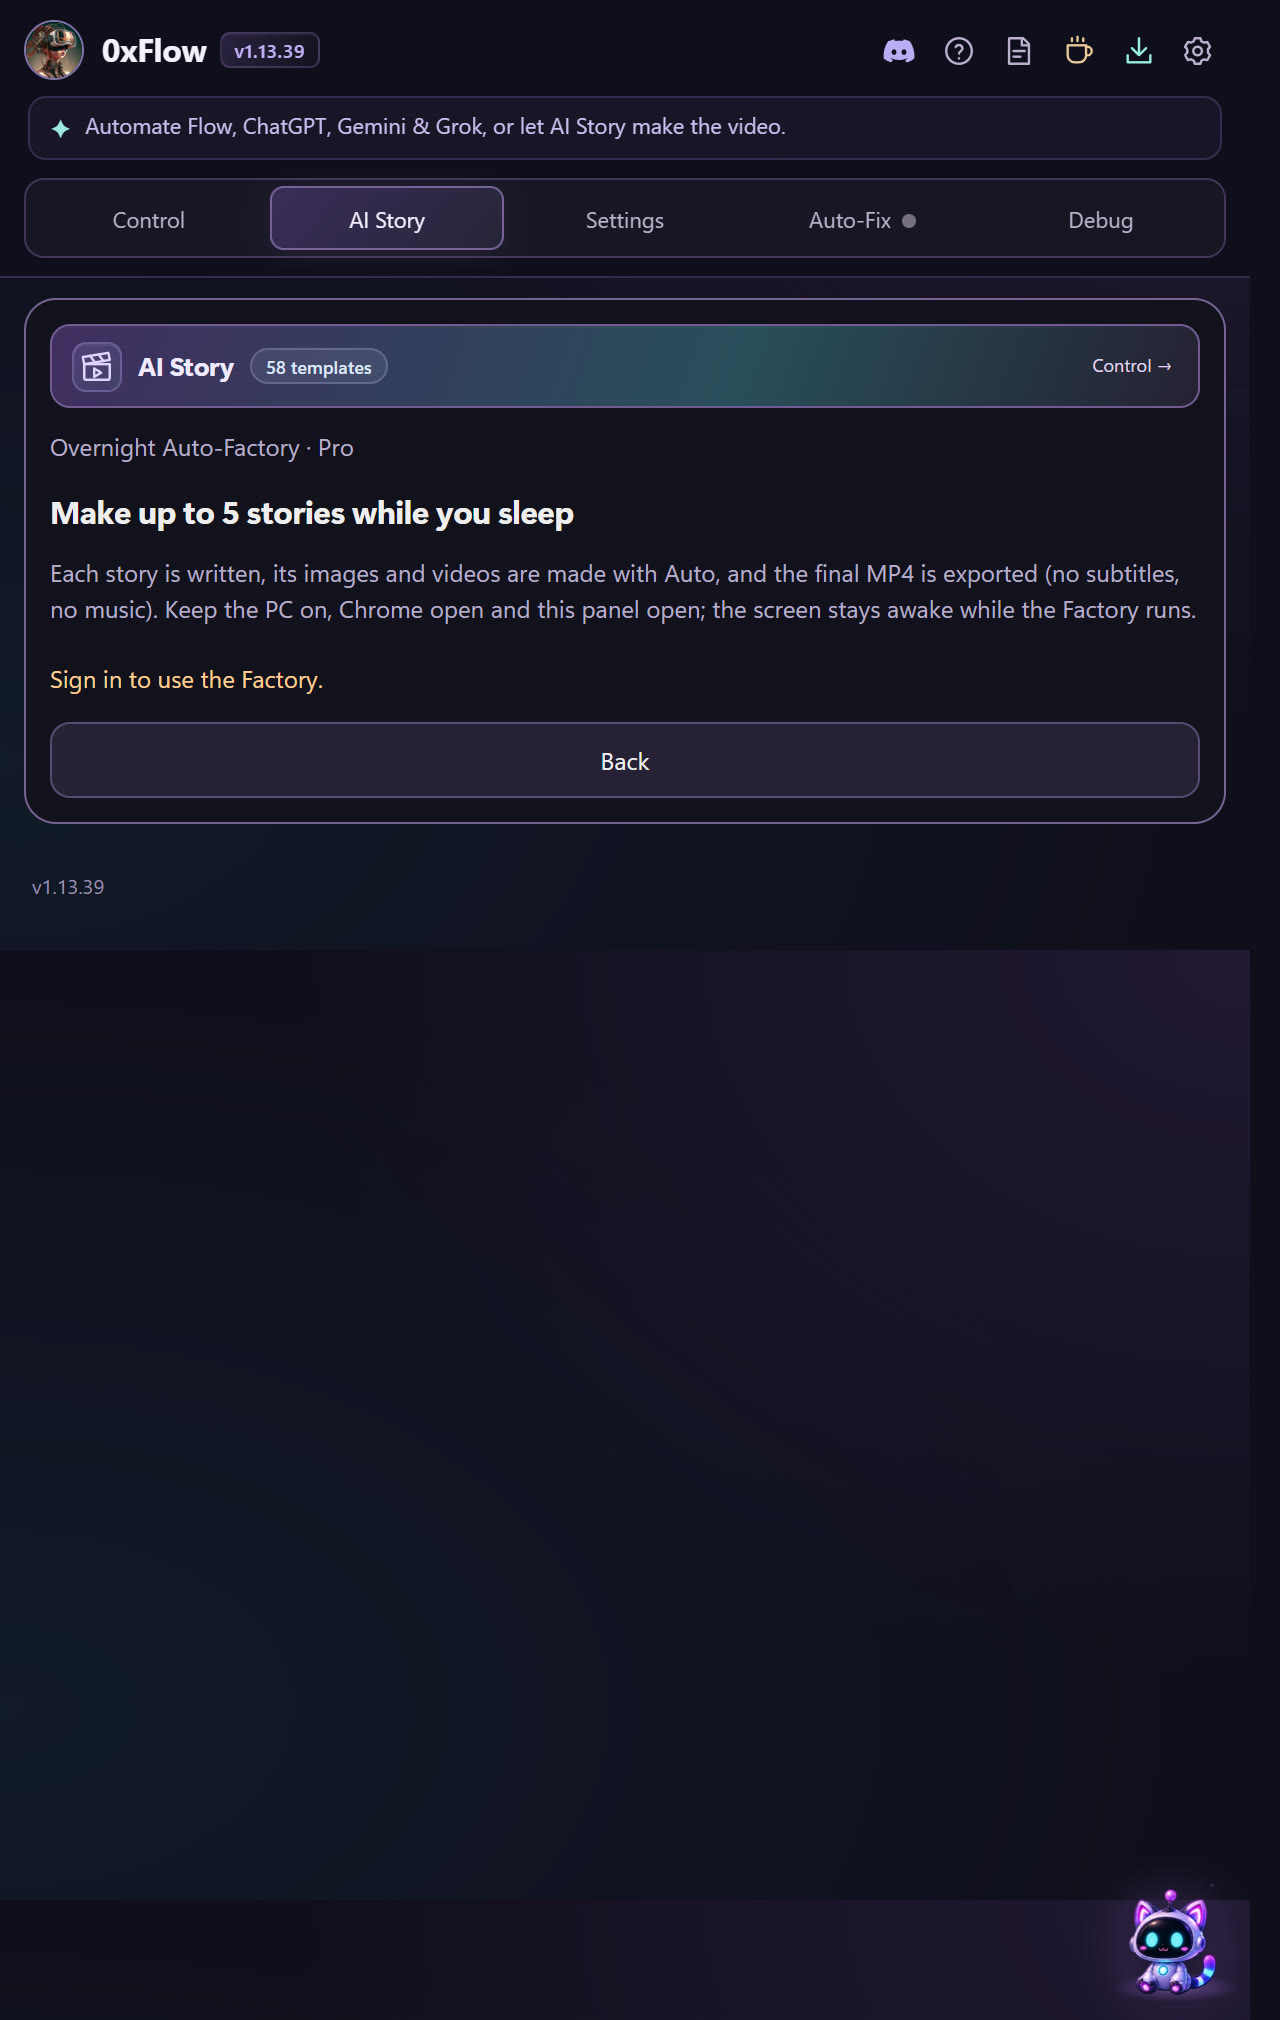
What you should seeOne downloaded sheet per four scenes, and four scene frames ready for review in the project.
BUILDER
Run the Factory overnight
The Factory writes, illustrates and exports up to 5 stories in a row while you sleep — each finished as a plain MP4, without subtitles or music. Pro feature with Google sign-in, arrives in the next extension update.
Prepare the night
Keep the PC on, Chrome open and the Flow Studio panel open. The screen is kept awake automatically while the Factory runs.
Set up the run
Open AI Story → 🏭 Factory. Choose a Template; let AI pick the topics or type your own (one per line, up to 5); set How many tonight (1–5); optionally tick Storyboard sheets to spend about 70% fewer image credits.
Start and watch
Press ▶ Start the Factory. Each story shows its stage — Writing the story…, Making images and videos…, Exporting the MP4…, ✓ Done. Click Open on a story to inspect its project.
Stop, resume, or continue after closing
Stop the Factory ends the night cleanly; everything finished so far is kept. If the panel was closed mid-run the Factory pauses itself — press Resume Factory to continue. New Factory run starts fresh.
The Factory setup screen
What you should seeA story list where every story ends in ✓ Done (or Skipped with a reason), and one exported MP4 per finished story.
HELP WHEN YOU NEED IT
Troubleshooting & FAQ
Find the symptom first. Resolve the cause before retrying a paid generation.
Builder says writing, but there are no images yet
Writing prepares scene text and prompts. Open the finished project, load the required image queue, and click Start in Control. Review/approve the images before loading the video queue.
I reached today’s Builder limit
Check the account card for your current plan and remaining stories. New stories and suggestions wait until the server’s reset. New-account and browser-installation caps can also apply. Existing projects remain available; switching accounts is not a way to reset installation limits.
A platform says the prompt was blocked
The service may reject text, a reference image, or the combination. Its warning does not always identify the exact cause. Read the actual queue message; use appropriate revisions or human review when requested. Cloud repair does not guarantee acceptance.
Sign-in will not open or return
Close any other sign-in window, retry once, and confirm that you are using the intended account. The Chrome Web Store build and a manually loaded test build have different extension identities. Report a redirect error with the installed version and the exact message. On phones (Lemur, Kiwi, Edge on Android), sign-in happens with a one-time code on a repair.corethea.com page — see chapter 02.
Someone sent me a Flow Studio sign-in link
Do not open it. A sign-in link signs your account into the extension that created it. Only use the link your own extension opens, and check that the 4-digit number matches the one in your panel.
The wrong character or image is attached
Check filenames, matching mentions, image order and the image-processing option. In a Builder project, use its queue-loading controls to keep prompts paired with the right scene frames.
My story feels unfinished
Read all scene text before generating images. Check that the selected runtime contains the whole premise and ending. Correct the package before spending credits; increasing or reducing the scene count is not a substitute for reviewing the script.
The queue stopped or needs a manual action
Check the selected platform tab for sign-in, a dialog, a generation limit or another visible request. Keep the panel open, resolve that step, then retry unfinished items. Background Mode is experimental and does not guarantee uninterrupted generation.
Which details help diagnose a problem?
Record the extension version, platform, mode, scene/prompt number and exact error. Export report in Control can save run statuses and settings. Remove private account information before sharing a report or screenshot.
No matching chapters
Try “images”, “sign in”, “repair” or “downloads”.